background image

§

Warranty certificate

§

§

Legal warranty

Our products are guaranteed for twelve months against any
defect, flaw or imperfection. During this time, all parts judged
defective by our Warranty control department may be repla-
ced in our workshops. Incidental costs of transportation and
packing payable by the buyer.
Some parts or components have a longer warranty period :
- Cast-iron shell of boiler : 3 years
- Steel shell of boiler : 3 years
- Removable or independent stainless steel hot water cylin-
der : 5 years
- Independent enamelled steel hot water cylinder : 3 years

- Incorporated circulating pump : 2 years.

§

Terms of the warranty

This warranty is only valid if :
- The unit has been installed and checked by a professional
installer before operating,
- All installation and adjustment instructions listed in the

technical manual supplied with the unit have been followed,
- All operation and maintenance instructions have been
followed.

This warranty does not cover

:

- Lamps, fuses, spark plugs, cast iron parts directly in con-
tact  with burning coal  and wood, firebricks, flue baffles,
glasses .
- Any damage resulting from the use of fuel not recommen-
ded in our instructions ;
- Parts which are damaged by external causes such as
unadapted chimneys, thunderstorms, damp, faulty pressure
or fail in pressure, thermic anomalies, explosions, etc...
- Electrical parts which are deteriorated by any connection
or use on a supply circuit with voltage within 10% of the
indicted voltage (230 V in EU).

Material subject to modifications without prior notice. This
manual does not engage the responsibility of
FRANCO BELGE.

*

Name and address of the installer :

_ _ _ _ _ _ _ _ _ _ _ _ _ _ _ _ _ _ _ _ _ _ _ _ _ _ _ _ _

_ _ _ _ _ _ _ _ _ _ _ _ _ _ _ _ _ _ _ _ _ _ _ _ _ _ _ _ _ _ _ _ _ _ _ _ _ _ _ _ _ _ _ _ _ _

(

Telephone : _ _ _ _ _ _ _ _ _ _ _ _ _ _ _ _ _ _ _ _ _ _ _ _ _ _ _ _ _ _ _ _ _ _ _ _ _ _ _

*

Name and address of the customer :

_ _ _ _ _ _ _ _ _ _ _ _ _ _ _ _ _ _ _ _ _ _ _ _ _ _ _ _

_ _ _ _ _ _ _ _ _ _ _ _ _ _ _ _ _ _ _ _ _ _ _ _ _ _ _ _ _ _ _ _ _ _ _ _ _ _ _ _ _ _ _ _ _ _

Date of installation :

__ __ / __ __ /__ __ __ __

Model of the appliance :

Color :

Serial number :

___ ___ ___ ___ ___ ___

• This certificate has to be completed and kept carefully.

In case of claims, send a copy of this to :

Les Fonderies Franco-Belges, rue Orphée Variscotte, 59660 MERVILLE, FRANCE.

D

ocument

97

9-3

E

N

~

28

/02

/20

00

174 05 05

Y

J

K

C

Содержание Belfort 174 05 05

Страница 1: ...2 2000 Les Fonderies Franco Belges 59660 MERVILLE Phone 03 28 43 43 43 Fax 03 28 43 43 99 RC Hazebrouck 445750565B Subject to modifications Belfort Oil fired stove Model 174 05 05 EN 1 Description of the appliance Installation instructions Operating instructions Spare parts English Norsk ...

Страница 2: ...8 Maintenance of the stove 8 Recommendation 9 Trouble shooting 10 Spare parts 11 FRANCO BELGE congratulates you on your choice FRANCO BELGE which has been granted the ISO 9001 certification guarantees the quality of its appliances and is committed to meet its customers needs FRANCO BELGE which can boast a 75 year experience in the industry of heating devices uses state of the art technologies to d...

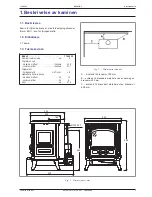
Страница 3: ... 000 Oil consumption at maximum speed litre h 0 58 gal hr 0 16 minimum speed litre h 0 17 gal hr 0 045 Chimney draught required at maximum speed Pa 15 minimum speed Pa 8 Weight kg 67 6 1 4 Description Flued oil stove with vaporizing burner Norm EN 1 Figure 1 Minimum clearances to combustible walls 392 340 182 Ø 120 127 452 530 558 420 Figure 2 Dimensions in mm 200 mm 200 mm 200 mm 200 mm Document ...

Страница 4: ... house fire may result For your safety follow the installation directions Contact local building or fire offi cials about restrictions and installation inspection in your area 2 1 Position of the unit The position of the appliance must be chosen very carefully in order to obtain the best possible results for heat distribution Position the unit to comply with the minimum clearances to combustible m...

Страница 5: ...the clamp 4 from the back and refit them on the top with the 2 screws and washers supplied 7 ensuring there is a good seal 2 Set the ceramic rope in the groove and fix the flue collar at rear with 2 bolts and washers supplied Reinstall the internal baffles Replace the rear heat shield 2 6 Chimney connector The appliance must be as close as possible to the chimney Avoid horizontal flue connection p...

Страница 6: ...e parts All removable parts fuel retainer baffle must be correctly installed 2 10 Oil flow adjustment The float regulator has been adjusted at the factory and should not need further adjustment If the burner does not work correctly check possible causes before readjusting the settings Chimney draught Fresh air inlet Oil supply Low setting Refer to 2 fig 12 set the regulating knob on 1 and let the ...

Страница 7: ...ding if necessary 2 11 Chimney draught Once the stove has been properly installed the chimney draught must be checked The adjustment of the draught will be made with the barometric damper located at the back of the stove 1 fig 12 The reading of the draught must be done once the unit is hot minimum 30 minutes of use Refer to the specifications p 3 for minimum draught requirement on low setting and ...

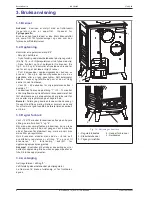
Страница 8: ...e burner stops during operating immediately turn off the control knob position 0 and wait until the burner is completely cool before repeating the lighting procedure 3 4 Shutting down Set dial to the 0 position 1 fig 14 Raise the safety lever of the float regulator 2 fig 14 Allow the flame to burn out completely before opening the door 3 5 Maintenance of the stove Every week operate the de scaling...

Страница 9: ...but rather as a patina of the enamel which does not affect its quality nor its service ability 3 6 Recommendation The adjustment of the stove has been made at the factory and checked by your installer Any anomaly of operation should be reported to him at once This room heater is a high heat producing appliance and may cause severe burns if touched on the glass front door or on top directly over th...

Страница 10: ...t build up noticed Flame imbalance Insufficient air supply Increase fresh air supply open door window add make up air supply Downdraught or blockage in chimney þ Check Chimney for Soot build up clean if necessary Ensure chimney height is sufficient and cap is not affected by any nearby obstructions Room is in negative pressure Increase fresh air supply Check draught with draught meter and adjust i...

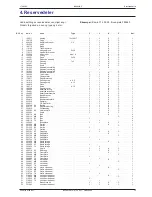
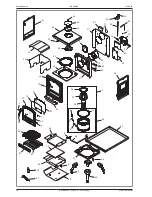
Страница 11: ... Back panel Y J K C 01 32 209916 Protector Y J K C 01 33 222560 Flue baffle Y J K C 01 34 222611 Suppl flue baffle Y J K C 01 35 236708 94 Bracket Y J K C 01 36 239715 60 Carburettor support Y J K C 01 37 259015 Fixing plate Y J K C 04 38 260583 60 Heat shield Y J K C 01 39 446302 Shield Y J K C 01 40 300118 MJ Leg K 04 40 300118 MK Leg C 04 40 300118 EF Leg Y 04 40 300118 79 Leg J 04 41 300483 Ba...

Страница 12: ... 18 19 20 21 22 23 24 25 26 27 28 30 31 32 33 34 35 36 37 38 39 40 41 42 43 44 45 46 47 48 49 50 51 52 53 54 55 56 57 58 59 60 13 61 62 63 7 9 21 67 8 66 65 Document n 979 3 EN 28 02 2000 174 05 05 BELFORT Oil fired stove 12 Technical manual ...

Страница 13: ...57 808001 ED Hand tool Y J K C 01 58 982629 Feed line regulator burner Y J K C 01 59 982630 Vent pipe Y J K C 01 60 818301 Grate Y J K C 01 61 307436 Fuel retainer Y J K C 01 62 109722 Ceramic coal 45x45x30 Y J K C 35 63 242913 Ground vat Y J K C 01 64 262218 Shield Y J K C 01 65 124412 Strut Y J K C 02 66 262606 60 Shield Y J K C 01 67 202801 Support Y J K C 01 Document n 979 3 EN 28 02 2000 Oil ...

Страница 14: ...ulting from the use of fuel not recommen ded in our instructions Parts which are damaged by external causes such as unadapted chimneys thunderstorms damp faulty pressure or fail in pressure thermic anomalies explosions etc Electrical parts which are deteriorated by any connection or use on a supply circuit with voltage within 10 of the indicted voltage 230 V in EU Material subject to modifications...

Страница 15: ... 43 43 99 RC Hazebrouck 445750565B Matériel sujet à modifications sans préavis Document non contractuel Belfort Parafinkamin Modell 174 05 05 Norsk DBE Godkjenning no 006 160 Beskrivelse av kaminen Installasjonsveiledning Bruksanvisning Reservedeler Garanti Sertifikat English Norsk Norsk Importør Hydro Texaco AS Telefon 22 12 40 00 Drammensveien 134 Skøyen 0212 Oslo ...

Страница 16: ...enning 8 Regler for bruk 8 Avstenging 8 Vedlikehold av kaminen 9 Anbefaling 9 Feilsøking 10 Reservedeler 11 INNHOLD side side FRANCO BELGE gratulerer Dem med Deres valg FRANCO BELGE garanterer kvaliteten på sine apparater alle ISO 9001 godkjent og forplikter seg til å tilfredstille kundenes ønsker Med mer enn 75 års erfaring bruker FRANCO BELGE alltid de mest avanserte teknologier i fremstillingen...

Страница 17: ... effekt liter time 0 17 Oljekvalitet Fyringsparafin mm2 s cSt 1 8 Nødvendig trekk i pipe ved maksimum effekt Pa 15 minimum effekt Pa 8 Vekt kg 67 6 392 340 182 Ø 120 127 452 530 558 420 Fig 1 Minimumsavstander A Avstand til brannmur 100 mm B avstand til brennbart materiale ved avslutning av brannmur 300 mm C avstand til brennbart materiale uten brannmur 600 mm Fig 2 Dimensjoner i mm Document n 979...

Страница 18: ... PÅBEGYNNES MÅ DET SØKES OM GODKJENNELSE FRA BYGNINGS RÅDET REF PLAN OG BYGNINGSLOVENS 7d 93e ARBEIDET KAN KUN PÅBEGYNNES NÅR TILLATELSE ER GITT FOR PRAKTISK VEILEDNING AV INSTALLASJON HENVISES DET TIL Veiledning om fyringsanlegg for flytende og gassformig brensel HR 2012 ISBN 82 7768 031 7 2 1 Plassering av kaminen Kaminens plassering må velges med omhu for å få best mulig varmedistribusjon Plass...

Страница 19: ...t den indre skjermplaten Fig 4 nr 4 og 7 Fest pakningsrepet i sporet og skru fast røkrørflensen med de medfølgende to skruer og skiver Påse at det er god tetting Sett den indre skjermplaten tilbake på plass Utsparingen i det bakre varmeskjoldet må ikke fjernes 2 5 Røkuttak bak Fig 7 Åpne hoveddøren og ta ut risten med de keramiske kullene Fig 4 nr 9 og 10 og ta ut den indre skjermplaten Fig 4 nr 4...

Страница 20: ...mig brensel HR 2012 ISBN 82 7768 031 7 Se vedlegg 2 side 53 og vedlegg 4 side 55 Eksempler på oljefyringsanlegg Når kaminen er forbundet med en ekstern eller fjerntliggende tank må kaminen festes til gulvet Hvis lagertanken er mer enn 3 5 meter over kaminen må det installeres en trykkreduksjonsventil i oljeledningen Se fig 11 Hvis lagertanken er lavere enn kaminen må det benyttes oljeløftingsanleg...

Страница 21: ...ed mer enn omdreining av gangen Dersom man foretar en justering av regulatoren må maksimum oljemengde fra regulatoren kontrolleres Se Pkt 1 3 Tekniske spesifikasjoner maksimum effekt liter time 2 12 Trekk i pipe Når kaminen er ferdig installert må det kontrolleres at det er tilfredsstillende trekkforhold Justering av trekken foretas med den barometriske demperen på baksiden av kaminen 1 fig 12 Avl...

Страница 22: ...lysatoren skal gløde rødt før man setter oljeregulatoren på et høyere nivå Bemerk Første gang kaminen tennes vil den kunne gi fra seg litt lukt fra ny maling Dette er normalt men sørg for at rommet er godt ventilert de første timene kaminen er i bruk 3 3 Regler for bruk Vent i 10 til 15 minutter før kaminen settes på en høyere stilling normalt mellom 2 og 4 Når man øker varmeffekten på kaminen bør...

Страница 23: ...ør alle emaljerte deler med en tørr eller lett fuktet myk klut Bruk en ren myk klut til å tørke av frontglasset mens kaminen er satt på laveste stilling 1 Når hoveddøren åpnes for rengjøring skifter flammen fra å være blå til gul Rengjør raskt og forsiktig Når døren lukkes vil flammen gå tilbake til normal blå farge Bemerk At små sprekker kommer til syne i emaljen under bruk er normalt og sprekken...

Страница 24: ...etter problemet tilkall installatør Utilstrekkelig oljetilførsel Kontroller oljefilter i regulator og oljetilførsel til brenner Kontroller at brenner ikke er tilsotet Flammen ryker Sot bygger seg opp Ustabil flamme Utilstrekkelig lufttilførsel Øk lufttilgangen til rommet åpne vinduer eller lignende Utilstrekkelig trekk i pipe eller tett pipe þ Kontroller trekkforhold i pipe Oljetilførsel på stilli...

Страница 25: ... C 1 32 209916 Beskyttelsesplate Y J K C 1 33 222560 Røkfører Y J K C 1 34 222611 Till Røkfører Y J K C 1 35 236708 94 Beslag Y J K C 1 36 239715 60 Regulatorbeslag Y J K C 1 37 259015 Festebeslag Y J K C 4 38 260583 60 Varmeskjold Y J K C 1 39 446302 Skjold Y J K C 1 40 300118 MJ Ben K 4 40 300118 MK Ben C 4 40 300118 EF Ben Y 4 40 300118 79 Ben J 4 41 300483 Bunnplate Y J K C 1 42 301526 MJ Dørl...

Страница 26: ... 17 18 19 20 21 22 23 24 25 26 27 28 30 31 32 33 34 35 36 37 38 39 40 41 42 43 44 45 46 47 48 49 50 51 52 53 54 55 56 57 58 59 60 13 61 62 63 7 9 21 67 8 66 65 Document n 979 3 NO 28 02 2000 Parafinkamin BELFORT 174 05 05 12 Teknisk manual ...

Страница 27: ...åndverktøy Y J K C 1 58 982629 Rør regulator brenner Y J K C 1 59 982630 Ventilasjonsrør Y J K C 1 60 818301 Rist Y J K C 1 61 307436 Brenselholder Y J K C 1 62 109722 Keramisk kull 45x45x30 Y J K C 35 63 242913 Sikkerhetskar Y J K C 1 64 262218 Skjold Y J K C 01 65 124412 Stolpe Y J K C 02 66 262606 60 Skjold Y J K C 01 67 202801 Beslag Y J K C 01 S 12 nr del nr navn Type Y J K C Ant Document n 9...

Страница 28: ...er som er forårsaket fra bruk av feil oljekvalitet Deler som er skadet p g a utenforliggende årsaker så som feil røkavløp damp feil trykk unormale termiskeforhold eksplosjoner etc Elektriske deler som forringes p g a tilkobling eller bruk av strømtilførsel som avviker mer enn 10 av den oppgitte spenningen 230 Volt Modifikasjon av deler eller materialer uten forutgående god kjennelse Installatør Na...

Отзывы: