


STEP 5:
Connect the brackets and boards for the second level in the following pattern:
1.
Connect
2
x 4ft Boards with Stacking Brackets on
both ends in alternating orientation.
2.
Connect
2
x 4ft Boards with stacking brackets
on both sides, facing the same orientation.
3.
Connect
4
x 4ft Boards with a stacking bracket on
one end and a mid-section 4-way bracket on the
other end in alternating orientation.
4.
Connect
2
x 2ft Boards with a stacking bracket on
one end and a mid-section 4-way bracket on the
other end in alternating orientation.
5.
Connect
2
x 2ft Boards with a stacking bracket on
one end and a top 4-way bracket on the
other end in alternating orientation.
6.
Connect
2
x 2ft Boards with mid-section 4-way brackets
on both ends in alternating orientation.
7.
Connect
4
x 2ft Boards with top 4-way brackets
on both ends, facing the same orientation.
8.
Connect
2
x Cut gate Boards with a stacking bracket
on the board end with pre-drilled holes.
NOTE
: The gate Boards will only have pre-drilled holes on one end.
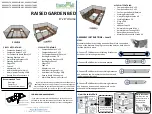
ASSEMBLY INSTRUCTIONS
–
Level 2
1
2
3
4
5
6
7
8
Step 6:
Before stacking your boards, lay them out around your 1
st
level frame.
NOTE
: Stacking stakes will be used for all additional levels and can insert into
the top of existing stakes.
2
2
4
4
3
7
7
6
6
3
7
7
1
1
5
5
3
3
8
8
Step 7.
Start your 2
nd
level by connecting the 3/5/8 joint first.
Have the bracket for the gate board (8) on the bottom of the
joint as shown in the picture to the left. Then continue from
this point stacking the remaining 2
nd
level boards.
Skip to step 1 of the Animal Barrier assembly if you are
assembling a 2-level bed design.


