


800002174, 800002174-AB1, 800002174-AB2
800003174, 800003174-AB1, 800003174-AB2
800004174, 800004174-AB1, 800004174-AB2
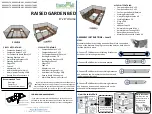
RAISED GARDEN BED
8’ x 8’ Alamo
Layout your Boards along the borderline and connect each
Board together by inserting the top of the stake through the
bracket loops with the stake pointing to the sky. This enables
you to freely position your border to get your desired location.
Customer Service: 1800-914-9835 |
© Frame It All. All Rights Reserved.
2 LEVEL KIT CONTAINS:
•
Composite Boards 4’ x 17
•
Composite Boards 2’ x 16
•
Cut Composite Board (Gate) x 2
•
Stacking Brackets x 44
•
4-way Bracing Brackets x 24
•
Stacking Stakes x 28
•
Plugs x 144
•
Caps x 4
•
Adapter cap x 10
•
Animal barrier gate (4ft) x 1
•
Animal barrier Fencing x 28ft
•
Gate to Board Connector x 4
ASSEMBLY INSTRUCTIONS
–
Level 1
STEP 1
:
Assemble the Boards by sliding one end of Board into channel end
of one of the brackets. Use plugs to cover the holes on both sides to
lock the bracket in place.
1.
Connect
7
x 4ft Boards with Stacking Brackets on
both ends in alternating orientation.
2.
Connect
4
x 2ft Boards in the same pattern
3.
Connect
2
x 4ft Boards with a stacking bracket on
one end and a top 4-way bracket on the other end
in alternating orientation.
4.
Connect
2
x 2ft Boards with a stacking bracket on
one end and a mid-section 4-way bracket on the
other end in alternating orientation.
FOR INDOOR & HARD SURFACE:
If you plan to assemble raised bed on a hard surface, use
hacksaw to remove the spike of each stake. Use these cut
down stakes for the base level only of your raised garden.
Trim stake spike with
hacksawfor use indoor
or on hard surfaces
How the Joints Work
Use plugs (included)
to cover the holes on
both side of Boards
Use plugs to
cover the holes
–
two plugs are
required per
bracket (1 on
each side)
Use a Cap to
complete the
top level.
Use stacking
stakes for
ground level
frames and
stacking
additional levels.
Use stacking
stake when
creating a
multi-level
Stacking stake fit
into the tops other
Stacking stakes
3-Way Connection:
Combine a top 4-way
bracket, mid-section 4-
way bracket and
stacking bracket.
2 LEVELS
3 LEVEL KIT CONTAINS:
•
Composite Boards 4’ x 25
•
Composite Boards 2’ x 22
•
Cut Composite Board (Gate) x 4
•
Stacking Brackets x 70
•
4-way Bracing Brackets x 28
•
Stacking Stakes x 42
•
Plugs x 212
•
Caps x 4
•
Adapter Cap x 10
•
Animal barrier gate (4ft) x 1
•
Animal barrier Fencing x 28ft
•
Gate to Board Connector x 4
•
Metal Gate Brace with Screws x 2
4 LEVEL KIT CONTAINS:
•
Composite Boards 4’ x 33
•
Composite Boards 2’ x 32
•
Cut Composite Board (Gate) x 6
•
Stacking Brackets x 88
•
4-way Bracing Brackets x 48
•
Stacking Stakes x 56
•
Plugs x 296
•
Caps x 4
•
Adapter Cap x 10
•
Animal barrier gate (4ft) x 1
•
Animal barrier Fencing x 28ft
•
Gate to Board connector x 4
•
Metal Gate Brace with Screws x 4
1
2
3
4
Recommended Tools:
-
Hammer
-
Power Drill
-
Flathead Screwdriver


