Frama F-LINK 2 Скачать руководство пользователя страница 6

6

Connect by Wireless

LAN Wireless connectivity

The LAN Wireless connectivity works for the Frama Fx Series 7, 7.5 and 9.
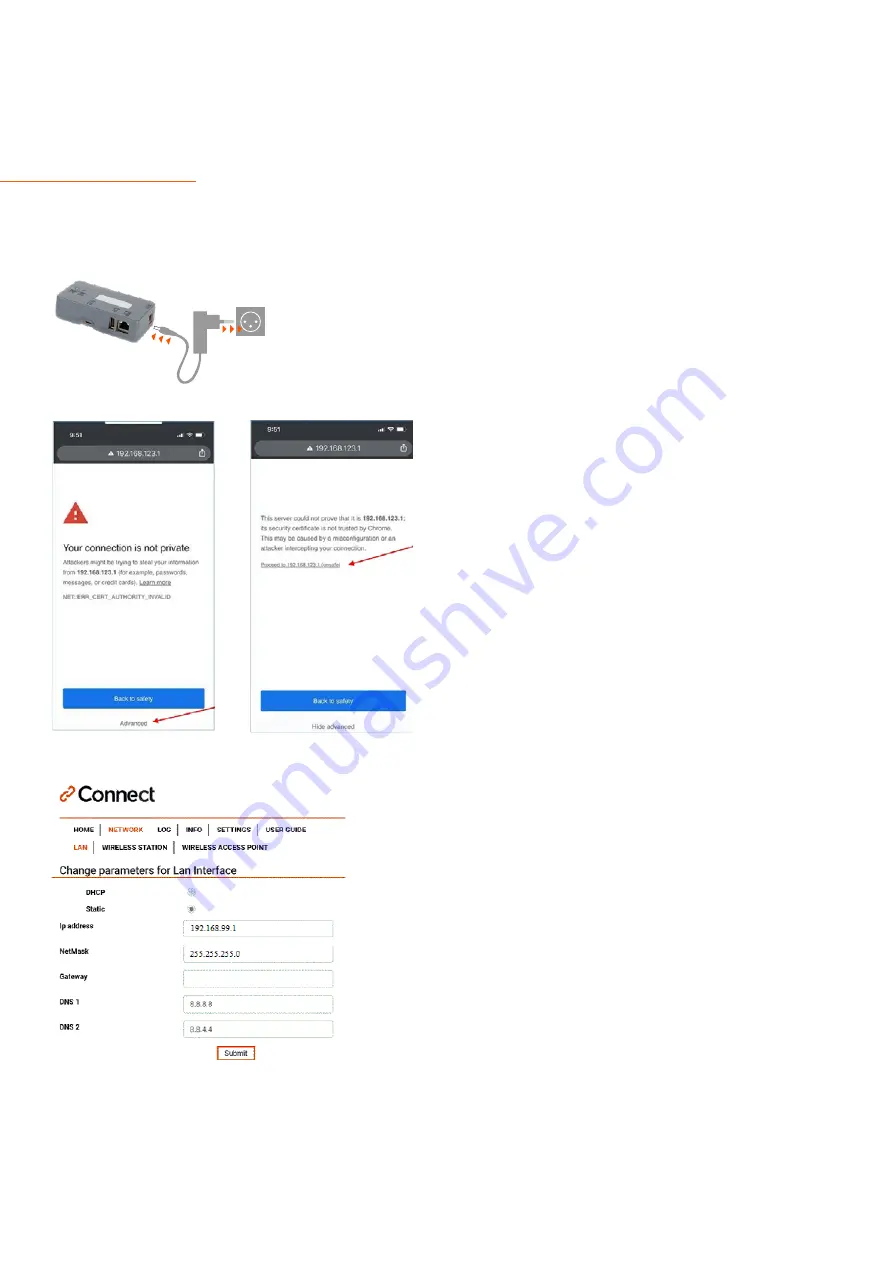
Plug in the 

Power Adapter

 and wait until the status lights are lit

On your 

Mobile Phone

, look in wireless setting for 

available networks.  Search for a network that starts with: 

Connect-A001245

 Select this network and enter the 

Password: Nconnect

Open an internet browser on this phone and enter the
following URL: 

https://192.168.123.1

You may see a warning that the connection is not private. Please 
click on the 

Advanced-tab

 in your browser to proceed to 

https://192.168.123.1

Now, you will be allowed to sign in. Use the following login:

Login: admin
Password: admin

Note:

 With your mobile phone, you must be connected with 

the box to modify settings

Step 1:

In the navigation, select 

Network /LAN

Configuration of Wireless mode for F-Link 2

Next, set the following parameters:
Select 

Static

 (not DHCP)

Sample settings. Ask the Network administrator for correct IP 
credentials:

IP address: 

192.168.99.1

NetMask: 

255.255.255.0

Gateway: 
DNS 1:   

8.8.8.8

DNS 2:   

8.8.4.4

Then, click the 

Submit

 button

LAN

LAN

Wireless

LAN

LAN

TLS 1.2

Содержание F-LINK 2

Страница 1: ...FRAMA Fx Series 7 7 5 and 9 USER MANUAL F LINK 2 Table of contents LAN connectivity 2 LAN wireless connectivity 6 Appendix 10...

Страница 2: ...d enter the following URL https 192 168 123 1 You may see a warning that the connection is not private Please click on the Advanced tab in your browser to proceed to https 192 168 123 1 Now you will b...

Страница 3: ...CP Sample settings Ask the Network administrator for correct IP credentials IP address 192 168 99 1 NetMask 255 255 255 0 Gateway 192 168 0 1 DNS 1 8 8 8 8 DNS 2 8 8 4 4 Then click the Submit button C...

Страница 4: ...ocket Step 1 On the Franking Systems go to Supervisor Mode Manger and then to Communication Setting and configure following parameters Next select LAN settings In LAN configuration select DHCP ON Also...

Страница 5: ...output port 4444 Activate URI redirection menu Redirection URI OLS ols Redirection URI PSD postal Note Next screens just confirm with OK until you reach Communication settings again Note Write URI inf...

Страница 6: ...u may see a warning that the connection is not private Please click on the Advanced tab in your browser to proceed to https 192 168 123 1 Now you will be allowed to sign in Use the following login Log...

Страница 7: ...ssword of your WLAN and click Connect After that you should receive a success information Press OK The F Link 2 is now connected to WI FI Now the configuration of the franking machine will take place...

Страница 8: ...ble between the F Link 2 and the franking systems Power up the F Link 2 if it s not already powered up Franking Systems Configuration On the Franking Systems go to Supervisor Mode Manger and then to C...

Страница 9: ...firm with OK Enter 8 8 8 8 for the preferred DNS IP address Enter 8 8 4 4 for the alternate DNS IP address Press OK Select Proxy off and confirm with OK The F Link 2 is successfully setup once you see...

Страница 10: ...o yellow The chosen Wi Fi station is disabled Step 1 Connect a USB key drive to a PC Make sure the key is formatted for FAT32 Step 2 Create a text file on the root directory of the key and name it ifr...

Страница 11: ...5 2 1mm barrel jack External Power Supply 5V DC 5 1 2A Safety UL CUL CB GS CE FCC Wireless Qualcomm Dual mode 802 11 a b g n ac up to 480Mbps 2 4 Ghz FlexNotch Antenna Wireless security WPA2 PSK WPA...

Отзывы: