ALL setup and configuration for the FC is performed through the Axe-Fx III.
The EZ Edit page makes it simple to change any footswitch to perform any function. Here’s a Quick Start Guide:
1) On the Axe-Fx III, open SETUP | FC Controllers and page to the EZ page.
2) Tap the desired FC footswitch. If you need to change the layout, do this at the top of the EZ page.
3) Use the NAV and VALUE controls to operate the EZ menu.
4) Be sure to notice that TAP and HOLD offer different settings. Set the Category and the Function for each as desired.
5) Set any parameters for the selected Function as desired. For example, when you select Category: Effect and Function:
Bypass, an “Effect” parameter appears to let you dial in the desired effect. (“Drive 1”, for example.)
You can also customize the Switch Ring Color and Mini-Display Labels.
6) To continue, you can tap a different footswitch to set it up, or press EXIT when finished.
To avoid annoying screen jumps and sonic mishaps, all footswitches are DISABLED while you are on the EZ page.
Change to a different menu page or press EXIT to test.
THE FC IS ORGANIZED AROUND “LAYOUTS”
A layout is a set of up to twelve footswitch definitions, each with its
own individual Tap Function and Hold Function.
Changing to a different layout (see below) is like changing to a
different “page” of footswitches. For example, one layout might be
used to select Presets, while another operates the Looper. Layouts
have numbers and names to facilitate their setup and use.
Any layout can be completely customized. You can change the Tap
or Hold Function of any switch right on the Axe-Fx III using “EZ” or
deep editing tools. Layouts are global, but there are ways to change
the functions of individual footswitches on a per-preset basis.
The Axe-Fx III provides eight layouts. If you completed Step 2 on the
first page of this guide, your rig is now pre-loaded with default
layouts for your FC. See the next page for a Quick Start guide to
default layouts, and see the FC Owner’s Manual for more details.
FOOTSWITCHES ARE SET UP USING “FUNCTIONS”
Every footswitch in every layout can have its own Tap Function and
Hold Function. Functions are arranged in Categories like “Presets”,
“Scenes” or “Effects”. The FC Owner’s Manual includes a complete
guide to all categories and functions.
Every Category has its own default LED ring color. You can change
these default colors — or the color of any individual switch.
The Mini-Display for each switch shows a “label” for the Tap
function. While the switch is depressed — even for a normal “tap” —
the label changes to show the Hold function.
See EZ Editing (#6, below) for an introduction to setting up
footswitches. Review the FC Owner’s Manual for a complete guide
to layouts, footswitches, functions, and more.
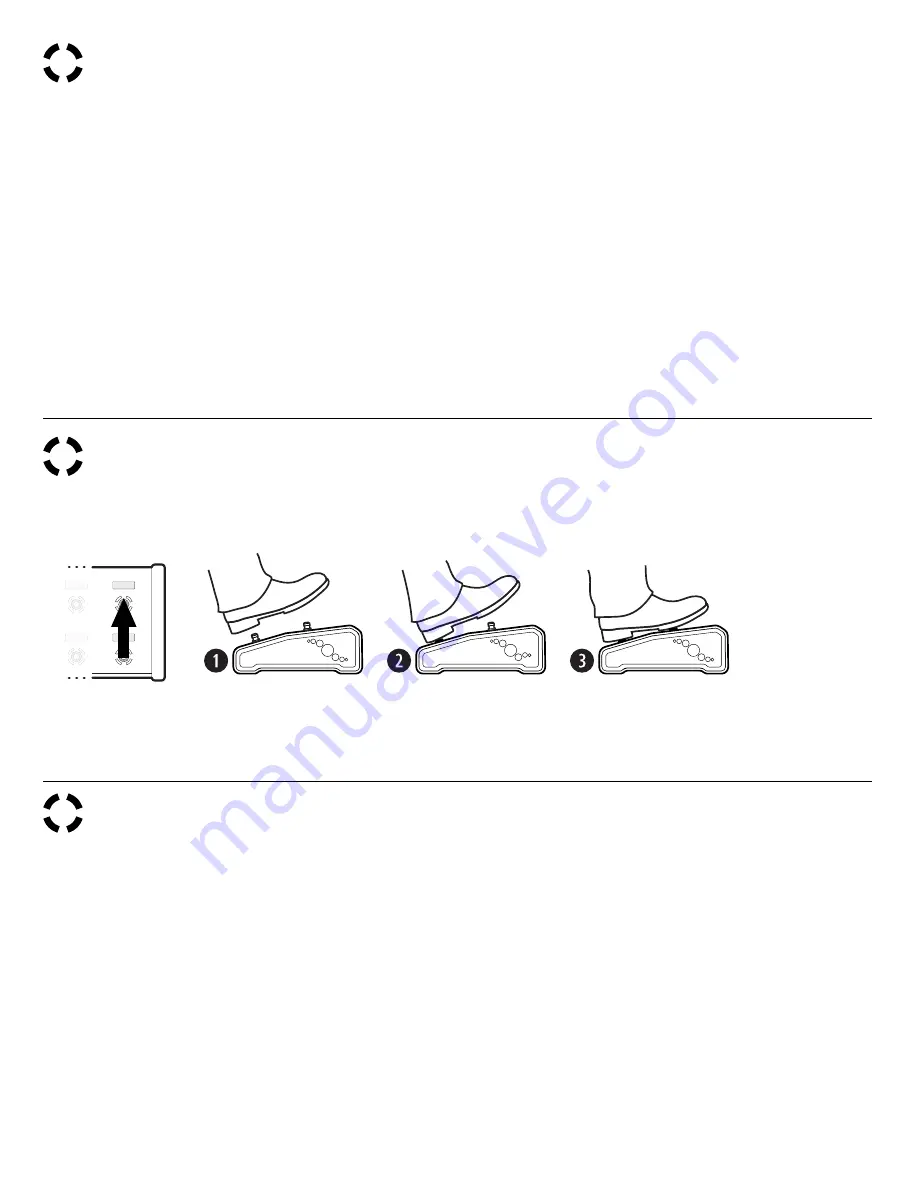
Switching from one layout to another is the key to the versatility of the FC. There are many ways to do this, but the built-in
Master Layout Menu (“MLM” for short) is the essential starting point. To show the MLM, rock your foot from heel to toe
over the two right-most footswitches on your FC, as shown in the illustration below:
Once the Master Layout Menu is shown, select any footswitch to load that layout and exit the MLM.
On the FC-12, the entire MLM is shown at once.
On the FC-6, perform the MLM Switch Combo again to switch between MLM “pages” for Layouts 1–6 and Layouts 7–8.
FC ESSENTIAL CONCEPTS
4
SWITCHING TO A DIFFERENT LAYOUT
5
EDITING FC SWITCHES WITH THE “EZ” PAGE
6


