background image

Automotive Diagnostic System NT809BT User's Manual V1.0

35

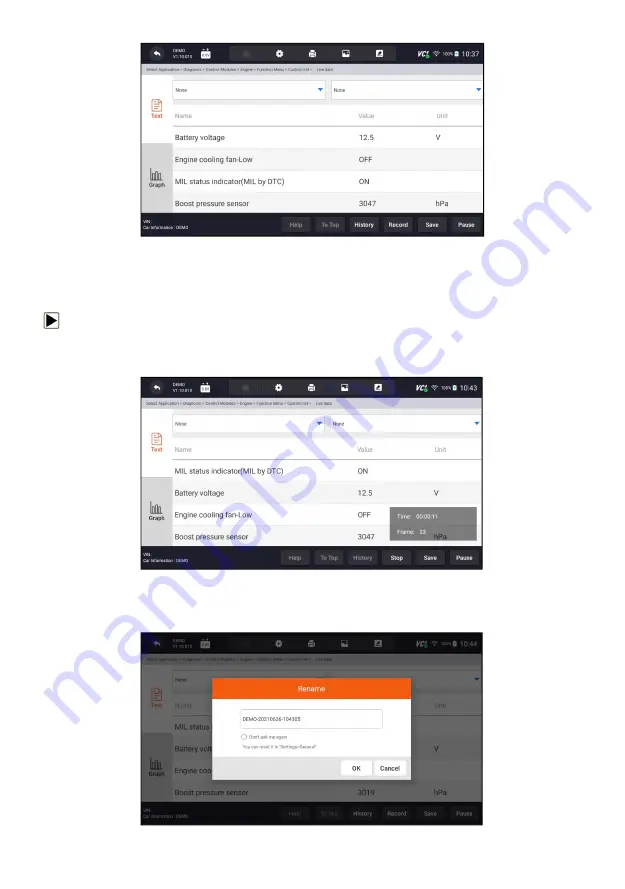
Figure 5-24 Sample Live Data Screen

5.2.3.3 Record data

Data Record is for recording the running data of the current control module.

To Record Data

1. Press

Record

button to record all selected live data, then it will show the

record time and frames.

Figure 5-25 Sample Live Data Record Screen

2. Press

Stop

button to create a record, then press

OK

to save the record

into Data Playback of Data Manager.

Содержание NT809BT

Страница 1: ...lders Copyright Information 2022 Shenzhen Foxwell Technology Co Ltd All rights reserved Disclaimer The information specifications and illustrations in this manual are based on the latest information available at the time of printing Foxwell reserves the right to make changes at any time without notice Visit our website at www foxwelltech us For Technical Assistance send us email at support foxwell...

Страница 2: ...al conditions improper storage exposure to moisture or dampness unauthorized modifications unauthorized repair misuse neglect abuse accident alteration improper installation or other acts which are not the fault of FOXWELL including damage caused by shipping b The Product has been damaged from external causes such as collision with an object or from fire flooding sand dirt windstorm lightning eart...

Страница 3: ...od FOXWELL normal service policies shall apply and the customer will be responsible for all shipping charges 5 ANY IMPLIED WARRANTY OF MERCHANTABILITY OR FITNESS FOR A PARTICULAR PURPOSE OR USE SHALL BE LIMITED TO THE DURATION OF THE FOREGOING LIMITED WRITTEN WARRANTY OTHERWISE THE FOREGOING LIMITED WARRANTY IS THE CONSUMER S SOLE AND EXCLUSIVE REMEDY AND IS IN LIEU OF ALL OTHER WARRANTIES EXPRESS...

Страница 4: ... V1 0 4 consequential damages so certain of the above limitations or exclusions may not apply to you the Consumer This limited warranty gives the Consumer specific legal rights and the Consumer may also have other rights which vary from state to state ...

Страница 5: ...ation which if not avoided will result in death or serious injury to the operator or to bystanders Indicates a potentially hazardous situation which if not avoided could result in death or serious injury to the operator or to bystanders Indicates a potentially hazardous situation which if not avoided may result in moderate or minor injury to the operator or to bystanders Important Safety Instructi...

Страница 6: ...e for gasoline chemical and electrical fires in work area Always be aware of rotating parts that move at high speed when an engine is running and keep a safe distance from these parts as well as other potentially moving objects to avoid serious injury Do not touch engine components that get very hot when an engine is running to avoid severe burns Block drive wheels before testing with engine runni...

Страница 7: ...F HOME SCREEN 15 4 VEHICLE IDENTIFICATION 17 4 1 VEHICLE CONNECTION 17 4 2 VIN READING 18 4 3 MANUAL SELECTION 20 4 4 VEHICLE HISTORY 23 5 DIAGNOSIS 23 5 1 VEHICLE IDENTIFICATION 24 5 2 DIAGNOSTIC OPERATIONS 27 6 MAINTENANCE 37 6 1 OIL LIGHT RESET 37 6 2 ELECTRONIC PARKING BRAKE EPB SERVICE 38 6 3 BATTERY REPLACEMENT BRT 39 6 4 DIESEL PARTICULATE FILTER DPF REGENERATION 40 6 5 THROTTLE BODY ALIGNM...

Страница 8: ... 4 MY PRODUCTS 55 8 5 FEEDBACK AND SUGGESTIONS 55 9 UPDATE 57 9 1 AUTOMATIC UPDATE 57 9 2 MANUAL UPDATE 58 10 VCI MANAGER 58 11 FIRMWARE UPDATE 60 12 SETTINGS 61 12 1 UNITS 62 12 2 LANGUAGE 62 12 3 FONT SIZE 62 12 4 SORT TILES 62 12 5 REMOTE CONTROL 63 12 6 AUTOMATIC UPDATE 63 12 7 SYSTEM SETTINGS 63 12 8 GENERAL 63 12 9 UNINSTALL VEHICLE SOFTWARE 63 12 10 CLEAR APP DATA 64 12 11 PRINT SETTINGS 64...

Страница 9: ... by a solid spot Example When VIN hotkey is selected a menu that lists all available options displays Menu options include Automatic Read Scan VIN Manual Entry 1 2 2 Arrow Icon An arrow icon indicates a procedure Example To connect to wall plug 1 Connect the USB charge cable to scanner and plug it to the wall socket 2 Press the power switch of the scan tool to power it on meanwhile the scanner too...

Страница 10: ...the same Foxwell advantages in car fault diagnostic tech such as multi manufacturer coverage service functions and accurate test data making it the perfect tool for busy garages or workshops who need the latest technology at unbeatable value 2 1 Scanner Descriptions This section illustrates external features ports and connectors of the scanner Figure 2 1 Front View 1 7 LED IPS Capacitive Touch Scr...

Страница 11: ...ort connects to wall plug to charge the scanner and can be used for data transfer 5 USB Port provides a USB connection for the external storage devices oscilloscope or video scope etc IMPORTANT Do not use solvents such as alcohol to clean display Use a mild nonabrasive detergent and a soft cotton cloth 2 2 VCI Dongle Descriptions NT809BT connects to the vehicle and get data through the VCI dongle ...

Страница 12: ...or off when abnormal 2 Communication Light is always on when VCI connect to device via bluetooth or USB and flashes when sending data 3 Power Light turns to red when powered on 2 3 Accessories This section lists the accessories that go with the scanner If you find any of the following items missing from your package contact your local dealer for assistance ...

Страница 13: ...Built in WIFI 802 11 b g n Wireless LAN USB2 0 OTG standard USB 2 0 HOST Bluetooth specification v2 1 EDR Bluetooth 4 0 Low Energy LE 10 20 m Built in Battery 4000mAh Lithium polymer battery chargeable via 5V USB power supply Protocols ISO9141 2 ISO14230 2 ISO15765 4 K L lines Double K Line SAE J1850 VPW SAE J1850PWM CAN ISO 11898 High speed Middle speed Lows peed and Single wire CAN KW81 KW82 GM ...

Страница 14: ...et scanner can be powered with the internal rechargeable battery The fully charged battery is capable of providing power for 5 hours of continuous operation NOTE Please turn off the tablet to save power when not use 3 1 2 External Power Supply The tablet can also be powered from a wall socket using the USB charging adapter The tablet also charges its internal battery pack through USB Type C cable ...

Страница 15: ...3 2 Sample Application Screen This section briefly introduces the applications that are preloaded into the scanner Diagnostic leads to test screens for diagnostic trouble code information freeze frame live data and ECU information Maintenance leads to screens for common used special functions like Oil light reset EPB BRT and DPF etc Update leads to screens for Foxwell ID registration and updating ...

Страница 16: ...rmware update VCI Manager VCI manage VCI binding unbinding rescan vehicle software 3 3 2 Diagnostic Menu Touch Diagnostic at the NT809BT application menu and the Diagnostic menu will display The operations of the buttons of Diagnostic menu are described in the below table Figure 3 3 Sample Diagnostic Menu Screen No Name Description 1 Back Back to the previous screen 2 Home Back to the Application ...

Страница 17: ...ch selection you make advances you to the next screen Exact procedures may vary somewhat by vehicle It typically identifies a vehicle by any of the following means VIN Reading Manual Selection NOTE Not all identification options listed above are applicable to all vehicles Available options may vary by vehicle manufacturer 4 1 Vehicle Connection To establish communication with NT809BT 1 Power up th...

Страница 18: ... Indicator isn t green it indicates that the signal strength of the transmitter is too weak to be detected In this case try to get closer to the device or check the connection of VCI dongle and remove all possible objects that cause signal interference 4 2 VIN Reading VIN button on the title bar is a shortcut for VIN reading menu which includes Automatic Read Manual Entry eliminating the need for ...

Страница 19: ...tic from home screen of the NT809BT application 2 Click VIN and choose Automatic Read from the option list 3 When the scan tool builds connection with the vehicle the VIN number displays If the Vehicle Specification or VIN code is correct press the OK to continue Figure 4 5 Sample Automatic Read Screen 4 If it takes too long to get the VIN code press Cancel to stop and input the VIN manually Or if...

Страница 20: ...cle by Manual Entry 1 Select Diagnostic from home screen of the NT809BT application 2 Click VIN and choose Manual Entry from the option list 3 Press Keyboard button to input a valid VIN code and press OK to continue Figure 4 7 Sample Manual Entry Screen 4 3 Manual Selection Select vehicle brand you are to test and two ways of getting to the diagnostic operations are available Smart VIN Manual Sele...

Страница 21: ...r VIN To identify a vehicle by Smart VIN 1 Select Diagnostic from home screen of the NT809BT application 2 A screen with vehicle manufacturers displays Select the area where the vehicle manufacturer from A menu of all vehicle manufacturers displays Or tap the Search box to search the car you are to test Figure 4 9 Sample Vehicle Selection Screen 3 Choose SmartVIN option to start reading the VIN au...

Страница 22: ...tain VIN characters such as model year and engine type To identify a vehicle by manual vehicle selection 1 Select Diagnostic from home screen of the NT809BT application 2 A screen with vehicle manufacturers displays Select the area where the vehicle manufacturer is from A menu of all vehicle manufacturers displays Or tap the Search box to search the car you are to test 3 Choose Manual Selection op...

Страница 23: ...agnostic page and the diagnostic records will display Figure 4 12 Sample History Record Screen 3 Choose the vehicle model you want to test from the list 4 Click the Diagnostic button at the bottom bar to go to vehicle test page Figure 4 13 Sample History Record Screen 5 Diagnosis This section illustrates how to use the scanner to read and clear diagnostic trouble codes view live data readings and ...

Страница 24: ...ot all identify options listed above are applicable to all vehicles Available options may vary by the year model and make of the test vehicle 5 1 1 Quick Scan Quick Scan performs an automatic system test to determine which control modules are installed on the vehicle and provides diagnostic trouble codes DTCs overview Depending on the number of control modules it may take a few minutes to complete...

Страница 25: ...roller scan a menu with a list of DTC displays and click button to the right to view DTC descriptions Figure 5 3 Sample Quick Scan Complete Screen 4 Press Report to create an overview of installed control units and their system status or press Save to save the report Press Erase to clear the information Figure 5 4 Sample DTC Save Screen ...

Страница 26: ...like to test When the scanner has established connection with the vehicle the Function Menu displays Figure 5 7 Sample Function Menu Screen 5 1 2 Control Modules Control Modules displays all controllers available of the vehicle manufacturer The controllers listed on the menu do not mean that they are installed on the vehicle It is useful for technicians who are familiar with the vehicle specificat...

Страница 27: ...nnection with the vehicle the Function Menu displays Figure 5 9 Sample Function Menu Screen 5 2 Diagnostic Operations After a system is selected and the scanner establishes communication with the vehicle the Function Menu displays Generally the menu options are Read Codes Clear Codes Live Data ECU Information NOTE Not all function options listed above are applicable to all vehicles Available optio...

Страница 28: ...s past codes that indicate intermittent DTCs that are not currently active Code history is number of engine starts since DTC s were first detected to see if they are current or intermittent Self diagnostic lets you manually activate system tests that check for DTCs Usually it includes a KOEO Key on engine off test and a KOER key on engine running test To read codes from a vehicle 1 Press Read Code...

Страница 29: ... print the information if need be Press to exit 5 2 2 Clear Codes Clear Codes menu lets you to clear all current and stored DTCs from a selected control module Also it erases all temporary ECU information including freeze frame so make sure that the selected system is completely checked and serviced by technicians and no vital information will be lost before clearing codes NOTE To clear codes make...

Страница 30: ... 3 Live Data Live Data menu lets you view real time PID data in text and plot formats learn good sensor data and compare them with faulty data and record live data from a selected vehicle electronic control module There are two ways to select the PID data of control module All Data Custom List Figure 5 14 Sample Function Menu Screen 5 2 3 1 All Data All Data menu lets you view all live PID data fr...

Страница 31: ...15 Sample Function Menu Screen 2 Press OK to complete the selection and all readings will be displayed in text format by default Figure 5 16 Sample Live Data Selection Screen Figure 5 17 Sample Live Data Screen Name Description Help To provide help information of a PID ...

Страница 32: ...during idle KEKO acceleration deceleration part load and heavy load on each vehicle comes into your shop and records them for future reference Click the dropdown list at the upper left of the screen to enter to choose a working condition to learn Figure 5 18 Sample Learn Mode Screen Compare Mode If that vehicle comes in is with a problem you can easily compare the faulty sensor and parameter readi...

Страница 33: ...raph and the plot displays To view another PID plot tab the name of a plot and a list of available PIDs display Select one from the dropdown box and the plot changes to the newly selected PID Figure 5 20 Sample PID Graph Screen Multi graphs displays the parameters in waveform graphs giving you the real picture of what s going on in the vehicle You can view up to 4 parameter graphs simultaneously F...

Страница 34: ... menu to display all available parameters from the selected control module 2 The custom data stream selection screen displays Tap the lines you wish to select The numbers showing on the right side indicates the order of selection and the live data will show as this order Figure 5 23 Sample Custom List Selection Screen 3 To deselect an item tap the line again Alternatively tap SELECT ALL or Deselec...

Страница 35: ...is for recording the running data of the current control module To Record Data 1 Press Record button to record all selected live data then it will show the record time and frames Figure 5 25 Sample Live Data Record Screen 2 Press Stop button to create a record then press OK to save the record into Data Playback of Data Manager ...

Страница 36: ...ntification string and the control module coding To read ECU information 1 Press ECU Information from Select Diagnostic Function menu Figure 5 27 Sample Function Menu Screen 2 A screen with detailed information of the selected control module displays Figure 5 28 Sample ECU Information Screen 3 Press to print the information if need be Press to exit 4 Press Save to store ECU information screen and ...

Страница 37: ...service and maintenance options include Oil Light Reset EPB Service Battery Configuration DPF Regeneration TPS TBA SAS Calibration CVT Gear Learn TPMS Relearn Odometer Injector coding ABS Bleeding Key Programming Immobilizer 6 1 Oil Light Reset Oil Light Reset menu allows you to reset the service lamps on the instrument cluster The Service Indicator System is designed to alert the driver when the ...

Страница 38: ...to continue display including an option to clear any stored codes once the interval has been reset Follow the on screen instructions 6 2 Electronic Parking Brake EPB Service EPB Service menu allows you to perform the service and maintenance of brake systems including deactivation and activation of the brake control system bleeding brake fluid opening and closing brake pads and setting brakes after...

Страница 39: ... after brake service Sensor calibration on Honda EPB vehicles allows to program the current output value of each sensor into the electric parking brake unit Provides parking brake unjam procedure and perform longitudinal accelerometer calibration on Land Rover EPB vehicles allows to drive the electronic park brake so it is unjamed in the releasing direction and then drive it into mounting position...

Страница 40: ...ect Display data Validate Battery or Clear codes from Function menu 6 4 Diesel Particulate Filter DPF Regeneration DPF Regeneration menu lets you perform the DPF cleaning to clear the blockage through continuous burning of the particulates captured in the DPF filter When a DPF regeneration cycle is completed the DPF light automatically goes off 6 5 Throttle Body Alignment TPS TBA It s very common ...

Страница 41: ...learn After the tire pressure MIL turns on and maintenance is performed the tire pressure resetting function must be performed to reset tire pressure and turn off the tire pressure MIL 6 10 Injector Coding Write injector actual code or rewrite code in the ECU to the injector code of the corresponding cylinder so as to more accurately control or correct cylinder injection quantity After the ECU or ...

Страница 42: ... the ignition in your vehicle 7 Data Manager Data Manager menu let you review stored screenshots and test reports playback recorded live data and other saved files Typical menu options include Image PDF Data Playback Data Record Report Figure 7 1 Sample Data Manager Screen 7 1 Image Image option leads to screens for review of stored screenshots In case a failure of NT809BT application or the Andro...

Страница 43: ...ype 7 1 1 How to Save an Image To take a screenshot 1 If want to save data of current screen press at the title bar to take a screenshot Figure 7 3 Sample Screenshot Screen 2 Add a description of the image and press the OK to save cancel button to give up Figure 7 4 Sample Screenshot Screen ...

Страница 44: ...hot for application menu screenshot or Press System Screenshot for system menu screenshot then all available pictures will be displayed Figure 7 5 Sample Browse Picture Screen 4 Press any available picture for review 5 To delete a picture tap button Delete and answer OK to delete Press Print to print the pictures and press Rename to change the picture name Figure 7 6 Sample Edit Picture Screen 6 L...

Страница 45: ...s You just need to press the PDF icon on the test screen add a description and press OK button to save 7 2 1 How to Create a PDF Report To create a PDF report 1 Press Data Manager from home screen of NT809BT diagnostic application 2 Press Report from Data Manager 3 Press any reports saved Figure 7 8 Sample of Reports Screen 4 Press Save to save changes Press PDF to create PDF file ...

Страница 46: ...ll be displayed Press Print to print the report or press Email to share the report Figure 7 10 Sample of Report edit Screen 7 2 2 Review PDF Report To review the PDF reports 1 Press Data Manager from home screen of NT809BT diagnostic application 2 Press PDF and all available PDF files will be displayed Figure 7 11 Sample Browse PDF Screen ...

Страница 47: ...ata Playing back a recording is just like using the scan tool on a live vehicle It let you review live data in text graph and graph merging formats Playback speed and direction forward or reverse can also be controlled To review recorded live data 1 Press Data Manager from home screen of NT809BT diagnostic application 2 Press Data Playback and all available records display Figure 7 13 Sample Data ...

Страница 48: ...b And to merge the graphs press the tab Merge Graph or press the tab Multi Graph to view multiple plots Figure 7 15 Sample Graph Screen 5 To move forward or reverse back of the playing just drag the progress bar forward or reverse Press the button to stop 6 Long press the record to Rename or Delete the records Figure 7 16 Sample Edit Data Playback Screen ...

Страница 49: ...e 8 1 Sample My Account Screen 8 1 Registration If you are new to FOXWELL please register a FOXWELL ID first either by Registering with the built in client Or registering through our website with the URL http www foxwelltech us register html 8 1 1 Register with Built in Client You are allowed to create a Foxwell ID with the built in client To register with built in client 1 Press My Account or Upd...

Страница 50: ...t a verification code Foxwell will send a 4 digit verification code to the email you just entered Figure 8 3 Sample ID Registration Screen 3 Get the security code in your mailbox input the code as verification code Then create a password and click Free Registration to complete Figure 8 4 Sample ID Registration Screen 4 The account has been created successfully message will appear if you registered...

Страница 51: ...it to activate the product or press to back Figure 8 6 Sample Production Activation Screen 8 1 2 Register through Website To register through our website 1 Visit Foxwell official website www foxwelltech us and press Register icon or go to the registration page by selecting Support from home page and then click Register Figure 8 7 Sample Website Register Screen ...

Страница 52: ...e Send Code button We will send a 4 digit verification code to the email you just entered Find the security code in your mailbox input the code create a password and click Free Registration to complete Figure 8 9 Sample Create Account Screen 3 Sign in to the Member Center click New Registration input the right serial number and click Submit to activate the product ...

Страница 53: ... application the user login page will show enter your FOXWELL ID and password and press Sign in button to sign in Figure 8 11 Sample Sign in Screen 8 2 1 Product activate If you are logging in for the first time it will prompt and guide you to activate the current device while sign in successfully To activate product 1 Press OK button to activate product and press Cancel to back ...

Страница 54: ...e Product Activation Screen 2 Click Submit to continue the activation and press to give up activation Figure 8 13 Sample Product Activation Submit Screen 3 Product is activated successfully message will appear if activate successfully Figure 8 14 Sample activate success Screen ...

Страница 55: ...ccount Screen 8 4 My Products This option let you activate a new product and manage activated products including serial number and expiration date Figure 8 16 My Product Screen 8 5 Feedback and suggestions This option allows you to log on your e mail and send feedback and suggestions about Foxwell products NOTE Please download e mail client on the NT809BT before using this function To send feedbac...

Страница 56: ...e are two options Diagnosis Feedback and General Feedback Figure 8 17 Sample feedback record Screen 3 Select Diagnosis Feedback or General Feedback for creating a feedback Select the type of error and some necessary content and problem description or attachments Press Save button to save the feedback Or press Email button to send if you have an email account Figure 8 18 Sample Feedback Edit Screen...

Страница 57: ...ite or by the built in update client NOTE Before registration and updating please make sure your network works correctly and the tablet is fully charged or connect to external power supply 9 1 Automatic Update When the automatic update is enabled an update symbol is displayed in the upper right corner if any software version is released Figure 9 1 Sample Automatic Update Screen To automatic update...

Страница 58: ...splays NOTE Please make sure your network works correctly and the tablet is fully charged or connect to external power supply Figure 9 2 Sample Update Screen 10 VCI Manager VCI Manager is used to unbind and bind the VCI When the VCI needs to be replaced you need to use this function to unbind the old VCI and re bind the replaced VCI Even if the VCI is not replaced the existing VCI device will be a...

Страница 59: ...ing Unbind a VCI dongle it will display whether to unbind the current VCI When clicking OK it will execute unbind rebind and refresh the vehicle Figure 10 1 Sample Unbind a VCI dongle Figure 10 2 Sample Unbinding Confirmation Prompt Figure 10 3 Sample Unbinding Current VCI ...

Страница 60: ...e 1 Click the Update application on the i53BT home screen 2 Check and download the firmware package 3 After the download is completed it will automatically jump to the Firmware Update function module 4 Check the battery level to ensure that the battery level should be greater than 20 5 It will start update automatically if there is an update available If update failed please follow the on screen i...

Страница 61: ...ate available the update file will be downloaded and saved automatically when you try to update the diagnostic software And you will be prompted to upgrade the firmware 12 Settings This section illustrates how to program the scanner to meet your specific needs When Settings application is selected a menu with available service options displays Menu options typically include Unit Language Font Size...

Страница 62: ...ttings from home screen of the NT809BT diagnostic application and select Language Then all available language options display 2 Select your preferred language to change 12 3 Font Size This option allows you to change the font size of application To change font size 1 Press Settings from home screen of the NT809BT diagnostic application and then select Font Size 2 Select your preferred font size th...

Страница 63: ...of the diagnostic software icon whenever there is a new version available 12 7 System Settings This option provides you a direct access to the Android system settings like sound display system security and etc Refer to Android documentation for more information 12 8 General This option lets you to turn on off the prompt when saving a file or login registration when started the scanner 12 9 Uninsta...

Страница 64: ...period of time some cache data will be generated As time goes by the cached data will become larger and larger which will affect the operation of the device This option allow you to clear the cache data of the app 12 11 Print Settings This option allows you to print any data or information anywhere and anytime either via PC network or Wi Fi To setup the printer connection 1 Tap the Settings applic...

Страница 65: ... Plugin Manager and turn on the Mopria Print Service then NT809BT will search for available printers automatically Figure 12 4 Sample Print Service Manager Screen 4 Select Mopria Print Service Press for return Figure 12 5 Sample Setting of Print Service Manager Screen 5 Choose the right printer Press for return ...

Страница 66: ...on at the right bottom Press for return Figure 12 7 Sample of Printer test 7 Choose the file or report you want to print and press the print icon Click on the red marked part to select an available printer Click the blue marked part to make more settings for the printer such as paper size number of copies etc Figure 12 8 Sample of File Printing Screen NOTE ...

Страница 67: ...tion of your scan tool 1 Press About from home screen of the NT809BT diagnostic application 2 A screen with detailed information of the scanner displays Figure 12 9 Sample Tool Information Screen 13 Remote Support Remote Control enables you to get remote support from Foxwell with TeamViewer when you have issues with Foxwell products There are two remote control tools TeamViewer QuickSupport and An...

Страница 68: ...Automotive Diagnostic System NT809BT User s Manual V1 0 68 Figure 13 1 Sample QuickSupport Screen 2 Send your ID to us to let our team to take control your tablet ...

Отзывы: