background image

42

NT6X4Elite Series User’s Manual_English_V1.02

Figure 9-18 Sample Sign in Screen

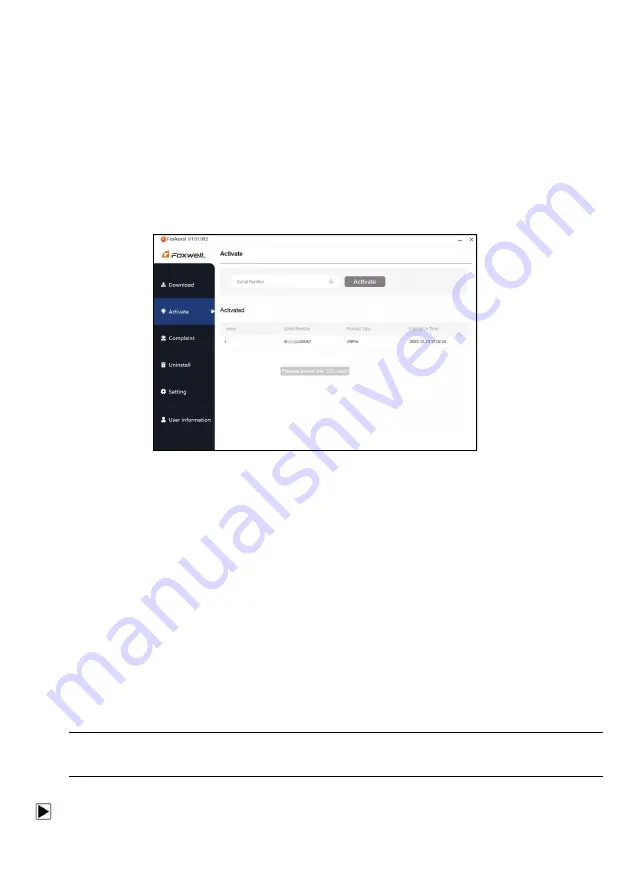
2. Select

Activate

and input serial number to complete product registration. If you have multiple

scanners to be registered, please enter all serial numbers you wish to activate. Or you can also

connect the scanner with your PC via USB cable, choose the Update icon and press the Enter Key

on the scanner, then your serial number will be automatically acquired by the FoxAssist and please

click Activate to complete.

Figure 9-19 Sample New Product Activate Screen

9.3 Update The Scanner

To update scanner

,

you need the following tools:

The scan tool

PC application FoxAssist

PC or laptop with USB ports

Internet service

To be able to use update tool, PC or laptop must meet the following minimum requirements:

Operation System: Windows 7, Windows 8 and Windows 10.

CPU: Intel P

or better

RAM: 64MB or better

Hard Disk Space: 30MB or better

Display: 800*600 pixel, 16 byte true color display or better

Internet Explorer 4.0 or newer

NOTE

Before updating, please make sure your network works correctly.

Before updating, please make sure you have already created a Foxwell ID.

To update your scanner:

Содержание NT6 4 Elite Series

Страница 1: ...rs Copyright Information 2019 Shenzhen Foxwell Technology Co Ltd All rights reserved Disclaimer The information specifications and illustrations in this manual are based on the latest information available at the time of printing Foxwell reserves the right to make changes at any time without notice Visit our website at www foxwelltech us For Technical Assistance send us email at support foxwelltec...

Страница 2: ...letion of service under this limited warranty 4 FOXWELL does not warrant uninterrupted or error free operation of the product If a problem develops during the limited warranty period the consumer shall take the following step by step procedure a The customer shall return the product to the place of purchase for repair or replacement processing contact your local FOXWELL distributor or visit our we...

Страница 3: ... OR EQUITABLE THEORY EVEN IF FOXWELL KNEW OF THE LIKELIHOOD OF SUCH DAMAGES FOXWELL SHALL NOT BE LIABLE FOR DELAY IN RENDERING SERVICE UNDER THE LIMITED WARRANTY OR LOSS OF USE DURING THE PERIOD THAT THE PRODUCT IS BEING REPAIRED 6 Some states do not allow limitation of how long an implied warranty lasts so the one year warranty limitation may not apply to you the Consumer Some states do not allow...

Страница 4: ... manner that would interfere with driving controls Do not exceed voltage limits between inputs specified in this user s manual Always wear ANSI approved goggles to protect your eyes from propelled objects as well as hot or caustic liquids Fuel oil vapors hot steam hot toxic exhaust gases acid refrigerant and other debris produced by a malfunction engine can cause serious injury or death Do not use...

Страница 5: ...TING STARTED 9 3 1 PROVIDING POWER TO SCANNER 9 3 1 1 Connecting to Vehicle Power 9 3 1 2 Connecting to Computer with USB Cable 9 3 2 APPLICATION OVERVIEW 9 3 3 INPUT DIALOG BOX 10 4 VEHICLE IDENTIFICATION 11 4 1 AUTO VIN 11 4 1 1 Automatic VIN Acquisition 11 4 1 2 Manual VIN Entry 13 4 2 MANUAL VEHICLE SELECTION 14 4 2 1 Smart VIN 14 4 2 2 Manual Selection 16 5 DIAGNOSTIC OPERATIONS 17 5 1 CONTRO...

Страница 6: ... LANGUAGE 29 8 2 CHANGE UNITS 30 8 3 CONFIGURE SHORTCUT KEYS 31 8 4 CONFIGURE BEEPER 32 8 5 DISPLAY TEST 33 8 6 KEYPAD TEST 33 8 7 TOOL INFORMATION 34 9 UPDATE 35 9 1 CREATE A FOXWELL ID 35 9 1 1 Register Through Website 35 9 1 2 Register With FoxAssist 38 9 2 REGISTER YOUR SCANNER 40 9 2 1 Register Through Website 40 9 2 2 Register With FoxAssist 41 9 3 UPDATE THE SCANNER 42 ...

Страница 7: ...s Beep Set Display Test Keypad Test About 1 2 2 Arrow Icon An arrow icon indicates a procedure Example To change menu language 1 Scroll with the arrow keys to highlight Language on the menu 2 Press the ENTER button to select 1 2 3 Note and Important Message Note A NOTE provides helpful information such as additional explanations tips and comments Example NOTE Test results do not necessarily indica...

Страница 8: ... 6 BACK Key exits a screen and generally returns to previous screen 7 HELP Key displays helpful information 8 USB Port provides USB power connection between the scanner and PC laptop 9 TF Card Port holds the TF memory card for data backup and software update IMPORTANT Do not use solvents such as alcohol to clean keypad or display Use a mild nonabrasive detergent and a soft cotton cloth 2 2 Accesso...

Страница 9: ...e DLC 4 Switch the ignition key to the ON position 5 The scanner automatically boots up IMPORTANT Never try to provide power for the scan tool from USB connection when the scan tool is communicating with a vehicle 3 1 2 Connecting to Computer with USB Cable The scan tool also receives power through the USB port when it is connected to a computer for software updates and printing of data To connect...

Страница 10: ...k up DTCs The scan tool provides 4 different types of keyboard to meet your specific needs Depending on the needs of text entry it automatically shows the most suitable keypad classic QWERTY keyboard for input of texts that contain both letters and numbers numeric keyboard for input of numbers alphabet keyboard for input of letters hexadecimal keyboard for special functions such as key matching UD...

Страница 11: ...menu driven you simply follow the screen prompts and make a series of choices Each selection you make advances you to the next screen Exact procedures may vary somewhat by vehicle It typically identifies a vehicle by any of the following means Automatic VIN reading Manual VIN entry Manual vehicle selection NOTE Not all identification options listed above are applicable to all vehicles Available op...

Страница 12: ...N Reading Screen 3 The scan tool starts to communicate with the vehicle and read the Vehicle Specification or VIN Code automatically Figure 4 3 Sample Automatic VIN Reading Screen 4 Answer YES if the Vehicle Specification or VIN code is correct and a menu of controller selection displays Answer NO if it is incorrect and you are required to enter the correct VIN number manually ...

Страница 13: ...input the VIN manually or click Cancel to quit Figure 4 5 Sample Manual Entry Screen 4 1 2 Manual VIN Entry Manual VIN Entry identifies a vehicle by manually inputting a 17 digit VIN code To identify a vehicle by manual VIN entry 1 Scroll with the arrow keys to highlight Auto VIN from the main menu and press the ENTER key Figure 4 6 Sample Main Menu Screen 2 Select Manually input VIN from the menu...

Страница 14: ...on Select vehicle brand you are to test and two ways of getting to the diagnostic operations are available SmartVIN Manual Selection 4 2 1 Smart VIN Smart VIN allows to identify a vehicle by automatically reading the vehicle identification number VIN To identify a vehicle by SmartVIN 1 Scroll with the arrow keys to highlight Diagnostic from main menu and press the ENTER key to start If you have th...

Страница 15: ...lays Select the area where the car brand is originated A list of vehicle makes display Figure 4 10 Sample Vehicle Manufacturer Area Selection Screen 3 Select the vehicle manufacturer A list of vehicle identification options displays Figure 4 11 Sample Vehicle Selection Screen 4 Select SmartVIN from the menu and press the ENTER key ...

Страница 16: ...en 6 Answer YES if the Vehicle Specification or VIN code is correct and a menu of controller selection displays Answer NO if incorrect and you are required to enter the correct VIN number manually Figure 4 14 Sample Manual VIN Entry Screen 4 2 2 Manual Selection Manual Selection identifies a vehicle by making several selections according to certain VIN characters such as model year and engine type...

Страница 17: ... data readings 5 1 Control Module Selection When you completed the identification of vehicle you have to identify the control modules installed in the vehicle There are two ways to identify the controllers installed in a car Quick Scan Control Modules 5 1 1 Quick Scan Quick Scan performs an automatic system test to determine which control modules are installed on the vehicle and provides diagnosti...

Страница 18: ...en 4 If there is diagnostic trouble code s detected in a control unit press the function key corresponding with Report on the screen to view details of code information Or press the function key Erase to clear them Figure 5 4 Sample DTC Screen 5 Press function key F1 to save the trouble code information 6 Select the system you would like to test and press the ENTER key When the scanner has establi...

Страница 19: ... mean that they are installed on the vehicle To select a system for testing 1 Scroll with the arrow keys to highlight Control Modules from the menu and press the ENTER key A controller menu displays Figure 5 6 Sample Control Module Screen 2 Select the system you would like to test When the scanner has established connection with the vehicle the Control Module menu displays Figure 5 7 Sample Contro...

Страница 20: ...ormation ECU Information screen displays the identification data of the control module under test such as the control module identification string the control module coding and Work Shop Code To read ECU information 1 Select ECU Information from the menu and press the ENTER key Figure 5 8 Sample Function Menu Screen 2 A screen with detailed information of the selected control module displays Figur...

Страница 21: ...ry If a fault occurs a specific number of times the code matures into a DTC and the MIL illuminates or blinks History codes are also referred to as past codes that indicate intermittent DTCs that are not currently active To read codes from a vehicle 1 Scroll with the arrow keys to highlight Read Codes from Function Menu and press the ENTER key A code list including code number and its description ...

Страница 22: ...DTCs from a selected control module Also it erases all temporary ECU information including freeze frame So make sure that the selected system is completely checked and serviced by technicians and no vital information will be lost before clearing codes NOTE To clear codes make sure that the ignition key is switched to ON with the engine off Clear Codes does not fix the problem that caused the fault...

Страница 23: ...a selected vehicle electronic control module Menu options typically include Complete List Custom List 5 2 4 1 Complete List Complete List menu lets you view all live PID data from a selected system To view live PID data 1 Scroll with the arrow keys to highlight Live Data from the menu and press the ENTER key Figure 5 15 Sample Function Menu Screen 2 Select the Complete List from the menu and press...

Страница 24: ...he Start key to resume collecting data To record data to memory of the scanner use the function key SAVE and press Stop Saving to stop recording at any time Figure 5 17 Sample Live Data Screen 4 Use up and down arrow key to select line If Graph is highlighted it indicates graphing is available for the selected line Press the function key Graph to display the PID graph Figure 5 18 Sample PID Graph ...

Страница 25: ...ect each other Figure 5 20 Sample Merge Graph Screen 7 Press the Back key to return to the previous menu 5 2 4 2 Custom List Custom List menu lets you to minimize the number of PIDs on the data list and focus on any suspicious or symptom specific data parameters To create a custom data list 1 Select Custom List from the menu and press the ENTER key Figure 5 21 Sample Live Data Menu Screen ...

Страница 26: ...o display selected items Figure 5 23 Sample Live Data Screen 6 Maintenance This section gives brief instructions of the most commonly required service and maintenance operations Typical service operation screens are a series of menu driven executive commands Follow on screen instructions to complete the operation Available service and maintenance options include Oil Light Reset EPB Service NOTE NT...

Страница 27: ...to communicate with the vehicle being tested but guides you to complete the service manually by providing step by step on screen instructions When Manual Reset is selected and the vehicle being tested identified a procedure opens on the screen Scroll with arrow keys to read the entire procedure and performing the necessary steps as directed by the on screen instructions The exact order of the test...

Страница 28: ...move the brake cable safely adjust brake cable s tension and calibrate the electric parking brake replacement Save and write clutch pedal programming on Renault EPB vehicles allows to save clutch pedal programming on Renault vehicles fitted with manual gearbox After this command is activated the tool allows to flash the electric parking brake unit with the saved clutch data Perform control functio...

Страница 29: ...tatus Read Codes Freeze Frame Data Clear Codes Live Data I M Readiness O2 Sensor Test On board Monitor Test Component Test Vehicle Information Modules Present Code Lookup NOTE Not all function options listed above are applicable to all vehicles Available options may vary by the year model and make of the test vehicle A Not supported the mode message displays if the option is not applicable to the ...

Страница 30: ...xit and return Figure 8 2 Sample Language Selection Screen 8 2 Change Units Selecting Unit opens a dialog box that allows you to choose units of measure To change the unit setup 1 Scroll with the arrow keys to highlight Units from Settings menu and press the ENTER key Figure 8 3 Sample Settings Screen 2 Press the up and down arrow key select an item and press the ENTER key to save and return ...

Страница 31: ...ut buttons To assign a function to a shortcut button 1 Scroll with the arrow keys to highlight Shortcuts from Settings menu and press the ENTER key A screen with available shortcut keys displays Figure 8 5 Sample Settings screen 2 Press the up and down arrow key select a shortcut key and press the ENTER key A screen with a list of loaded applications displays Figure 8 6 Sample Shortcuts Screen ...

Страница 32: ...hortcuts Screen 8 4 Configure Beeper Selecting Beep Set opens a dialog box that allows you to turn on off the beeper To turn on off the beeper 1 Scroll with the arrow keys to highlight Beep Set from Settings menu and press ENTER key Figure 8 8 Sample Settings Screen 2 Press the up and down arrow key select an item and press the ENTER key to save and return Figure 8 9 Sample Beeper On Off Screen ...

Страница 33: ... are any missing spots in the LCD screen Figure 8 10 Sample LCD Test Screen 2 To quit the test press the Back key 8 6 Keypad Test Selecting Keypad Test option opens a screen that allows you to check the functionality of the keypad To test the keypad 1 Scroll with the arrow keys to highlight Keypad Test from Settings menu and press ENTER key Figure 8 11 Sample Settings Screen 2 Press any key to sta...

Страница 34: ...ut option opens a screen that shows information about your scan tool such as serial number which may be required for product registration To view information of your scan tool 1 Scroll with the arrow keys to highlight About from Settings menu and press the ENTER key Figure 8 13 Sample Settings Screen 2 A screen with detailed information of the scanner displays ...

Страница 35: ... For step 1 and 2 you can also go to our site with the link below Step 1 http www foxwelltech us support detail 216 html Step 2 http www foxwelltech us support detail 621 html 9 1 Create a Foxwell ID 9 1 1 Register Through Website If you are new to FOXWELL please register on www foxwelltech us and create a FOXWELL ID first If you have installed the update application FoxAssist please refer to the ...

Страница 36: ...ideas and your stories about our products Note Please always remember your FOXWELL ID and Password as it s important for your to manage your product and updates Figure 9 3 Sample Registration Form Filling Screen IMPORTANT User name is limited to Email address and please always find the Verification Code in your registered email 3 A Registration success message will appear if you registered success...

Страница 37: ...en click Forget password You are required to input your registered email address verification code new password and confirmed password click Reset password Figure 9 6 Sample User ID and or Password Retrieve Screen IMPORTANT Before enter new password or confirm password please enter the correct Verification Code in your registered email 7 A Password reset succeeded message will appear if you rest p...

Страница 38: ...mail or Foxwell ID will appear under SEARCH RESULT Figure 9 9 Sample FOXWELL Search Result Screen 9 1 2 Register With FoxAssist You are also allowed to register and create a Foxwell ID with the update client FoxAssist To register through website 1 Visit our site www foxwelltech us and go the Product page Find your product model and click it to view the product profile Or Find the update tool under...

Страница 39: ...xAssist Main Screen 4 Click Register button a Register window will pop up Enter your own email address and click Send code to find the verification code in your mailbox Create a unique password confirm password and then click Free registration to complete Figure 9 12 Sample Register Screen 5 A Registered account is successful message will appear if you registered successfully ...

Страница 40: ...WELL ID and Password to sign in Figure 9 14 Sample Sign in Screen 9 2 Register Your Scanner To register a scanner you can either register on www foxwelltech us or by the update PC application FoxAssist 9 2 1 Register Through Website 1 Open www foxwelltech us main page and click Sign in Input your FOXWELL ID registered email and password Figure 9 15 Sample Sign in Screen ...

Страница 41: ...nput correct serial number and click the Submit button to complete product registration Please repeat the process if you have more products Figure 9 17 Sample New Product Registration Screen NOTE To check the serial number of a device please boot it up and select Setting About The serial number is right on the About page You can also find the serial number on the back of main unit or Warranty Card...

Страница 42: ...te to complete Figure 9 19 Sample New Product Activate Screen 9 3 Update The Scanner To update scanner you need the following tools The scan tool PC application FoxAssist PC or laptop with USB ports Internet service To be able to use update tool PC or laptop must meet the following minimum requirements Operation System Windows 7 Windows 8 and Windows 10 CPU Intel PⅢ or better RAM 64MB or better Ha...

Страница 43: ...rd Figure 9 20 Sample Sign in FoxAssist Screen 4 You are lead to Download tap after you sign in please choose the Update icon and press the Enter Key on the scanner then all updates applicable to your scanner display Figure 9 21 Sample Download Screen 5 Click the check box es in front of the software s you wish to update and then click the Upgrade button on the top of the software s to download ...

Страница 44: ...he Current Status If the Current Status shows Downloading please do not close the update application Figure 9 23 Sample Updating Screen 7 When all the items are updated an All software downloads are successfully installed message displays Please click OK to confirm Figure 9 24 Sample Update Completed Screen 8 Please click Return to review all the software status ...

Страница 45: ... the software updates failed Please check the network connection If the problem still exists please contact support foxwelltech com or your local dealer for assistance 9 Should you have any questions regarding the product please click Complaint fill in all required information and click Submit to send us your issue Figure 9 26 Sample Complaint Screen ...

Страница 46: ...re 9 27 Sample Software Uninstallation Screen 11 Please click Setting to change the update tool language Figure 9 28 Sample FoxAssist Setting Screen 12 Please click User Information to view your personal information To modify your personal information just click the Edit and type in the message box and click Confirm To help us provide better sales please make sure that the telephone email and coun...

Страница 47: ...47 NT6X4Elite Series User s Manual_English_V1 02 Figure 9 29 Sample User Information Screen ...

Отзывы: