section,then the whole file will get deleted.
d.When it is Timelapse recording or Motion recording,if
the memory card is full then it will stop recording or
loop recording.
5.Video menu settings
If the time of the old file is longer than the video
Please read this manual carefully before using the product.
User manual
Timelapse
recording
Set the space of time for capturing
1 frame video.
Loop
recording
On / Off
When enabling this function, it
can recycling
memory space
and loop
record.When
the
memory card is full,the system
will delete
the earliest
file
automatically
and continue
recording.
Microphone
When enabling this setting, it
will record
the video and
sound synchronously.
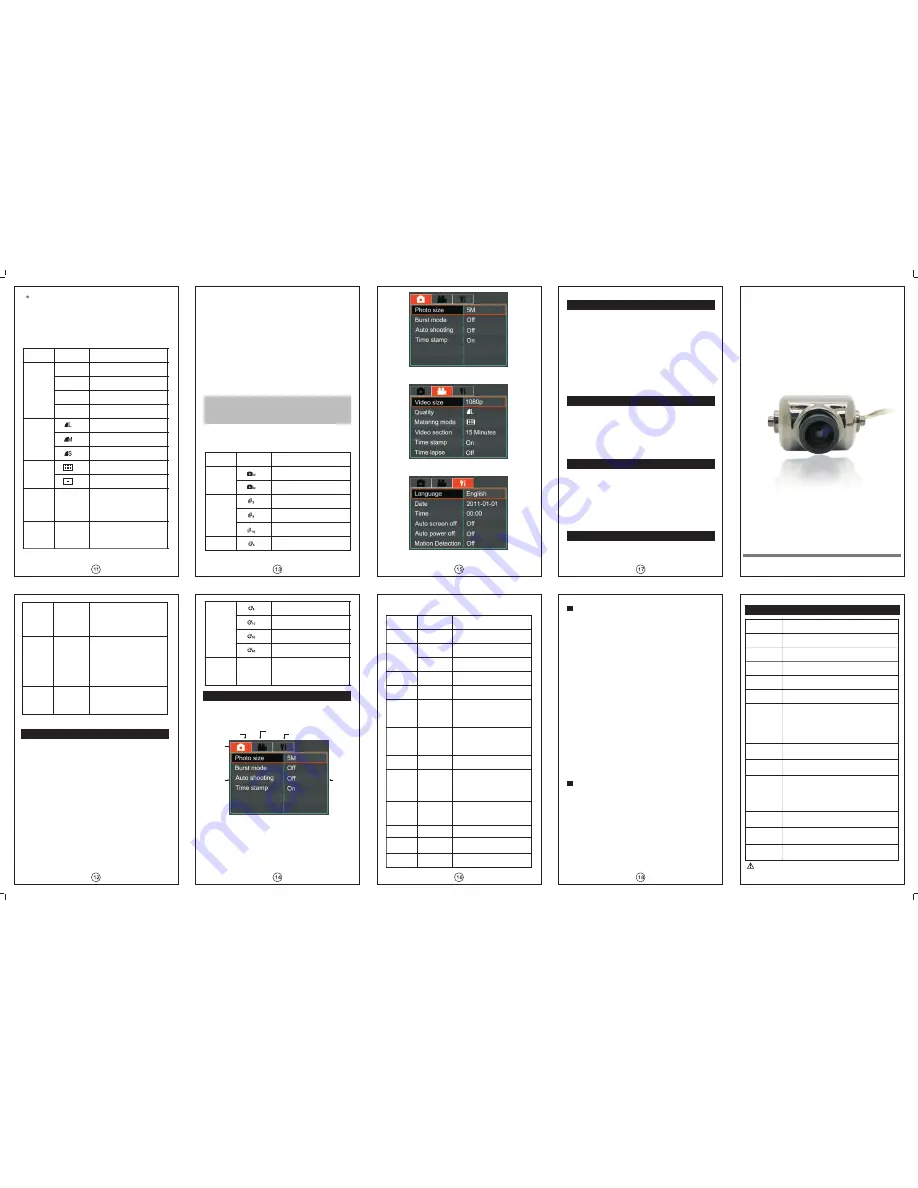
5.Camera setting menu
Function description
Items
Setting
Pixel
Photo pixel:2592x1944
Photo pixel:2048x1536
Continuous
shooting
Shoot 3 photoes at one hit
Shoot 5 photoes at one hit
Shoot 10 photoes at one hit
Auto
shooting
Shoot 1 photo every 3
Image sensor
1/3.2 CMOS
Lense
Fixed focus
,
f=2.7mm, angle of view=140°
Up and down adjustment angle= 90°
Exposure
control
Auto exposure
White balance
Auto white balance
Photo
Format: JPEG Pixel: 2592×1944
H.264 video compression
Size 16:9 1920×1080
(
30fps
)
4:3 1440×1080
(
30fps
)
16:9 1280×720
(
60fps
)/
1280×720
(
30fps
)
Video section
(
5min/10min/15min/30min
)
Bitrate
(
8Mbps
、
12Mbps
、
15Mbps
)
Video
Storage
High speed Micro SD
(
TF card
)
Maximun support 32GB
LCD glass
screen
2.0
″
TFT LCD Pixel: 960×240
Multifunction
interface
AV out
、
USB(Compatible with standard MINI
USB plug)
、
DC input
、
Universal serial data
input
、
Mono audio channel
、
USB 2.0 high-speed
communication
、
HDMI output
、
C-TYPE interface
,
data format HDMI 1.2
Dimensions
About 52.8 × 43 × 16mm length/width/thickness
(
not including the
)
Lense
Weight
About 38 g (
)
without av out cable plugged
Operation
temperature
-
10
℃-
40
℃
Items
Contents
Photo taking
Specifications
Function description
Items
Menu setting
Resolution
1080p
16:9 Full HD
1920X1080P 30fps
1080ps
4:3 Full HD
1440X1080P 30fps
720pH
16:9 Full HD
1280X720P 60fps
720p
16:9 Full HD
1280x720p 30fps
Video
Quality
Maximum
Average metering
Medium
Minimum
Metering
mode
Central weighted metering
Video
sectioning
When
in
continious
recording,the video file will be
saved in sections as the time
set here.
5 min/
10 min/
15 min/
20 min/
30 min
Time stamp
On / Off
When enabling this setting,
the date and time will be
shown on the up left corner of
the screen.
Auto
shooting
Shoot 1 photo every
5 seconds
Shoot 1 photo every
10 seconds
Time stamp
When enabling this setting ,
the date and time will be
shown on the up left of the
photoes.
Main Menu
Camera menu
Setup menu
Video menu
Tab
Menu
Menu
settings
Language
Date
Simplified
Chinese
2011/01/01
Set the date
Time
Set the time in 24-hour time
system
00:00
Auto screen
off
Set the time for auto screen off.
When there is no button operation
within certain time,the screen will
be off automatically to save power.
Press any key to turn it on.
Auto
power off
Set the time for auto power off.
When there is no operation within
certain time,it will shut down
automatically.
Motion
detecting
High/Medium/
Low
Set the detecting sensitivity
Light source
frequency
50Hz/60Hz
Set according to the power grid
frequency to avoid the interference
while working under a fluorescent
lamp.If it is working under the
nature light,then this setting can
be passed over.
Video output
NTSC/PAL
Set the format if you are outputing
the video to TV.Select the right
format accoding to state video
system.
Formatting
Restore
factory
defaults
Upgrade
Reset all the settings to the default
Upgrade programs
Format the memory card
Set the system language as
Traditional Chinese
Set the system language
as Simplified Chinese
2
、
Menu setting items
Function description
Items
Menu setting
Language
Set English as the system
language
English
Upgrade programs
Close
1 sec./frame
10 sec./frame
30 sec./frame
60sec./frame
On / Off
1. Normal photo mode
Press Camera button to take pictures. The icon will be
shown on the screen while shooting.
2. Continuous capture mode
When enabling this function, the related icon will be
shown on the screen.Press Camera button and it will take
photoes continuously as the setting in the menu.
3. Auto shooting
When enabling this function, the related icon will be
shown on the screen.Press Camera button and it will take
photoes as the pre-set intervals.
4. Motion detecting shooting
a. When enabling Motion detecting function,the related
icon will be shown on the screen.Press Camera
button to start motion detecting photo taking.
moment it is triggered.
b.When it is triggered by the detected object, it will start
shooting.The red camera icon will be shown on the
screen.
c.If the object stands still for 30 seconds,it will stop
shooting and keep detecting until next
triggering.Press Camera button again can stop
Motion detecting shooting and go back to the
standby mode.
d.Make sure the device is fixed and stable when using
this function, or it will be affected and fail to detect the
motion properly when the car rocks.
Notice: When the Motion detection,Continuous
shooting and Auto shooting are all open, press the
Camera button can only start Motion detecting
shooting.
With the icon keeps flashing,it will start shooting the
1.Main Menu settings
a. In standby mode, long press the Menu button and the
Main Menu interface will pop out.
Shoot 1 photo every
30 seconds
Shoot 1 photo every
60 seconds
On / Off
b.Shortly press Menu button to browse Camera, Video
and Setup tabs.
c.Press Camera button and Video button to select
items.Press Confirm button to enter set state.Press
Camera button and Video button to set and press
Confirm button to confirm and go back.
a.Please make sure the battery power is sufficient or there is
external power supply.
b.Please copy the upgraded files to the memory card(Please do
not change the name of the files).Then insert the memory card
into the card slot.
Traditional
Chinese
Off/
30s/
60s/
120s
Off/
30s/
60s/
120s/
300s
Upgrade.Press Confirm to enter Upgrade
interface,then select Yes and press Confirm to start
upgrading.
d. After it finishes upgrading,the system will restart
automatically.
a.Connect the device with the HD TV set through an
HDMI cable (not included in this product).
b.Make sure there is HDMI sign on the HDMI cable.
c.A transfer line is needed to transfer the HDMI C TYPE
to HDMI A TYPE when connecting to the HDMI
interface of HD TV set.
a.Connect the device to PC.
b.When the screen shows the Connecting to PC
interface,press up/down button to select
YES.Connect the device to PC as a removable
disk.Operations like Playback,Copy,Delete and so on
can be done on the computer.
c.Turn on the recorder and enter Setup menu>
Output vidoes and photoes to HD TV
Connecting to PC
Solutions for common problems
Video recording/Photo taking
1.Cannot record video or take photoes
a.Please check if the memory is full,if it is,delete the
unnecessary videos and photoes.
b.Please check the settings in the menu.Make sure the
Timelapse recording and Motion detecting are set
right.
c.Please check if the Continuous shooting and Auto
shooting are set right.
2.Stop in the middle of the recording
a.Please check if the memory card is Micro SD card or
Micro SDHC card that the device supports.
b.To ensure normal recording, Micro SD card or Micro
SDHC card must be high speed.
c.The transmission grade of the card should be Class 4
at least.
d.In car mode,please mount the device and fix it levelly
before connecting the auto power.If the power is
connected first,it will start recording before the device
is placed properly.The record file will be protected
and leaves less room for recording. When the
memory card is full,the loop recording will stop.
3. Fuzzy picture
a.Please check if there is any dirt or fingerprint on the
lense.Wipe the lense gently with a dry and soft cloth if
the it turns dirty.
About playback
1.Cannot playback
a.Please check if the memory card is inserted properly.
b.If there is no file stored in the memory card,it can not
play back.
c.If the name of the file has been changed,it can not
play back.
d.If the file has been modified,it can not play back.
2.White dots in the picture
a.If recording in dark place,the dust particles may
reflect light and cause the white dots in the picture.
b.Please check if there is any dust on the lense.
Foxtech
HoryzonHD V3
Do not use this cam with UHF radio Control without
the UHF shield kit .