background image

Chapter 3     BIOS Description

42

v

ACPI function

ACPI stands for 

Advanced Configuration and Power Interface

. ACPI is a

standard that defines power and configuration management interfaces be-
tween an operating system and the BIOS. In other words, it is a standard that
describes how computer components work together to manage system
hardware. In order to use this function the ACPI specification must be sup-
ported by the OS (for example, Windows2000 or WindowsXP). The available
setting values are: Enabled and Disabled.

v

 ACPI Suspend Type

This option is used to set the energy saving mode of the ACPI function.
W hen you select  

S1 (POS)

 mode, the power will not shut off and the

supply status will remain as it is, in S1 mode the computer can be resumed
at any time. When you select 

S3 (STR)

 mode, the power will be cut off after

a delay period. The status of the computer before it enters STR will be saved
in memory, and the computer can quickly return to previous status when the
STR function wakes. W hen you select 

S1 & S3

 mode, the system will

automatically select the delay time.

v

Power Management Option

This option is used to set the power management scheme. The available
settings are: User Define, Min Saving and Max Saving.

v

HDD Power Down

This option is used to define the continuous HDD idle time before the HDD
enters power saving mode. The setting values are: Disabled, 1 Min, 2 Min, 3
Min, 4 Min, 5 Min, 6 Min, 7 Min, 8 Min, 9 Min, 10 Min, 11 Min, 12 Min, 13 Min, 14
Min, 15 Min.

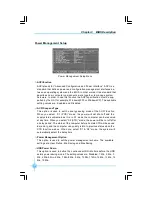
Power Management Setup Menu

Power Management Setup

PDF 

文件使用

 "pdfFactory" 

试用版本创建


www.fineprint.com.cn

Содержание P4M800P7MA series

Страница 1: ...ore information If you want more information about our products please visit Foxconn s website http www foxconnchannel com Version Trademark User s Manual V1 0 for P4M800P7MA motherboard Symbol description Note refers to important information that can help you to use motherboard better Attention indicates that it may damage hardware or cause data loss and tells you how to avoid such problems Warni...

Страница 2: ...characteristics of information technology equipment þ EN 61000 3 2 2000 Electromagnetic compatibility EMC Part 3 Limits Section 2 Limits for harmonic current emissions equipment input current 16A per phase þ EN 61000 3 3 A1 2001 Electromagnetic compatibility EMC Part 3 Limits Section 2 Limits of voltage fluctuations and flicker in low voltage supply systems for equipment with rated current 16A þ E...

Страница 3: ...acturer HON HAI PRECISION INDUSTRY COMPANY LTD Address 66 CHUNG SHAN RD TU CHENG INDUSTRIAL DISTRICT TAIPEI HSIEN TAIWAN R O C SupplementaryInformation This device complies with Part 15 of the FCC Rules Operation is subject to the follow ing two conditions 1 this device may not cause harmful interference and 2 this device must accept any interference received including interference that may cause ...

Страница 4: ...Enter BIOS Setup 21 Main menu 21 Standard CMOS Features 23 BIOS Features 26 Advanced BIOS Features 28 Advanced Chipset Features 32 Integrated Peripherals 38 Power Management Setup 43 PnP PCIConfigurations 49 PC Health Status 50 Load Fail Safe Defaults 51 Load Optimized Defaults 51 Set Supervisor User Password 51 Save Exit Setup 52 Exit Without Saving 52 Table of Contents Chapter 1 1 Chapter 2 2 Ch...

Страница 5: ...4 Start to install drivers 55 Directions for Bundled Software SuperStep 57 SuperLogo 60 SuperUpdate 62 Special BIOS Functions SuperBoot 64 SuperBIOS Protect 65 SuperRecovery 66 SuperSpeed 75 Table of Contents 4 4 Chapter 6 6 5 5 Chapter Chapter ...

Страница 6: ...ilure to switch off the DC power supply may result in serious damage to your system or memory module Warning We cannot guarantee that your system will operate normally while over clocked Normal operation depends on the over clock capacity of your device Warning Attention Since BIOS programs are upgraded from time to time the BIOS description in this manual is just for reference We do not guarantee...

Страница 7: ...abit LAN 6 with 6 Channel audio 8 with 8 Channel audio E with 1394 function S with SATA function 2 with DDR2 function R with RAID function You can find PPID label on the motherboard It indicates the functions that the motherboard has For example On the black mark of the PPID label it means the motherboard supports 6 Channel Audio 6 1394 port E onboard 10 100M LAN L SATA function S ...

Страница 8: ...rior performance reliability and quality at a reasonable price This motherboard adopts the advanced VIA P4M800 Pro VT8237R Plus chipset providing users a computer platform with a high integration compatibil ity performance price ratio This chapter includes the following information v Main Features v Motherboard Layout v Rear I O Ports 1 1 ...

Страница 9: ...DIMM slots Supports DDR 333 400 and DDR2 533 400 Supports 128 256 512 1024 Mb technology up to 2GB USB 2 0 Ports Supports hot plug Eight USB 2 0 ports Supports wake up from S1 and S3 mode Supports USB 2 0 Protocol up to 480 Mbps transmission rate Onboard Serial ATA S 150 MBps transfer rate Supports two S ATA devices Supports RAID 0 RAID 1 JBOD Onboard 1394 E optional Supports hot plug With rate of...

Страница 10: ... UniChromeTM Pro AGP 8X AGP 8X AGP 3 0 is the VGA interface specification that enabled enhanced graphics performance with high bandwidth speeds up to 2 12 GB s Green Function Supports ACPI Advanced Configuration and Power Interface Supports S0 normal S1 power on suspend S3 suspend to RAM S4 Suspend to disk depends on OS and S5 soft off Expansion Slots Three PCI slots One AGP slot Advanced Features...

Страница 11: ...tors 11 South Bridge VT8237R Plus 12 HDD Connectors 13 FDD Connector 14 System Fan Connector 15 24 pin ATX Power Connector 16 DDR DIMM Slots 17 DDR2 DIMM Slots 18 CPU Fan Connector 19 North Bridge P4M800 Pro 20 CPU Socket 21 AGP 8X Slot 22 IrDA Header optional 23 4 pin ATX 12V Power Connector 24 Chassis Intruder Connector optional 25 COM2 Connector 26 S PDIF OUT Connector optional 12 23 21 20 19 1...

Страница 12: ...ine out jack Microphone jack Use the three audio ports to connect audio devices The Line in jack is for a tape player or other audio sources The Line out jack is for a headphone or a speaker The Microphone jack is for a microphone In 6 Channel mode the function of the three jacks becomes Rear Speaker Out Front Speaker Out and Center Subwoofer Speaker respectively 9 Rear I O Ports LAN Port optional...

Страница 13: ...d pin headers and the mounting of jumpers Cau tion should be exercised during the installation of these modules Please refer to the motherboard layout prior to any installation and read the contents in this chapter carefully This chapter includes the following information v CPU v Memory v Power supply v Other Connectors v Expansion Slots v Jumpers Chapter2 2 ...

Страница 14: ...on of CPU Below is the CPU socket illustration Follow these procedures to install a CPU Load lever Load plate Protective cover 1 Use thumb and forefinger to hold the hook of the load lever and pull the lever down and away from socket to unlock it Lift the load lever 2 Push down the rear tab with your forefinger to bring the front end of the load plate up slightly Open the load plate with thumb Be ...

Страница 15: ...ovides the orientation directed function Lower the CPU straight down without tilting or sliding the CPU in the socket 4 After installing the CPU remove the protective cover from load plate The protective cover is used to protect the contacts of the socket Do not discard the protective cover Always replace the socket cover if the CPU is removed from the socket Alignment Key SocketCutouts Pin 1 posi...

Страница 16: ...load plate then the CPU is locked completely Note Excessive temperatures will severely damage the CPU and system Therefore you should install CPU cooling fan and make sure that the cooling fan works normally at all times in order to prevent overheating and damaging to the CPU Please refer to your CPU fan user guide to install it properly ...

Страница 17: ...ies for x8 and x16 devices You must install at least one memory bank to ensure normal operation Attention 1 Before you install memory modules please make sure that all DIMMs in one system are of the same type e g all DDR or all DDR2 not mixed 2 If DDR and DDR2 memory banks are installed simultaneously or all four sockets are populated with DIMMs the buzzer will alarm for memory error warning and p...

Страница 18: ...ign the memory module to the DIMM slot and insert the module vertically into the DIMM slot 3 The plastic clips at both sides of the DIMM slot will lock automatically Warning 104 Pins 80 Pins 128 Pins 112 Pins DDR memory DDR2 memory Be sure to unplug the AC power supply before adding or removing expansion cards or other system peripherals especially the memory devices otherwise your motherboard or ...

Страница 19: ... picture Align the connector 24 pin ATX power connector PWR1 PWR1 is the ATX power supply connector Make sure that the power supply cable and pins are properly aligned with the connector on the motherboard Firmly plug the power supply cable into the connector and make sure it is secure 4 pin ATX_12V Power Connector PWR2 The ATX power supply connects to PWR2 and provides power to the CPU 4 pinATX_1...

Страница 20: ...e cable s blue connector to the primary recommended or secondary IDE connector then connect the gray connector to the Ultra DMA 133 100 66 slave device hard disk drive and the black connector to the Ultra DMA 133 100 66 master device If you install two hard disks you must configure the second drive as a slave device by setting its jumper accordingly Refer to the hard disk documentation for the jum...

Страница 21: ...anel of the case The Power LED indicates the system s status When the system is in S0 status the LED is on When the system is in S1 status the LED is blink When the system is in S3 S4 S5 status the LED is off FP1 Power Swith Connector PWRBTN Attach the connector to the power button of the case Pushing this switch allows the system to be turned on and off rather than using the power supply button C...

Страница 22: ...N1 and SYS_FAN1 can be detected and viewed in PC Health Status section of the CMOS Setup These fans will be automatically turned off after the system enters suspend mode CPU_FAN1 POWER GROUND CONTROL SENSE 1 SYS_FAN1 SENSE 12V GND 1 1394 Header F_1394_1 F_1394_2 optional The 1394 expansion cable can be connected to either the front provided that the front panel of your chassis is equipped with the...

Страница 23: ... PDIF OutConnector SPDIF_OUT The S PDIF out connector is capable of provid ing digital audio to external speakers or com pressed AC3 data to an external Dolby digital decoder Note The empty pin of S PDIF cable should be aligned to empty pin of S PDIF out connector SPDIF_OUT Speaker Connector SPEAKER The speaker connector is used to connect speaker of the chassis SPEAKER 1 SPK Pull high SPKJ Empty ...

Страница 24: ...an detect the chasis intrusion through the status of this connector If the connector has been closed once the system will send a message To uti lize this function set Chassis Intrusion to En abled in the PC Health Status section of the CMOS Setup Save and exit then boot the oper ating system once to make sure this function takes effect INTR 1 INTRUDERJ 2 GND ...

Страница 25: ...tly access the master memory and supports 4X and 8X speeds Warning The motherboard may be damaged if a 3 3V AGP card is used Make sure that your AGP card is 1 5V specification Note the notches on the card golden fingers to ensure that they fit the AGP slot on your motherboard Installing an expansion card 1 Before installing the expansion card read carefully the documentation that came with it and ...

Страница 26: ...ld refer to this when adjusting jumper settings Clear CMOS Jumper CLS_CMOS This motherboard uses the CMOS RAM to store all the set parameters The CMOS can be cleared by removing the CMOS jumper How to clear CMOS 1 Turn off the AC power supply and quickly connect pins 1 and 2 together using the jumper cap 2 Return the jumper setting to normal pins 2 and 3 locked together with the jumper cap 3 Turn ...

Страница 27: ... during the system POST process 2 You want to change the default CMOS settings This chapter includes the following information v Enter BIOS Setup v Main Menu v Standard CMOS Features v BIOS Features v Advanced BIOS Features v Advanced Chipset Features v Integrated Peripherals v Power Management Setup v PnP PCI Configurations v PC Health Status v Load Fail Safe Defaults v Load Optimized Defaults v ...

Страница 28: ...ow POST Screen DEL to enter SETUP Main Menu The main menu allows you to select from the list of setup functions and two exit choices Use the arrow keys to select among the items and press Enter to accept or go to the sub menu The items in the main menu are explained as below Standard CMOS Features The basic system configuration can be set up through this menu BIOS Features The special features can...

Страница 29: ... The system s PnP PCI settings and parameters can be modified through this menu PC Health Status This will display the current status of your PC Load Fail Safe Defaults The default BIOS settings can be loaded through this menu Load Optimized Defaults The optimal performance settings can be loaded through this menu however the stable default values may be affected Set Supervisor Password The superv...

Страница 30: ...me This option allows you to set up the desired time usually as the current time with hour minute second format IDE Primary Secondary Master Slave These categories identify the HDD types of 2 IDE channels installed in the computer system There are three choices provided for the Enhanced IDE BIOS None Auto and Manual None means no HDD is installed or set Auto means the system can auto detect the ha...

Страница 31: ... CGA 40 Color Graphic Adapter powering up in 40 column mode CGA 80 Color Graphic Adapter powering up in 80 column mode MONO Monochrome adapter including high resolution monochrome adapters Halt On This category determines whether or not the computer will stop if an error is detected during powering up All Errors Whenever the BIOS detects a nonfatal error the system will stop and you will be prompt...

Страница 32: ...ned by POST Power On Self Test of the BIOS Base Memory The BIOS POST will determine the amount of base or conventional memory installed in the system Extended Memory The BIOS determines how much extended memory is present during the POST Total Memory Total memory of the system ...

Страница 33: ...tects your PC from being affected by viruses e g CIH The available setting values are Disabled and Enabled v SuperRecovery SuperRecovery Hotkey SuperRecovery provides the users with an excellent data protection and HDD recovery function There are 12 optional hotkey and the default hotkey is LSHIFT F12 v SuperSpeed Current FSB DRAM Frequency It shows the current clock frequency of the front side bu...

Страница 34: ...d to reduce electromagnetic interference The setting values are Disabled and Enabled Spread Spectrum If you enable spread spectrum it can significantly reduce the EMI Electro Magnetic Interference generated by the system The setting values are Disabled and Enabled Warning Be sure your selection is right CPU overclock will be dangerous We will not be responsible for any damages caused ...

Страница 35: ...w keys and change the HDD priority using or you can exit this menu by pressing Esc vVirus Warning Allows you to choose the VIRUS warning feature for IDE hard disk boot sector protection If this function is enabled and someone attempt to write data into this area BIOS will show a warning message on screen and an alarm will beep The setting values are Disabled and Enabled Note Such function provides...

Страница 36: ...ows you to set the boot device s sequence vBoot Other Device With this function set to enable the system will boot from some other de vices if the first second third boot devices failed The setting values are Dis abled and Enabled vBoot Up NumLock Status This option defines if the keyboard Num Lock key is active when your system is started The setting values are On and Off vTypematic Rate Setting ...

Страница 37: ...ion of MPS Table used in NT4 0 OS vOS Select For DRAM 64MB This option is only required if you have installed more than 64 MB of memory and you are running the OS 2 operating system Otherwise leave this option at the default vFull Screen LOGO Show This option allows you to enable or disable the full screen logo The available setting values are Disabled and Enabled vSmall Logo EPA Show This option ...

Страница 38: ...ed when the on die sensor gose from not hot to hot vTM2 Bus VID Represents the voltage of the throttled performance state that will be initi ated when the on die sensor gose from not hot to hot vLimit CPUID MaxVal The option is used to set limit CPUID MaxVal The available setting values are Disabled and Enabled Set Limit CPUID MaxVal to 3 should be Disabled for WinXP vExecute Disable Bit The optio...

Страница 39: ... bus vMemory Hole This option is used to select memory hole The setting values are Disabled 15M 16M vSystem BIOS Cacheable Select Enabled to allow caching of the system BIOS which may improve performance If any other program writes to this memory area a system error may result The available setting values are Enabled and Disabled v Init Display First This option is used to set which display device...

Страница 40: ...lled SDRAM Dis able the function if 16MB SDRAM is installed vPrecharge to Active Trp This option controls the number of cycles for Row Address Strobe RAS to be allowed to precharge If insufficient time is allowed for the RAS to accumulate its charge before DRAM refresh refresh may be incomplete and DRAM may fail to retain data This option applies only when synchro nous DRAM is installed in the sys...

Страница 41: ...et Write to Read CMD Twtr v Write Recovery Time Twtr This option is used to set Write Recovery Time Twtr vDRAM Command Rate This setting controls the SDRAM command rate Selecting 1T allows SDRAM signal controller to run at 1T T clock cycles rate Selecting 2T makes SDRAM signal controller run at 2T rate 1T is faster than 2T vRDSAIT mode This option is used to set RDSAIT mode v RDSAIT selection When...

Страница 42: ...ified It is used to key in a HEX number vAGP Fast Write This option enables or disables the AGP Fast Write feature The Fast Write technology allows the CPU to write directly to the graphics card without pass ing anything through the system memory and improves the AGP 4X speed Select Enabled only when your AGP card supports the feature The setting values are Disabled and Enabled vAGP Master 1 WS Wr...

Страница 43: ...Memory Size This option is used to set the onboard VGA share memory size If you are running under Windows XP or Windows 2000 set this option to 32M or lower The setting values are Disabled 16M 32M 64M vDirect Frame Buffer This option is used to enable or disable direct frame buffer vSelect Display Device This option is used to select display device vPanel Type This option is used to select panel t...

Страница 44: ... allows you to enable or disable PCI delay transaction The setting value are Disabled and Enabled vVLink mode selection This option allows you to select VLink mode vVLink 8X Support This option allows you to enable or disable the VLink 8X support When Enabled it may increase system performance The setting values are Disabled and Enabled vDRDY_Timing This option allows you to select DRDY_Timing CPU...

Страница 45: ...Onboard Lan Device This option is used to enable or disable onboard LAN device The setting values are Disabled and Enabled v Onboard Lan Boot ROM The option enables or disables the initialization of the onboard LAN Boot ROM during bootup The setting values are Disabled and Enabled vOnboard 1394 Device This option is used to enable or disable Onboard 1394 Device The setting values are Disabled and ...

Страница 46: ...Enabled vIDE Prefetch Mode This option is used to enable or disable IDE prefetch mode The setting values are Disabled and Enabled vPrimary Secondary Master Salve PIO These four items let you assign which kind of PIO Programmed Input Output is used by IDE devices Choose Auto to let the system auto detect which PIO mode is best or select a PIO mode from 0 4 vPrimary Secondary Master Salve UDMA Ultra...

Страница 47: ...s are Disabled and Auto vOnChip USB Controller This option is used to set onchip USB controller vOnChip EHCI Controller This option is used to enable or disable onchip EHCI controller The setting values are Disabled and Enabled vUSB Emulation This option is used to enable or disable USB legacy keyboard mouse and USB storage vUSB Keyboard Mouse Support When USB Emulation is set as KM MS the two opt...

Страница 48: ...alled on the board vRxD TxD Active This option is used to set the RxD and TxD parameters It is recommended to keep the default setting vIR Transmission Delay This option is used to set whether the IR Transmission Delay is enabled The available setting values are Disabled and Enabled vUR2 Duplex Mode This option is available when UART 2 mode is set to either ASKIR or IrDA This item enables you to d...

Страница 49: ...ess and corresponding interrupt for the onboard parallel port The setting values are SPP EPP ECP ECP EPP vECP Mode Use DMA When the Parallel Port Mode is set to ECP or ECP EPP this option is used to select the channel for the ECP mode The setting values are 1 and 3 ...

Страница 50: ...hut off and the supply status will remain as it is in S1 mode the computer can beresumed at any time When you select S3 STR mode the power will be cut off after a delay period The status of the computer before it enters STR will be saved in memory and the computer can quickly return to previous status when the STR function wakes When you select S1 S3 mode the system will automatically select the d...

Страница 51: ...mode DPMS Support mode is a new screen power management system and it needs to be supported by the monitor you re using vMODEM Use IRQ This option is used to set the IRQ in which the modem can use The setting values are NA 3 4 5 7 9 10 11 vSoft Off by PWRBTN This option is used to set the power down method This function is only valid for systems using an ATX power supply When Instant Off is select...

Страница 52: ...abled and Enabled vModem Ring Resume This option is used to set the system to be waked up by the modem ring The setting values are Disabled and Enabled vRTC Alarm Resume This option is used to set alarm to power on the system by the date 1 31 or time hh mm ss The setting values are Disabled and Enabled vDate of Month This option is used to set the timing for the start up day of the month The setti...

Страница 53: ...nd Enabled vIRQ5 LPT2 This option is used to enable or disable IRQ5 LPT2 activity monitoring The setting value are Disabled and Enabled vIRQ6 Floppy Disk This option is used to enable or disable IRQ6 Floppy Disk activity monitoring The setting values are Disabled and Enabled vIRQ7 LPT1 This option is used to enable or disable IRQ7 LPT1 activity monitoring The setting value are Disabled and Enabled...

Страница 54: ...ion is used to enable or disable IRQ12 PS 2 Mouse activity monitoring The setting values are Disabled and Enabled vIRQ13 Coprocessor This option is used to enable or disable IRQ13 Coprocessor activity monitoring The setting values are Disabled and Enabled vIRQ14 Hard Disk This option is used to enable or disable IRQ14 Hard Disk activity monitoring The setting values are Disabled and Enabled vIRQ15...

Страница 55: ...eme If all cards you use support PnP then select Auto ESCD and the BIOS automatically distributes interruption resources If you install ISA cards not supporting PnP you will need to select Manual and manually adjust interruption resources in the event of hardware conflicts However since this motherboard has no ISA slot this option does not apply vIRQ Resources Press the Enter key then manually set...

Страница 56: ... option is used to enable or disable the system to be waken up by PS 2 mouse from S3 S4 S5 staus The setting values are Disabled and Enabled vUSB Resume from S3 This option is used to enable or disable the USB to be resume from S3 The setting values are Disabled and Enabled vVGA W hen on of VGA any activity from one of the listed system peripheral devices or IRQs wakes up the system The setting va...

Страница 57: ...ower to the computer vCurrent System CPU Temperature The current system CPU temperature will be automatically detected by the system vSYSTEM CPUFAN The system CPU fan speed will be automatically detected by the system vVcore 12V VCC 5 V VCC 3 3 V V Battery V 3 3VSB V The current voltages will be automatically detected by the system vSmart CPU FAN Temperature This option is used to set smart CPU fa...

Страница 58: ...erformance parameters for the system to improve the performance of your system components However if the optimized performance parameters are not supported by your hardware devices it will likely cause system reliability and stability issues If you only want to load the optimized default for a single option select the desired option and press the F7 key Set Supervisor User Password The access righ...

Страница 59: ... If you do not want to set a password just press Enter when prompted to enter a password and in the screen the following message will appear If no password is keyed in any user can enter the system and view modify the CMOS settings Password Disabled Press any key to continue Under the menu Advanced BIOS Features if you select System from the Security Option you will be prompted to enter a password...

Страница 60: ...utility CD that came with the motherboard contains use ful software and several utility drivers that enhance the motherboard features This chapter includes the following information v Utility CD content v Start to install drivers 4 4 Chapter ...

Страница 61: ...otherboard You should install the drivers in order and you need to restart your computer after the drivers all installed A VIA 4in1 B DirectX 9 0 C Audio Driver D VGA Driver E LAN Driver F VIA RAID 2 Accessories Use this option to install additional software programs A SuperUtility B Adobe Reader C Norton Internet Security D Create RAID Floppy 3 Manual Click here to browse user manual content 4 Br...

Страница 62: ...nd click to enter the install driver screen You can select the driver that you want to install and begin the setup steps Click here Note 1 Install the latest service pack firstly if your OS is Windows XP or Windows 2000 2 Follow the CD screen order to install your motherboard drivers ...

Страница 63: ...Chapter 4 Driver CD Introduction 56 This chapter will introduce how to use attached software This chapter provides the following information v SuperStep v SuperLogo v SuperUpdate 5 5 Chapter ...

Страница 64: ... runs irregularly 3 Adjusts the CPU frequency to speed up your system and achieve better system performance 4 Simple and easy to operate with a user friendly graphics interface Using SuperStep Link to FOXCONN Website Go to Fan page System Fan1 speed System Fan2 speed Exit Program Minimize Window SuperStep Help Adjust System Fan2 warning criteria CPU Fan speed Adjust CPU Fan warning criteria Reset ...

Страница 65: ...ent voltage readings Adjust voltages warning criteria upper limit Adjust voltages warning criteria Lower limit Go to Temperature page Adjust CPU tem perature warning criteria Adjust system temperature warning criteria Apply the adjust ments Reset the warn ing criteria to default settings Current CPU Temperature Current system Temperature ...

Страница 66: ...tically provide warning mes sages Apply the changes Reset to the default settings Go to Clock page Current PCI Express clock Current PCI clock Current CPU Clock Reset to the default settings Current CPU Ratio Adjust the CPU External Frequency Apply the adjustments Adjust the monitoring Interval ...

Страница 67: ...ts 4Mb size flash parts flash write method is independent with flash type 3 Simple and easy to operate with a user friendly graphics interface 4 Supports BMP and JPEG graphic format files The best color is 16 or 256 colors The best resolution is 136x84 for top right logo and 640x480 or 800x600 for full screen logo Using SuperLogo SuperLogo Help About SuperLogo Go to ROM Info page Display the Flash...

Страница 68: ...lete the Full screen mode Top Right mode Boot without logo Go to Update BIOS page Browse a BIN file for updating BIOS BIOS image file location Follow the Wizard to complete the BIOS function Go to Backup page Backup Logo Follow the Wizard to complete the backup function Backup whole BIOS image ...

Страница 69: ...e flash parts flash write method is independent of flash type 3 Simple and easy to operate with a user friendly graphics interface Using SuperUpdate Perform the BIOS update from local image Browse BIOS bin file from local Storage Exit Program Minimize Window SuperUpdate Help Backup system BIOS to an image file About SuperUpdate Link to Foxconn Website Update BIOS via internet automati cally Curren...

Страница 70: ...functions of BIOS and how to use them in detail It can further exert the max potential of motherboard to bring you super value enjoyment This chapter introduces the following special functions of BIOS v SuperBoot v SuperBIOS Protect v SuperRecovery v SuperSpeed Chapter 6 6 ...

Страница 71: ...PC can bootup without any unnecessary SuperBoot is quite easy to use choose the right option in CMOS setup refer to BIOS features SuperBoot saves the information when the PC boots up the first time and restores the parameters for the system thus letting the PC boot freely and rapidly Notes 1 If the previous boot was not completed then the BIOS will perform a normal POST even if SuperBoot is enable...

Страница 72: ... such as the CIH virus are so dangerous that they may overwrite the BIOS If the BIOS has been damaged the system will be unable to boot We provide the following solution which protects the system BIOS from being attacked by such viruses The way to implement this function set SuperBIOS Protect as Enabled the BIOS will be protected ...

Страница 73: ...r example if you haven t divided a hidden partition items like Release Hidden Partition Back up and Recov ery will be displayed in gray and can t be selected And when you select an item the related information will appear on the bottom of the screen Disclaimer Please study this software program s specification carefully before using it The vendor should not be liable for any damage arising out of ...

Страница 74: ...on and press Enter to confirm it Attention 1 Make sure that you have selected a HDD before entering the main menu 2 Make sure that the HDD you selected is ATA5 or higher For HDDs lower than ATA5 there will be a No Support message in the HDD list menu listing beside the name of it 3 Only one HDD can be operated at a time Note If you have assigned a password to the selected HDD you will be prompted ...

Страница 75: ... be continued Once the division is done any future variation to the HDD will never affect the hidden partition such as virus causing turbulence windows system breaking down or data loss SuperRecovery can recover all the data backed up in hidden partition letting you easily get your computer on track again 2 Divide Hidden Partition A Enter a percentage of the HDD total capacity or an actual size in...

Страница 76: ...ased partition is still unavailable for you after the system is restarted It s necessary for you to enable it by using FDISK PQMAGIC or some other tools Attention 1 All the HDD data will be cleared by the partitioning process so it is better to do the division on an empty HDD 2 At the same time the overall HDD capacity will decrease in order to make space for the hidden partition which will become...

Страница 77: ...e CMOS data B The backing up or recovery of CMOS data should be done on a motherboard of the same type Backup Select BACKUP to enter the Backup interface where you can find the following three sub function items BACKUP CMOS SETUP BACKUP PARTITION TABLE and BACKUP HARDDISK DATA Switch the highlight bar by pressing the arrow keys to make a selection and then press Enter to confirm your choice ...

Страница 78: ...rogress bar showing 3 Backup Hard disk Data A If there are active partitions system partition you can choose to backup an active partition or the whole disk But only one can be taken between the two choices Old data will be replaced by the newly backed up data ...

Страница 79: ...ow keys to make a selection and press Enter to confirm your selection C A report with all the critical data on this operation will be displayed after the backup is completed Original Size The data size loaded in selected partition Valid Size The size of valid data Elapsed Time How long the procession cost Compressed Size The size of data after compression Compressed Rate Compressed Size Valid Size...

Страница 80: ...S Functions 73 2 Recover Partition Table This function is used to recover all partition tables including extended partitions 1 Recover CMOS Setup This function is used to restore the latest backup of CMOS settings you made ...

Страница 81: ...d first Press Enter if password is null B Enter the new password Then enter the same again to confirm it C Press Enter for null password D The password will be saved in the hidden partition 4 Back to Main This item is used to exit the Recovery interface 3 Recover Hard disk Data This item is used to restore the backed up data from the hidden partition ...

Страница 82: ...witch on power to the system and press the Del key to enter BIOS Setup 4 Enter the BIOS Features SuperSpeed menu to set the CPU clock 5 Save and exit BIOS Setup your system will now boot successfully BIOS provides you with a set of basic values for your processor selection in stead of the jumper settings The processor speed can be manually set from the BIOS Features menu screen Warning Be sure you...

Отзывы: