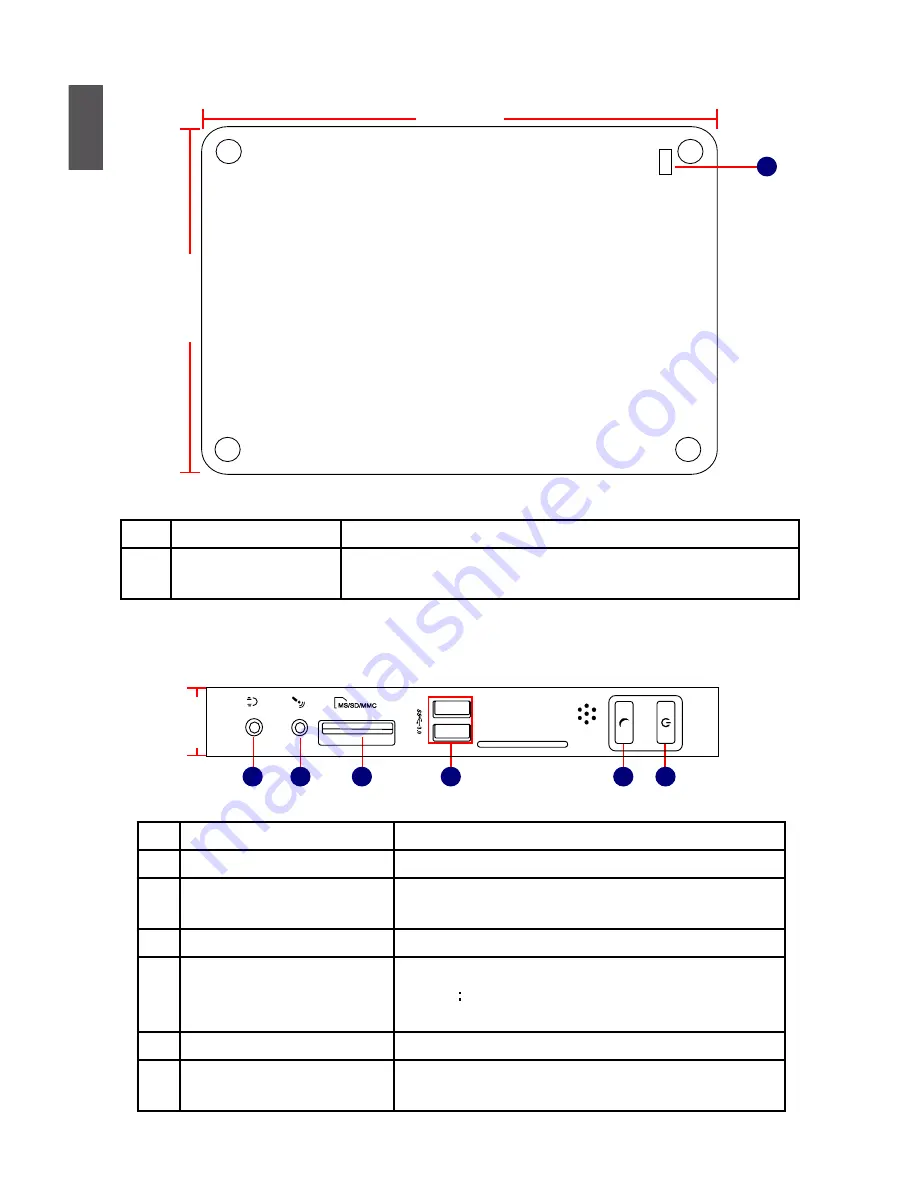
Foxconn Nettop nT-A3000 Series Скачать руководство пользователя страница 7

1

2

1-1 Top View

No.  Name

Description

1

Headphone  Port

Connects to a headphone

2

Microphone In and S/PDIF In
Port

Connects to a microphone or playback devices with 
optical connectors(3.5mm jack)

3

Multi-Function Card Reader Support SD/SDHC/MS/MS Pro/MMC memory cards

4

USB 3.0 Ports

Connect to USB devices
Caution:Before using it, you need to install the “AS- 
Media USB3.0 driver” in the Driver CD.

5

Suspend Button

Enter suspend mode in operating system    

6

Power Button with 
Integrated LED Indicator

Turning the power on/off, Indicates system states

Indicates system states

24mm

1

2

3

6

4

5

No.

Name

Description

1

Kensington Lock

Attach a Kensington security system or a compatible lock to 
secure your Nettop

190mm

135mm

1

1-2 Front Side View

Содержание Nettop nT-A3000 Series

Страница 1: ...nT A3000 Series Nettop User s Manual...

Страница 2: ...negative consequences for the environment and human health which could other wise be caused by inappropriate waste handling of this product For more detailed information about recycling of this produc...

Страница 3: ...onnected before using NET TOP This product should only be used in an environment with ambient tem peratures between 0 C and 40 C To reduce the risk of fire use only No 26 AWG or larger UL listed or CS...

Страница 4: ...ement of NETTOP On the Desk 5 On the Display Back 5 Connection of NETTOP Connect the Monitor 7 Connect the USB Devices 7 Connect the Network Cable 8 Connect the Power Cord 8 Chapter 3 BIOS Setup Enter...

Страница 5: ...pter Power Adapter Power Cord magnet rubber foot Vesa mount Seatbase Opening Tool Mini PCIe Half Card Support Screw Cover Screw for VESA Mounting M8 0X9 7mm 4X Screw for HDD Support Bracket M 4 7X2 85...

Страница 6: ...This chapter introduces NETTOP s outlook Top View Front Side View Back Side View Bottom View...

Страница 7: ...ry cards 4 USB 3 0 Ports Connect to USB devices Caution Before using it you need to install the AS Media USB3 0 driver in the Driver CD 5 Suspend Button Enter suspend mode in operating system 6 Power...

Страница 8: ...ered analog speakers or record ing devices with optical connectors 3 5mm jack 6 Power Input Port Connects to the power adapter 4 3 6 5 2 1 No Name Description 1 Sheet Metal NETDVD optional accessary o...

Страница 9: ...In this chapter the placement and the connection of some neces sary peripherals will be introduced This chapter includes the following information Placement of NETTOP Connection of NETTOP...

Страница 10: ...dard The two groups of holes on your dispaly have different space between and they help you easily fasten the bracket onto your display C A U T I O N 2 On the Display Back This is the best space savin...

Страница 11: ...2 2 2 Fit the NETTOP into the bracket with power button locating at the top for easy touch Lift up the NETTOP straightly to take it out C A U T I O N 2 1...

Страница 12: ...o the NETTOP through DVI connector 2 Connect the USB Devices Connect USB devices to the USB ports of the NETTOP for example mouse and keyboard 3 Connect the Network Cable Connect LAN cable to the RJ 4...

Страница 13: ...r input port of the NETTOP and push the power but ton to start it The power adapter is dissipating heat during normal use please make sure not to cover it and keep it away from your body to prevent di...

Страница 14: ...f Test POST process 2 You want to change the default CMOS settings This chapter includes the following information Enter BIOS Setup Main Advanced Boot Security Save Exit Since BIOS could be updated so...

Страница 15: ...priority and enable Quiet Boot feature here Security The Administrator User password can be set up through this menu to prevent unauthorized use of your computer If you set a password the system will...

Страница 16: ...ion AMD E 350 Processor This item shows the current CPU name The CPU name are for reference only please refer to the physical nettop for specific features Processor Speed This item shows the processor...

Страница 17: ...to 12 Date date from 1 to 31 Year year set up by users Use ENTER TAB to select a field Use or to input the value System Time This item allows you to configure the desired time Use ENTER TAB to select...

Страница 18: ...rt function When entering deep sleep mode system S4 S5 only can wake up from power button USB 2 0 Port S3 Wakeup This item is used to enable or disable USB 2 0 Port S3 Wakeup Function LAN USB 3 0 Port...

Страница 19: ...rting C6 power Loss This item is used to enable or disable C6 power state which is featured in Fusion processors Integrated GPU UMA Frame Buffer This item is used to set Integrate Graphics UMA Frame B...

Страница 20: ...es F3 Optimized Defaults F4 Save Exit ESC Exit select the keyboard numlock state Bootup Numlock State This item is used to select the keyboard numlock state The defaulte setting is On Quiet Boot This...

Страница 21: ...e BBS Priorities 1st Boot SATA WDC Wd1600BE Select Screen Select Item Enter Select Change Opt F1 General Help F2 Previous Values F3 Optimized Defaults F4 Save Exit ESC Exit Set Boot Priority Version 2...

Страница 22: ...a power on password and must be entered to boot or enter Setup In Setup the User will have Administrator rights Administrator Password User Password Select Screen Select Item Enter Select Change Opt F...

Страница 23: ...o exit setup utility without saving your modifications select No or ESC to return to the main menu Save Changes and Reset If you select this option and press Enter a message will be displayed in the s...

Страница 24: ...expansion cards were installed the system might fail to work Save as User Defaults If you select this option and press Enter a message will be displayed in the screen Select Yes to save the changes do...

Страница 25: ...This chapter introduces the Windows installation Install Windows 7 Install Drivers in Windows 7...

Страница 26: ...into the NETDVD or USB DVD ROM drive 3 Select and go to the Boot menu set the Boot Option 1 to DVD drive press F4 key to save change and exit BIOS Version 2 10 1206 Copyright C 2010 American Megatrend...

Страница 27: ...license terms appear choose accept and click Next to continue 7 It will then ask you to select the installation type Click Custom advanced to install a new copy of Windows 8 The setup will the displa...

Страница 28: ...ing a 70GB partition to install Windows Make your modifications and click Apply To ensure that all Windows features work correctly Windows might create additional partitions for system files So you wi...

Страница 29: ...uring the installa tion your computer will restart several times 11 When the installation is complete setup will prepare your computer for it s first use You can then follow the steps to select system...

Страница 30: ...e 2 Waiting for a few seconds the main menu will be displayed on the screen 3 Use these options to install all the drivers for your system You must click AMD Chipset Driver to install it first After t...

Страница 31: ...one or more of the following measures Reorient or relocate the receiving antenna Increase the separation between the equipment and receiver Connect the equipment into an outlet on a circuit different...

Отзывы: