Fowke Electronic X50W Скачать руководство пользователя страница 9

User manual 


Notice


Before  use  electric  supply  must  ensure  the  specifications  of  local  power  supply  meet 
requirements. 
Please ensure that the charging process is ventilated and can’t be covered with any object. After 
charging, remove the power supply as soon as possible. 
When  shooting  during  charging,  it  is  forbidden  to  use  the  computer  to  power  the  camera, 
otherwise it may damage the computer. 
 
2.4 Power on and power off the camera 
1.Install the battery, long press power key to power on the camera; 
2. In the state of boot, long pres the power key to power off the camera; 
3.  The  camera  supports  the  function  of  power  on/off  the  camera  via  open/close  the  screen; 
unfold the screen the camera will power on automatically; fold the screen the camera will power 
off automatically; 
4.The camera support the function of power on/off automatically. When the camera is not in use 
for long time, camera will power off automatically to save battery. When the battery is low, “Low 
battery” will shown on the screen and power off automatically later. 
 
2.5 Switch working modes 
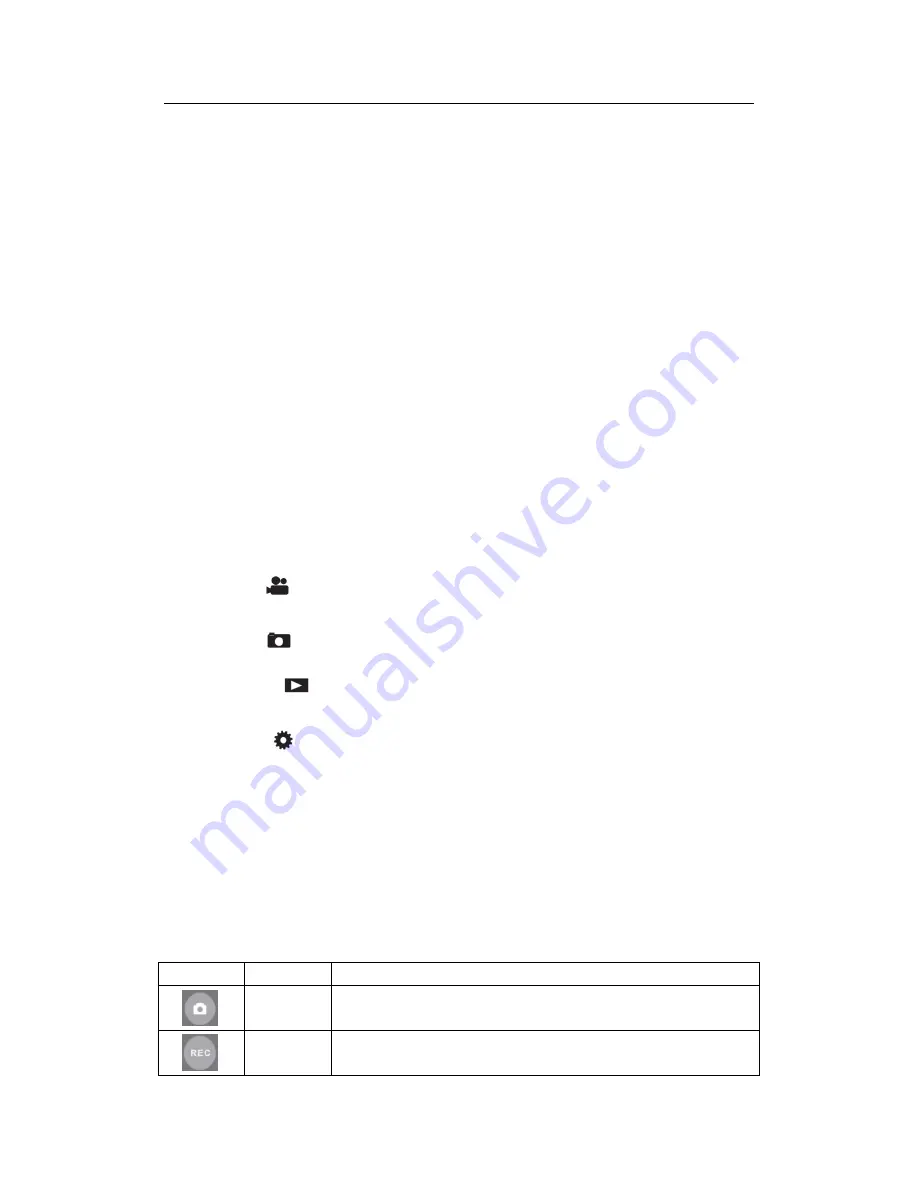
2.5.1The camera support three working modes and one Setting modes. 

Video mode: 

will show on top left corner of the screen, at that time camera can record 

video and set relevant parameter; 

Photo mode: 

  will show on top left corner of the screen, at that time camera can take 

photo and set relevant parameter; 

Playback  mode: 

  will  show  on  top  left  corner  of  the  screen,  at  that  time  camera  can 

playback photo or video and make related operation; 

Setting mode: 

  will show on top left corner of the screen, in this mode users can set the 

system parameter. 
 
2.5.2 Switch working modes   

Press

Mode

key can switch working modes: Photo mode/Video mode/Playback mode, related 

icon of each mode will show on top left corner of the screen.   
 
                       
2.6 Instructions of remote control 
Camera also can be operating by remote control; key functions of remote control are as below: 

Icon 

Key name 

Functions 


Photo key 

Photo mode: take photo 


Video key 

Video mode: start / stop recording ; 
Video playback mode: stop play during playback. 

Содержание X50W

Страница 1: ...2 7 Connect to PC 9 2 8 Connect to TV 9 2 9 Use external microphone 10 2 10 Use zoom function 10 2 11Use fill light function 10 2 12Use micro spur function 11 3Use the camera 11 3 1Movie Mode 11 3 1 1...

Страница 2: ...25 3 3 4 Playback Photo 26 3 3 5 Protect Photo 27 3 3 6 Delete Photo 27 3 4 Setting Mode 28 3 4 1 Language 28 3 4 2 Beep 29 3 4 3 Light Frequency 29 3 4 4 Power Save 30 3 4 5 TP Calibration 30 3 4 6 D...

Страница 3: ...ove the batteries if a foreign body or liquid has entered the camera Otherwise have danger of fire or electrocution Switch off the camera and remove the batteries once camera has been dropped down and...

Страница 4: ...ts dispose different wastes separately Waste batteries can t be disposed like domestic waste Consumers are obliged to return waste batteries to communal collection points or battery retailers Please u...

Страница 5: ...cro spur 3 0 inch touch screen WIFI wireless operation by mobile phone IR remote control Dual ultra bright flashlights cold warm color options Support external microphone Max support 64GB SD card Supp...

Страница 6: ...t press the key to turn on off fill light The switch sequence is as follows Warm light Code light Warm cold light Off Micro spur means micro spur mode close range shooting Remote receiver window Fill...

Страница 7: ...art play video Video key In Video mode press it to start Pause to record video In Video playback mod press it to stop recording Zoom key In Photo mode Video mode Zoon in out picture In Playback mode p...

Страница 8: ...and cause accidents Do not use substandard lithium battery and adaptor Adaptor specification Input AC 100 240V 50 60HZ output DC 5V 1 5A 2 3 Charge the battery 2 3 1Install the battery connect camera...

Страница 9: ...o save battery When the battery is low Low battery will shown on the screen and power off automatically later 2 5 Switch working modes 2 5 1The camera support three working modes and one Setting modes...

Страница 10: ...m Out key Photo Video mode Zoom out frame Playback mode Fast backward during play video Notice Before use remote control please take off the battery protective slice When use remote control please aim...

Страница 11: ...one optional accessory not supplied This camera supports to use external microphone Use external microphone can reduce the surrounding noise improve the voice quality of video and provide users better...

Страница 12: ...tch warm light cold light warm cold light off 2 12 Use micro spur The micro spur allows you to make a clear picture of the close range of photos video files Photo Video mode the micro spur switch can...

Страница 13: ...new memory card or delete the file in this memory card to continue recording The user can set the parameters in the video mode so that you can get more beautiful pictures The operation is as follows I...

Страница 14: ...uper Fine Fine Normal 4 Press Photo key to save and back press Menu key to back to video mode This function supports touch screen operation 1 In Video mode press Menu key to shift to the menu 2 Click...

Страница 15: ...lance This function can adjust the color deviation of the recorded video image according to the different light source environment Suggest use automatic mode 1 In Video mode press Menu key to shift to...

Страница 16: ...into sub menu click key and key on the screen to select 3 Select desired effect click Menu key on the bottom of screen to back to video mode 3 1 7DIS This function can turn on or turn off DIS when rec...

Страница 17: ...o back to video mode This function supports touch screen operation 1 In Video mode press Menu to shift to the menu 2 Click WDR enter into sub menu click the item of ON or OFF click Menu key on the bot...

Страница 18: ...10 Lapse Duration Lapse Duration is when the memory card is full the camera automatically restarts the recording from the first file of the memory card and overrides the old video file This function...

Страница 19: ...ion 2 Press Photo key to enter into the sub menu of Slow Motion 3 Press Zoom key to left right to select ON OFF 4 Press Photo key to save and back press Menu key to back to video mode This function su...

Страница 20: ...ded 5 If the memory card is full the screen displays SD card is full and a new memory card is needed to be replaced or the files in the card need to deleted to continue taking photos In the Photo mode...

Страница 21: ...ht select the desired photo quality Super Fine Fine Normal 4 Press the Photo key to save press the Menu key to back to photo mode This function supports touch screen operation 1 In Photo mode press Me...

Страница 22: ...de press Menu key shift to menu interface turn the Zoom key to the right select the Exposure 2 Press Photo key enter into the sub menu of Exposure 3 Turn the Zoom key to the left right select the desi...

Страница 23: ...lance to enter into sub menu of White Balance press to page up or page down 3 Click the desired option click Menu to back to photo mode 3 2 7 Effect This function is to set special effects of photos u...

Страница 24: ...n operation 1 In Photo mode press Menu key shift to menu interface 2 Click Stabilizer enter into sub menu of Stabilizer select whether to open this function click Menu to back to photo mode 3 2 9 WDR...

Страница 25: ...Menu key to back to photo mode This function supports touch screen operation 1 In Photo mode press Menu key shift to menu interface 2 Click Face Tracking enter into sub menu of Face Tracking select w...

Страница 26: ...Photo Burst 2 Press Photo key enter into the sub menu of Photo Burst 3 Turn the Zoom key to the left right select the desired option OFF 3photos 5photos 4 Press the Photo key to save press the Menu ke...

Страница 27: ...ed files in different file categories the operation method is as follows 3 3 1 Playback Video 1 Press Mode key shift to Playback mode turn the Zoom key to the right to select VIDEO 2 Press Photo key e...

Страница 28: ...finish setting this function according to instructions Notice Single protect cancel protection of the current file Protect All protect all files in the cameras Unprotect All cancel protection on all...

Страница 29: ...eos This function supports touch screen operation 1 In Playback mode turn Zoom key to left right to select VIDEO 2 Press Photo to shift to playlist click Menu on the bottom left of screen 3 Click Dele...

Страница 30: ...ed option Single All finish setting this function according to instructions Notice Single protect cancel protection of the current file Protect All protect all files in the cameras Unprotect All cance...

Страница 31: ...upports touch screen operation 1 In Playback mode turn the Zoom key to left right to select JPG 2 Press the Photo to shift to playlist click Menu on the bottom right of screen 3 Click Delete to enter...

Страница 32: ...o save and back to Setting mode This function supports touch screen operation 1 In Setting mode click Language 2 Enter into sub menu of Language click to page up or page down 3 Click the desired langu...

Страница 33: ...ction supports touch screen operation 1 In Setting mode click Light Frequency 2 Enter into sub menu of Light Frequency select the desired frequency then back to Setting mode 3 4 4 Power Save This func...

Страница 34: ...n supports touch screen operation 1 In Setting mode click TP Calibration 2 Enter into sub menu of TP Calibration select the desired option No Yes when selecting No it will disable this function when s...

Страница 35: ...ng No it will disable this function when selecting Yes press the Photo key to process and back to Setting mode The function supports touch screen operation 1 In Setting mode click Format 2 Enter into...

Страница 36: ...cting Version Info it will show current firmware press the Photo key to back to Setting mode If user want to update firmware they should copy the firmware to SD card insert the SD card into to camera...

Страница 37: ...nect to mobile phone 1 Switch the camera to Photo mode or Video mode long press DISP WIFI key Wi Fi ON will be shown on camera screen then user will see the interface like the second picture 2 Open th...

Страница 38: ...Appendix 5 1 Specification Image sensor CMOS 14 0MP CMOS sensor Memory medium Built in 16MBflash SD HCSD card up to 64GB ISO Auto ISO50 ISO100 ISO200 ISO400 ISO800 ISO1600 Lens Fixed lens F 2 4 f 7 3...

Страница 39: ...isn t formatted before use Format the memory card Memory card speed is too low Use class10 or faster memory card Memory card with protection Cancel the protection of memory card Picture video taken at...

Страница 40: ...perate the equipment NOTE This equipment has been tested and found to comply with the limits for a Class B digital device pursuant to part 15 of the FCC Rules These limits are designed to provide reas...

Отзывы: