background image

OWNER’S MANUAL / 

ELBA 45

11

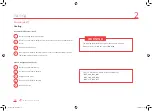
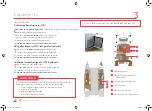
Connect engines circuit breakers

 (port and starboard engine compartments) and check that the 

windlass circuit breaker 

and the

 service circuit breaker

 are switched on.

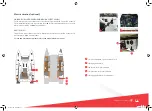
5

 b


V


Diesel plug hole

 a


V


Starboard engine stop switch

 b


V


Windlass circuit breaker

 c


V


Service circuit breaker 

 d


V


Port engine stop switch

e


V


Service circuit breaker

 a


V


Freshwater plug hole

Filling:

4

 a

 b

 a

 c

 b

 d

a

b

 b

 e

 d

 a

 c

01_gdu_ELBA_fp_EN.indd   11

28/08/2019   11:08

Содержание ELBA 45

Страница 1: ...ELBA 45 OWNER S MANUAL 01_gdu_ELBA_fp_EN indd 1 28 08 2019 11 08...

Страница 2: ...you have changed to a type of boat that you are not familiar with for your comfort and safety ensure that you acquire expe rience in handling and using the boat before taking command of it Your deale...

Страница 3: ...ng 19 3 Equipments page 21 V Deck 22 25 V Hull saloon 26 31 4Systems page 33 V Steering system 34 V Electricity 35 37 V Gas circuit 40 V Water 41 43 Manoverboard prevention 5 and man recovery page 51...

Страница 4: ...ELBA 45 01_gdu_ELBA_fp_EN indd 4 28 08 2019 11 08...

Страница 5: ...1 Technical Specifications V Manufacturer s plate 6 V Identity sheet 6 V Design category 6 V Characteristics 7 01_gdu_ELBA_fp_EN indd 5 28 08 2019 11 08...

Страница 6: ...Be very careful before going to sea Fountaine Pajot cannot guarantee the perfect ope ration of the boat in exceptional sea conditions violent storms hurricanes cyclones tornadoes etc The ELBA 45 is a...

Страница 7: ...esh water weight 700 kg 700 L Black and grey water weight 160 kg Liquids total weight 1250kg Surface of sails MAINSAIL GENOA GENAKER OPTIONAL 75 m2 806 ft2 49 m2 527 ft2 121 m2 1302 ft2 Inboard engine...

Страница 8: ...ELBA 45 01_gdu_ELBA_fp_EN indd 8 28 08 2019 11 08...

Страница 9: ...g V Entrance door 10 V Leaving the harbour 10 12 V Starting the engines 13 14 V Sailing 15 16 V Arriving in a harbour 17 V Anchorage 17 18 V Mooring and towing 19 2 01_gdu_ELBA_fp_EN indd 9 28 08 2019...

Страница 10: ...y hatches included covers deck hatches and windscreen panels The safety hatches are mentioned NEVER OPEN WHEN SAILING always respect this warning Sailing means that the boat is neither anchored moored...

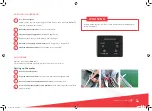
Страница 11: ...it breaker and the service circuit breaker are switched on 5 b V Diesel plug hole a V Starboard engine stop switch b V Windlass circuit breaker c V Service circuit breaker d V Port engine stop switch...

Страница 12: ...ctrical panel is in the position AUTO Open all gas valves bottle d and appliances b Open the diesel tanks valves Located under the bed frame on the rear port and starboard Check the navigation lights...

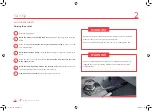
Страница 13: ...nts Volvo engines EVC System V Activate the EVC system by pressing on the ON OFF button STARTING THE ENGINES The EVC control panel cannot be deactivated if an engine is running WARNING STOP Pr chauffa...

Страница 14: ...RTING THE ENGINES NEXT 4 5 6 V Never activate the motor starter more than ten seconds to start up the engines as water may get into the exhaust and damage the engines V Before starting a sails navigat...

Страница 15: ...docked When anchored When not used whilst sailing Sail reduction table according to apparent wind Beating and close reaching Tailwind and broad reaching MAXIMUM SAIL AREA 0 18 knots 0 15 knots MAINSA...

Страница 16: ...k point is at 10cm approximatively above the boom 1 2 3 4 Classic reef system reef 2 et 3 Release the mainsail sheet Release the mainsail s halyard Strap the tack point Haul up the mainsail s halyard...

Страница 17: ...e diesel tank valves when stopped for a long period 1 2 3 4 5 6 Always let the engines run idle for a few minutes before shutting them down completely WARNING Unhook the safety hoist Drop the anchor a...

Страница 18: ...in by pulling hard on the security hoist this will jam the anchor on the davit and prevent it to damage davit or hulls Clamp the hoist to avoid the anchor moving on the davit 1 2 3 4 5 6 7 Raising the...

Страница 19: ...6 cleats a 2 x front 2 x middle 2 x aft a V Mooring cleats The cleats have a resistance of around 6000kg They are designed for a 18 polya mide rope For towing use the 2 front cleats to attach a 18 pol...

Страница 20: ...ELBA 45 01_gdu_ELBA_fp_EN indd 20 28 08 2019 11 09...

Страница 21: ...V Deck 22 25 V Hull saloon 26 31 3 Equipments 01_gdu_ELBA_fp_EN indd 21 28 08 2019 11 09...

Страница 22: ...a is located on the aft starboard skirt It is commissioned with two taps hot water cold water located in the port engine compartment and is activated by rotating the end of the shower a V Deck shower...

Страница 23: ...0 sec Max load on platform 150 kgs The platform holds two hinged stainless stell dinghy cradles which enables the dinghy to be secured with ratchet straps onto the platform The system is delivered wit...

Страница 24: ...the mainsail rail on the bimini The 12V connection is done on the service battery pack b The solar panels are protec ted by a specific circuit breaker c For use and maintenance please refer to the man...

Страница 25: ...ircuit breaker DAVIT WINCH This winch is connected to the service battery pack and runs on the 12V network It is protected by a 120A circuit breaker For use and maintenance please refer to the manufac...

Страница 26: ...ost the refrigerator regularly WARNING 90L galley freezer or 130L refrigerator optional Turn on the refrigerator switch on the electrical panel Set the freezer thermostat to the temperature required T...

Страница 27: ...r may be started locally in the fore technical hold or by remote from the command beside the switch panel The generator always has priority over the dock line The dock generator switch is selected aut...

Страница 28: ...water inlet valves in the gangways then check that the boat is connected to the dock or the generator is operating Each station is supplied by a specific line added on the AC network circuit breaker...

Страница 29: ...the heater tank via the switch on the electrical panel Each cabin is fitted with a control panel and can manage its heating For use and maintenance please refer to the manufacturer s manual a V Boiler...

Страница 30: ...12V or 220V For the 220V watermaker the power generator must be running For use and maintenance please refer to the manufacturer s manual a V Desalinator b V 220 V circuit breakers panel c V Remote c...

Страница 31: ...OWNER S MANUAL ELBA 45 31 01_gdu_ELBA_fp_EN indd 31 28 08 2019 11 09...

Страница 32: ...ELBA 45 01_gdu_ELBA_fp_EN indd 32 28 08 2019 11 09...

Страница 33: ...V Steering system 34 V Electricity 35 37 V Gas circuit 38 V Water 39 47 Systems 4 01_gdu_ELBA_fp_EN indd 33 28 08 2019 11 09...

Страница 34: ...d steering chain on one end and between turnbuckles and pull pull cables on the other end is to be carried out The emergency tiller is secured at the top of the port OR starboard rudder head It is onl...

Страница 35: ...the drawing DDF_ELC_062_732 12V DC engines network Battery coupling V The coupling between the service battery pack and the engine battery is triggered when the voltage on one of the packs exceeds 13...

Страница 36: ...fety instructions indicated on the battery during assembly V Do not smoke V Do not put tools on both terminals at once V Observe the assembly disassembly instructions V Observe the battery safety symb...

Страница 37: ...reaker before working on the electrical panel Locate the cause of the fault before resetting a fuse Open the electrical panel cover Press the reset button If the fuses blow regularly call an electrici...

Страница 38: ...n identical cable Connect the dock extension by rolling it out fully or start the power generator Check that the current is flowing using the light indicator on the 220V unit or 110V depending on the...

Страница 39: ...The boat can be fitted with an inverter charger b This inverter charger is powered with 12V by a service battery pack and protected by a circuit breakers panel For use and maintenance refer to the man...

Страница 40: ...butane V Ventilate well when using the cooking hob WARNING GAS CIRCUIT Open the pressure reducer shut off valve pressure reducer not supplied attached directly to the gas bottle Open the shut offvalv...

Страница 41: ...supply valve a is open at all times Switch on the fresh water pump function on the electrical panel 1 2 3 For more information please refer to drawings DDF_PLB_062_804 and DDF_PLB_062_805 The hot wate...

Страница 42: ...rocess Open the sea water inlet valve located at the bow in the port gangway The floor hatches open with a suction cup Switch on the sea water pump function on the electrical panel at the chart table...

Страница 43: ...open using suction cups Set the WC lever into water intake position Pump at least 10 times to flush and dilute the black water Set the WC lever into flushing position Pump a few times to empty the bo...

Страница 44: ...VACUATION 1 evacuation valve per holding tank accessible through the hatches in the showers Do not throw anything in the WC as it may block the check valves WARNING WATER NEXT Systems 4 a V Sea water...

Страница 45: ...a 25 A circuit breaker The starting up is initiated by a switch beside each toilets For more information please refer to drawings DDF_PLB_062_804 or depending to the layout version DDF_PLB_062_805 an...

Страница 46: ...the holding tank Never force the pump Storage capacity 90L WARNING In High sea By evacuating the black water into the sea open the evacuation valve When docked By pumping the waste deck fillers 1 2 F...

Страница 47: ...n a tank under the staircase floors which evacuates directly into the sea The necessary cleaning of these tanks and their sensors is done thanks to a screwed hatch Shower drainage For more information...

Страница 48: ...the central shower 1 seacock for the washbasin in the starboard owner s head accessible in the cabinet under the washbasin For more information please refer to drawings DDF_PLB_062_804 or depending to...

Страница 49: ...b a ELECTRICAL BOAT PUMP Check operation before navigation The boat is fitted with 4 electric bilge pumps with an automatic trigger V 1 per engine compartment V 1 per hull Activate the switch on the e...

Страница 50: ...ELBA 45 01_gdu_ELBA_fp_EN indd 50 28 08 2019 11 09...

Страница 51: ...Manoverboard prevention and man recovery 5 01_gdu_ELBA_fp_EN indd 51 28 08 2019 11 09...

Страница 52: ...e covered with an antiskid surface or teak covering which allows the crew to move on the boat in a secure way It is also recommended according to sea or wind conditions to wear safety harnesses and us...

Страница 53: ...OWNER S MANUAL ELBA 45 53 01_gdu_ELBA_fp_EN indd 53 28 08 2019 11 09...

Страница 54: ...ELBA 45 01_gdu_ELBA_fp_EN indd 54 28 08 2019 11 09...

Страница 55: ...Fire protection 6 01_gdu_ELBA_fp_EN indd 55 28 08 2019 11 09...

Страница 56: ...guisher s hose and trigger the extinguisher according to the manufacturer s instructions If you choose to install a carbon dioxide extinguisher it can only be installed in areas with powered up electr...

Страница 57: ...OWNER S MANUAL ELBA 45 57 01_gdu_ELBA_fp_EN indd 57 28 08 2019 11 09...

Страница 58: ...ELBA 45 01_gdu_ELBA_fp_EN indd 58 28 08 2019 11 09...

Страница 59: ...Preparing the winter season Handling V Water circuit 60 V Outside 60 V Engines 60 V Preparation 60 V Craning 60 7 01_gdu_ELBA_fp_EN indd 59 28 08 2019 11 09...

Страница 60: ...rubbing of ropes and moorings V To protect the engines please refer to the manufacturer s recommendation V The wintering of the engines must be carried out by a professional V Depending on the locati...

Страница 61: ...OWNER S MANUAL ELBA 45 61 01_gdu_ELBA_fp_EN indd 61 28 08 2019 11 09...

Страница 62: ...ELBA 45 01_gdu_ELBA_fp_EN indd 62 28 08 2019 11 09...

Страница 63: ...Maintenance V Drainage 64 V Running rigging sheets and ropes 65 V Periodic maintenance chart 66 68 8 01_gdu_ELBA_fp_EN indd 63 28 08 2019 11 09...

Страница 64: ...OWNER S MANUAL ELBA 45 64 Maintenance 8 DRAINAGE DATE SAILING TIMES FILTER CHANGE 01_gdu_ELBA_fp_EN indd 64 28 08 2019 11 09...

Страница 65: ...core 12 16fx 12 31 Reef 3 Polyester 24fx polyester braided core 12 16fx 12 34 Lazy 1 Polyester 16fx polyester core 6 23 Lazy 2 Polyester 16fx polyester core 6 6 Topping lift Polyester 16fx polyester c...

Страница 66: ...HLY Check tips of arrow bars ANNUALY Check and greasing pulleys MONTHLY Check ends of halyards ANNUALY Check the turnbuckles and crimping of shrouds ANNUALY Check shackles and blockers IN USE QUARTERL...

Страница 67: ...level of autopilot MONTHLY Change the autopilot oil SEE MANUFACTURER S INSTRUCTIONS MAINTENANCE Check tightening greasing cable lugs and power connectors QUARTERLY Check navigation lights and outdoor...

Страница 68: ...check by manufacturer SEE MANUFACTURER S INSTRUCTIONS Clean suction strainers ANNUALY MAINTENANCE Test electrical and manual bilge pumps IN THE BEGINNING IN USE Check water groups under pressure leak...

Страница 69: ...01_gdu_ELBA_fp_EN indd 69 28 08 2019 11 09...

Страница 70: ...Fountaine Pajot S A Z I 17 290 Aigrefeuille France fountaine pajot fountaine pajot com www fountaine pajot com cr ation graphique Seelab Studio www seelab fr 01_gdu_ELBA_fp_EN indd 70 28 08 2019 11 09...
Отзывы: