

2.
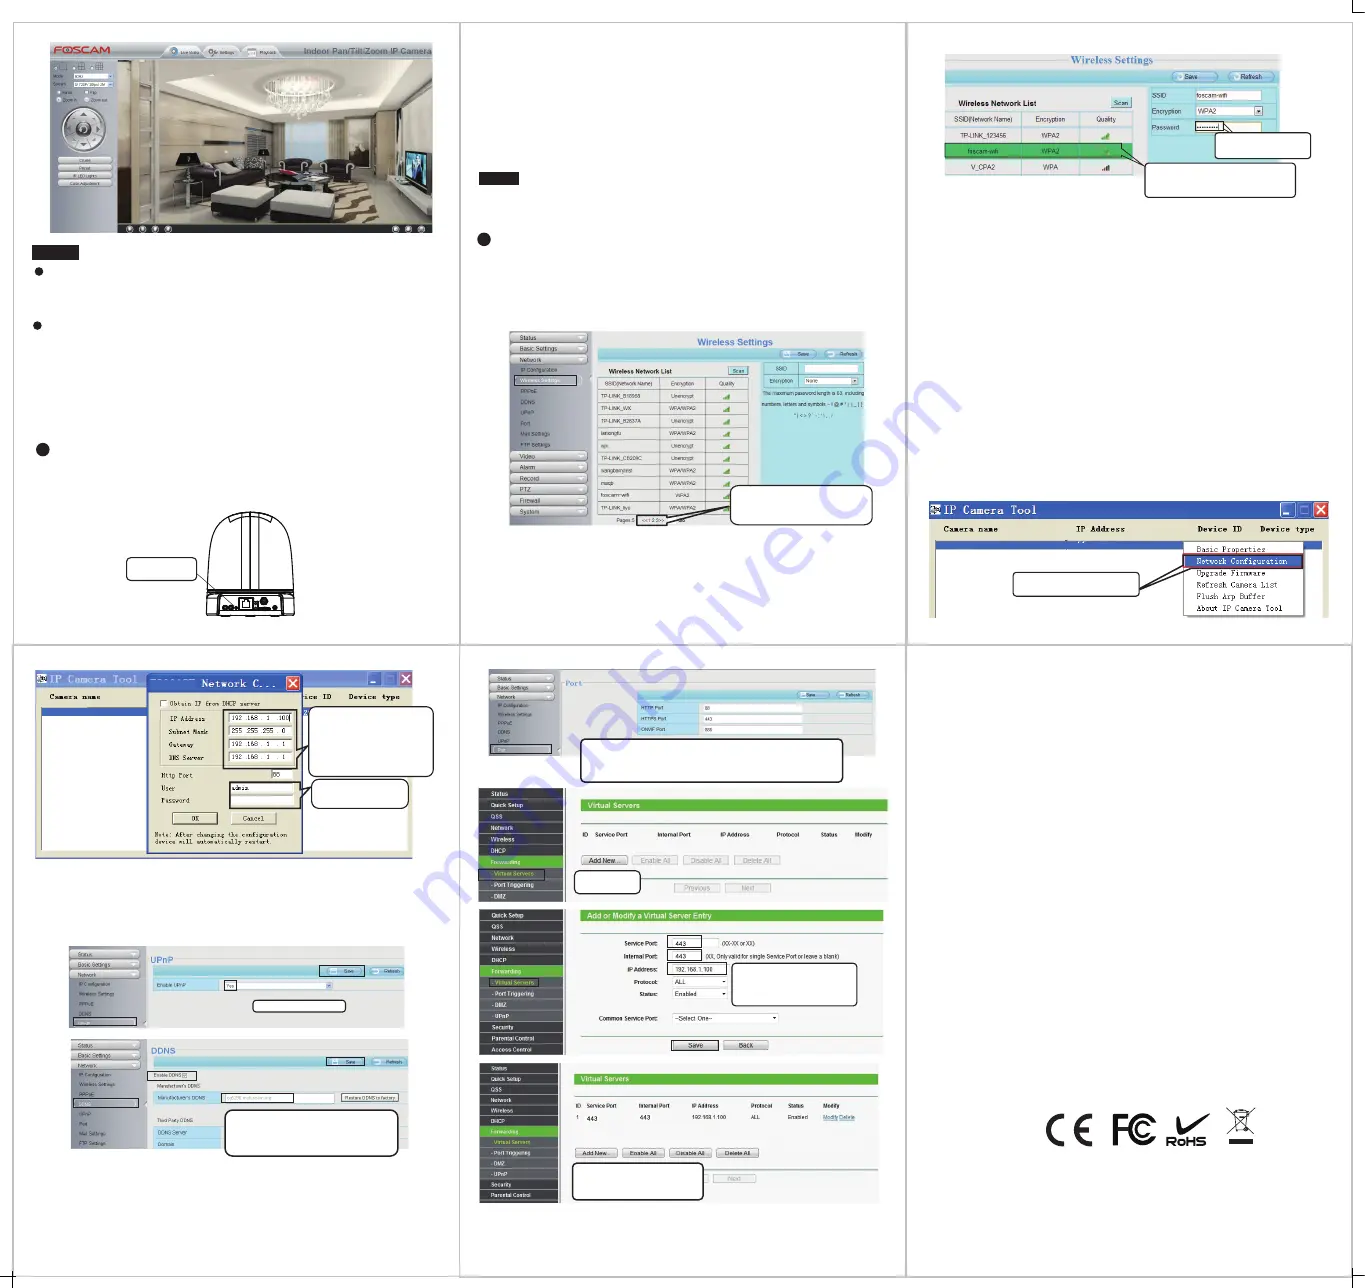
Click the SSID (name of your router) in the list, and the corres-
ponding SSID and encryption will be filled into the relevant fields
automatically on the right side of the page. All you need to do is
input the password for your wireless network.
1. Click the SSID (name) of your router,
and the corresponding information will
be filled in the fields.
2. Input the password of
your router.
1.
Choose
Settings
on the top of the camera page, then go to
the “
Network - Wireless Settings
” section on the left side of
the screen, then click
Scan
.
3.
Click the
Save
button and disconnect the network cable.
Don’t power off the camera until it is able to show up in the IP
Camera Tool. If the camera does not show up, try unplugging the
power cord from the camera and plugging it back in. It should
connect to the wireless network automatically.
1.
Run the IP Camera Tool, and assign an IP address for your
camera.
If you need to access your IP camera outside of your LAN, you
need to configure some settings on your router. Please follow the
corresponding steps:
2.
Enable UPnP and DDNS in the camera’s settings page. We
recommend you to use the Foscam DDNS by factory default, but
if you want to use the third party DDNS, please check the user
manual for further instructions.
3.
Configure port (HTTPS port) forwarding on your router. For
these steps, we will be using the
TP-LINK brand wireless router as
an example. First, we need go to the “
Forwarding – Virtual
Servers
” panel for setup. For other brands, you can check the user
guide or user manual of the router, or consult the manufacturer.
4.
Now you can access your IP camera by https://domain name:
HTTPS port via the Internet.
Foscam Digital Technologies LLC
www.foscam.us
5
Remote Access
7
Technical Support
6
Access the IP Camera by
Smart Phone
2.
Press the WPS button on your wireless router within 60 seconds.
The WPS button is usually on the front or back of your router. If you
are not sure about the WPS function of your router, please refer to
your router’s User Manual.
3.
The camera will automatically create a secure wireless connection
to your router in about 60 seconds. If you have connected the
network cable, please disconnect it.
:
Note:
Please set the security mode of your router to WPA-PSK/WPA2-PSK,
or the WPS settings may be failed.
If your wireless router doesn't support WPS function, please
setup by the following steps.
AUDIO
OUT IN WPS
ANT
DC 5V
SD
WPS Button
4
Wireless Connection
WPS (Wi-Fi Protected Set-up)
We recommend that you use WPS function to setup wireless
connection.
1.
Press and hold the WPS button for two seconds.
Click
Add New
.
If you want to access your camera on smart phone, please
search and install
Foscam Viewer
on APP Store or Google Play
for iOS or Android devices.
For details, please refer to the Android or iOS User Manual in the
CD.
Right click your camera and
click Network Configuration.
FI9826W
Http://192.168.1.100:88
You can see the port of your camera here.
If you want to set Remote Access for several cameras on the same
network, you will need to change the HTTPS port for each camera.
Notes:
If you forget your username or password, you can press and
hold the reset button on the bottom of the camera using a pin
for 5 seconds. This resets the camera to factory defaults.
If you want to access your camera over wireless or the Internet,
please continue with the setup by following the Wireless and
Remote Access steps below.
IP Address
: Set this in the same
subnet as your computer , or keep
it as default.
Subnet Mask
: Keep it as default.
Gateway
and
DNS Server
: Set it
to the IP address of your router.
Input the username and
password, click
OK
.
FI9826W
FI9826W
While we hope your experience with the IPCAM network camera
is enjoyable and easy to use, you may experience some issues or
have questions that this User’s Guide has not answered.
Please contact support via e-mail at
You
can also reach technical support at
1-800-930-0949
by
following the automated instructions.
Click through different pages to see
other wireless networks if there are
more than 10.
Input the port and IP address
of your camera and click
Save
.
Here you have finished the Port
Forwarding setup.
Click
Enable DDNS
and click
Save
.
The content in the Manufacture’s DDNS
column is the domain name of your camera.
Select
Yes
and click
Save
.


