background image

4 8

F O R T I F O N E - 4 5 0 i   A N D   F O R T I F O N E - 5 5 0 i   T E L E P H O N E   U S E R   G U I D E

Codec Priority

: Select the priority for audio codecs.

Centralized Conference: 

This parameter enables or disables server control and processing of 

conferences. When enabled, the server provides a single RTP stream for the conference. When 
disabled, the phone processes separate RTP streams for each participant, maximum 3-parties. A URL is 
required for centralized conference. FortiVoice does not use centralized conference.

Dialog BLF:

 This parameter enables or disables use of the Broadsoft BLF function that provides a 

location for BLF (Busy Lamp Field) indications for all DSS line types. If enabled, enter the URL of BLF 
server where the status information will be retrieved.

Options Timer:

 This timer sets the SIP options interval.

STUN Server Address:

 If required, enter a STUN server IP address or FQDN.

MWI Usage:

 Enable for indication of new messages for the registered voicemail system.

When done, press the 

Save

 button to store settings to the phone. 

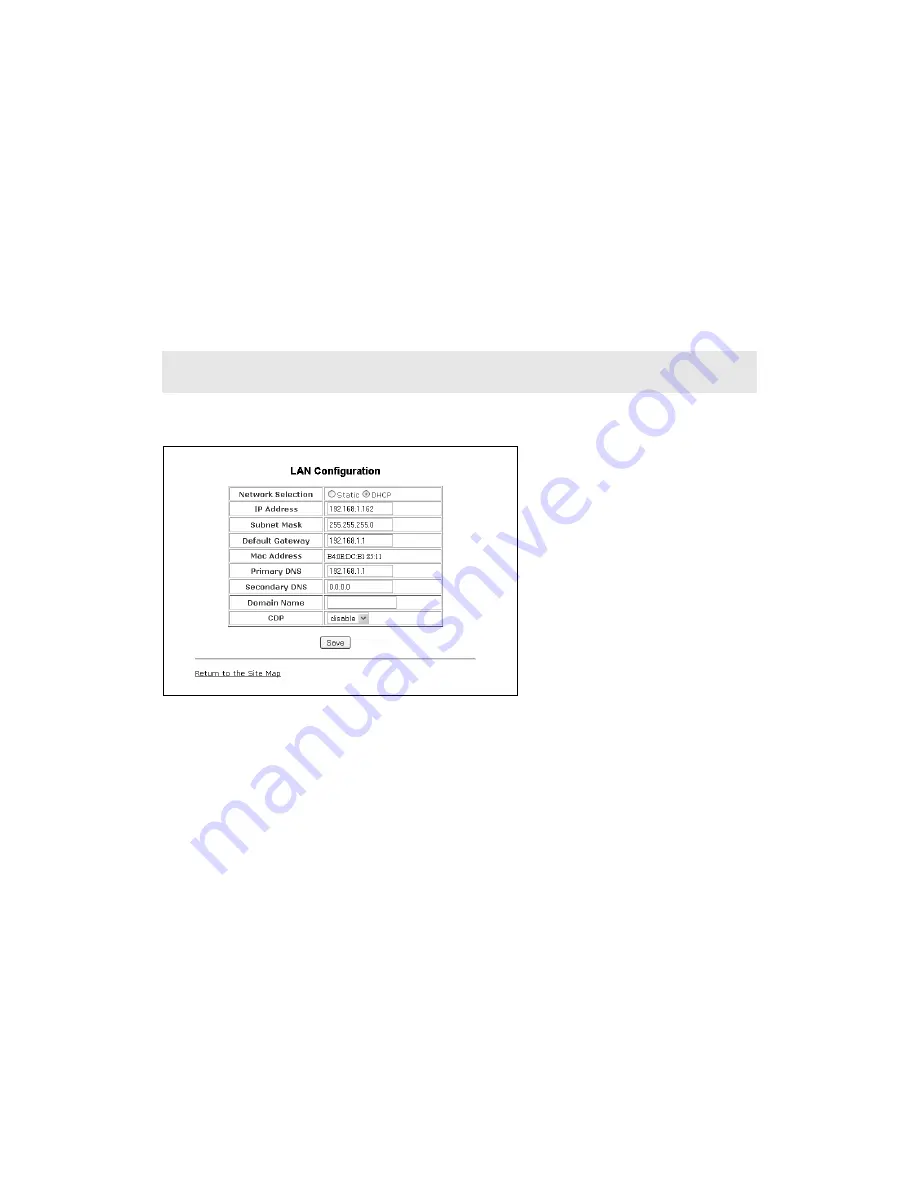
LAN CONFIGURATION 

The 

LAN Configuration

 page is used to set the network parameters required for proper operation when 

connected to a LAN. If using DHCP, then the values should be automatically filled and no edits required. 
For manual configuration, see the network administrator for IP information.

LAN Configuration

Network Selection:

 Select Static or DHCP. If Static selected, then manually assign the required IP 

parameters.

IP address:

 A valid IP address is required for the phone.

Subnet Mask:

 Enter the subnet mask for the LAN.

Default Gateway: 

Enter the default gateway IP address of the LAN.

Mac Address:

 Shows the MAC address of the phone LAN port. Not editable.

Primary DNS:

 IP address of the primary DNS server.

Secondary DNS:

 IP address of an auxiliary DNS server. Optional

Domain Name:

 Domain name for the LAN. Optional

CDP: 

Enable or disable for the use of the Cisco Discovery Protocol used for VLAN ID.

Changing the proxy server address, proxy port, outbound proxy, backup proxy, VMS address or local UDP port 
requires a reboot of the phone.

Содержание FortiFone-450i

Страница 1: ...FortiFone 450i and FortiFone 550i Telephone User Guide ...

Страница 2: ...ion 1 4 October 2011 Copyright 2011 Fortinet Inc All rights reserved Contents and terms are subject to change by Fortinet without prior notice Trademarks The names of actual companies and products mentioned herein may be the trademarks of their respective owners ...

Страница 3: ...w to Navigate through Menus 14 Entering Values with the Dial Pad and Softkeys 14 Setting a Hunt Group as an Access Code Prefix 14 Configuration Overview 15 Network Configuration 15 Network Mode 15 IP Address 16 Subnet Mask 16 Default Gateway 16 Primary DNS Address 16 Secondary DNS Address 17 MAC Address 17 VLAN Settings 17 VLAN Priority LAN 17 VLAN ID LAN 18 VLAN Priority PC 18 VLAN ID PC 19 CDP 1...

Страница 4: ...ble if optional Bluetooth module is installed 31 Pairing a Bluetooth headset 31 Bluetooth Headset Status Indicators 32 Connecting or Disconnecting a Paired Headset 32 Deleting a Headset from the Paired List 33 Bluetooth Module Information 33 Connect Mode 33 Call Preferences 33 Do Not Disturb 34 Call Waiting 34 Call Waiting Tone 34 Call Hold Ringback 35 Message Waiting Tone 35 Auto Answer 35 Anonym...

Страница 5: ...plex Dial Plan 54 2nd Dial Tone 54 Phone Information 55 Phone Settings 56 Phone Settings 56 Functions 57 Ring Settings 57 User Define Rings RTTTL 57 Phone Book 58 Loading a contact list using a web browser 59 Downloading the phone book to a file on a PC using a web browser 59 Multicast Paging 60 Paging Prefix 60 Priority Paging Group 60 General Paging Group 60 Programmable Keys 61 Call Log 62 Netw...

Страница 6: ...E 550I PHONE WITH FORTIVOICE 74 Access an outside line 74 Accessing Features 74 Voicemail 75 Updating the Firmware 76 Checking for Updates 76 Internet Update 76 After the Update 76 Using the IP Phone Update Utility 76 TROUBLESHOOTING 77 Information 77 Troubleshooting Guide 78 APPENDIX A SPECIFICATIONS FORTIFONE 450I FORTIFONE 550I 79 Hardware Specifications 79 APPENDIX B CHARACTER TABLE FOR DIAL P...

Страница 7: ...sage waiting with indicator lamp and tone Full duplex speakerphone Intercom paging with other FortiVoice extensions Built in two port 10 100 Ethernet switch Lets you share a connection with your computer Inline PoE support eliminates the need for power adapters Optional Bluetooth module compatible with supported headset models FortiFone 550i only Using two FortiFone 50e expansion modules REQUIREME...

Страница 8: ...n buttons Left use to view previous menu when return arrow appears in LCD menu Press to go back to previous menus while in the configuration menus Right use to see additional menu items when appears in LCD menu Up use to view Call Log when phone is idle Down use to access Phone Book while phone is idle OK center button use to select current item or save value in LCD menu Configuration Pressing thi...

Страница 9: ... three context sensitive softkeys located just below the LCD Below is a list of icons and their meaning FortiFone 550i only LAN or Network connection icon indicates the status of the LAN connection to the IP phone If the icon is blinking check the LAN connection PC port icon when displayed indicates a device such as a PC is connected to the PC port of the IP phone Bluetooth icon indicates the opti...

Страница 10: ...nnect a headset When blinking slowly the Bluetooth headset is in use INSTALLING THE FORTIFONE 450i FORTIFONE 550i CONNECTING THE IP PHONE The figure below shows the cable connections for your IP phone The LAN and desktop PC connections employ standard Category 5 cables terminated with RJ 45 connectors The FortiFone 450i FortiFone 550i supports PoE Power over Ethernet in accordance with the IEEE 80...

Страница 11: ...55 angle 30 angle Figure 3 Installing the foot stand Wiring Chart 1 LAN Connect the IP phone LAN port to the LAN wall jack with the provided Ethernet cable 2 PC Optionally connect the IP phone PC port to your desktop PC with an Ethernet cable not supplied 3 Power If the LAN port supports PoE then the power adapter is not required If PoE is not supported on the LAN connect the power adapter to the ...

Страница 12: ...so note the stand must not be attached to the phone when mounting on a wall Remove the handset hook from the phone as shown in the figure below Reverse the hook and re install in the phone so that the hook catches the groove in the handset receiver Complete all wiring Figure 4 FortiFone 450i FortiFone 550i wall mount installation PROVISIONING THE FORTIFONE 450i FORTIFONE 550i WITH FORTIVOICE If us...

Страница 13: ...ata IP address of the phone Default gateway address Subnet mask Two methods are available for manual configuration The LCD Configuration Menu permits local configuration using the dial pad and softkeys The second method employs the FortiFone 450i FortiFone 550i Web Manager which allows access to the IP phone configuration using a Web browser If configuring the phone for the first time it is recomm...

Страница 14: ... the Mode softkey switches the dial pad mode The dial pad mode displays in the right of the LCD above the softkeys as for numeric for upper case characters for lower case characters and for special characters To enter characters with the dial pad use the digit with the desired character Press the same digit repeatedly until the desired character appears in the LCD After entering a character pause ...

Страница 15: ... Network Configuration menu allows the access and configuration of the network parameters for the phone Network Mode The phone is capable of obtaining all of its IP configuration data from a DHCP server When a DHCP server is not available static address parameters can be used Selecting Static requires the manual entry of other several network parameters including IP address of the phone Default ga...

Страница 16: ...one requires a valid subnet for proper operation To enter the Subnet Mask Press the button then select 1 Network Configuration then 3 Subnet Input the Subnet Mask using the dial pad and press the OK softkey to save the changes Default Gateway Selecting static addressing for the Network Mode requires manual entry of a default gateway address The IP Phone requires a valid default gateway address for...

Страница 17: ...EEE 802 1p Q standards Separate VLAN tags are assigned for the IP phone PC port and the LAN voice port With a VLAN ID assigned only frames with the assigned ID are accepted and all SIP and voice frames sent by the FortiFone 450i FortiFone 550i include the VLAN ID assigned to the LAN port FortiVoice phone systems do not support VLAN tagging so this should not be used with FortiVoice phone system de...

Страница 18: ...dial pad and press the OK softkey to save your entry VLAN Priority PC The VLAN Priority PC establishes the priority for Ethernet frames for the phone PC port Setting the VLAN ID to zero 0 disables VLAN framing and the phone will use only standard Ethernet frames To assign the VLAN Priority for the PC port Press the button then select 1 Network Configuration then 8 VLAN Select 3 VLAN Priority PC In...

Страница 19: ...plays only if function_cdp is enabled in the configuration file As a default the CDP parameter is disabled since FortiVoice does not use VLAN tagging To set the CDP status Press the button then select 1 Network Configuration then 9 CDP Select the desired softkey Yes or No to enable or disable CDP Changing the VLAN Priority requires a reboot of the phone When you exit the menu you will receive a re...

Страница 20: ...guration Line Parameters Assign parameters in this section for each SIP line SIP Server Address The SIP Server Address is the IP address or FQDN of the SIP server or PBX Different SIP servers can be defined for each line To assign the Call Server address Press the button then select 2 SIP Configuration then 1 Line Configuration Enter the line button number or move the cursor using the Down softkey...

Страница 21: ... SIP Configuration then 1 Line Configuration Enter the line button number or move the cursor using the Down softkey and press the Select softkey to select a line Select 3 Display Name Input the Display Name using the dial pad and press the OK softkey to save your entry User Name A User Name extension or phone number is required for proper operation and must match the user ID or account assigned in...

Страница 22: ...d in the SIP server using the dial pad and press the OK softkey to save your entry Authentication Password Authentication of the line with the SIP call server requires an Authentication Password in conjunction with the User Name To assign the Authentication Password Press the button then 2 SIP Configuration then 1 Line Configuration Enter the line button number or move the cursor using the Down so...

Страница 23: ...ible only to the associated phone In addition the status of an active or held private line call displays only at the associated phone Only the active user may transfer or conference calls on a private line A BLA appears at line buttons of more than one phone All phones with an appearance can access incoming and held calls on the BLA and receive status information for the call Note for proper opera...

Страница 24: ... Outbound Proxy Address If required an Outbound Proxy Address can be defined so that the phone sends all SIP requests to the proxy instead of the SIP server configured in the section SIP Server Address on page 20 The address can be an IP address or FQDN To assign an Outbound Proxy Address Press the button then select 2 SIP Configuration then 2 Outbound Proxy Addr Input the Outbound Proxy Address u...

Страница 25: ... Address Input the Backup Proxy Address using the dial pad and press the OK softkey to save your entry Backup Proxy Port The Backup Proxy Port defines the port used when sending SIP messages to the backup proxy defined in the section Backup Proxy Address on page 25 To assign the Backup Proxy Port Press the button then select 2 SIP Configuration then 5 Backup Proxy Port Input the Backup Proxy Port ...

Страница 26: ... The default port used for RTP packets is 23000 To change an RTP Start Port Press the button then select 2 SIP Configuration then 7 RTP Start Port Input the RTP Start Port using the dial pad and press the OK softkey to save your entry Proxy Registration If Proxy Registration is set to Yes the phone will register with the appropriate SIP or proxy server upon initial power up during a reboot and at ...

Страница 27: ...ry Voicemail URL The Voicemail URL is used to access the voicemail of a host service or PBX If not configured by the host service or PBX then it should be configured accordingly To assign the Voicemail URL Press the button then select 2 SIP Configuration then 10 Voicemail URL Input the Voicemail URL using the dial pad and press the OK softkey to save your entry Domain The Domain specifies the doma...

Страница 28: ...he contrast of the LCD is adjustable for best viewing angle To adjust the LCD contrast Press the button select 3 Phone Settings then 1 LCD Contrast Press the Down softkey to decrease the contrast or press the Up softkey to increase the contrast To configure another parameter press the Back softkey to continue or press the button to exit the configuration menu Ring Settings The IP phone has 9 ring ...

Страница 29: ... on the line as specified in the previous Default Ring Type section Press the Select softkey to save the selection To configure another parameter press the Back softkey to continue or press the button to exit the configuration menu Delayed Ring The phone can delay when the audible ring tone is played for incoming calls by up to 10 seconds To configure the Delayed Ring option Press the button then ...

Страница 30: ...or phone s web interface Note Local settings will be overridden by the FortiVoice settings when a configuration file is downloaded to the phone if the key was not configured by the administrator as User Defined Time Configuration Within the Time Configuration menu the IP Address or FQDN of the desired Simple Network Time Protocol SNTP server and the local time zone are defined In addition Daylight...

Страница 31: ...gs menu Press 1 1 to access the Backlight menu Use the Up and Down softkeys to see other options then press the OK softkey to enable the new setting Press the button to exit the configuration session Bluetooth FortiFone 550i only visible if optional Bluetooth module is installed The FortiFone 550i phone can be equipped with an optional Bluetooth module With the module installed up to 5 Bluetooth h...

Страница 32: ...eadsets paired to the phone When blinking rapidly the FortiFone 550i is searching or attempting to pair with a headset Bluetooth paired icon indicates one or more maximum 5 headsets are paired with the module but none are active When blinking rapidly the FortiFone 550i is attempting to pair or connect a headset Bluetooth connected icon indicates a headset is connected to the FortiFone 550i When bl...

Страница 33: ...uetooth Module Information The Bluetooth module has a universally unique identifier assigned to it Example 00 22 A5 21 AA C1 To view the UUID for the Bluetooth module installed in a FortiFone 550i Press the button Dial 3 to access 3 Phone Settings then dial 12 to access 12 Bluetooth Dial 2 to access 2 Local Device Info to display the UUID Press the button to exit the menu Connect Mode The Bluetoot...

Страница 34: ...to indicate the new call and an optional beep tone is delivered over the existing conversation In addition the LCD displays the incoming Caller ID during the notification If Call Waiting is disabled the phone will return a busy status to the phone system and it will handle the call accordingly By default Call Waiting is enabled on all FortiFone 450i FortiFone 550i phones To enable disable Call Wai...

Страница 35: ...ssage wait indication Press the button then select 4 Call Preferences then 5 Msg Waiting Tone Press the On softkey to enable stutter dial tone or press the Off softkey to disable stutter dial tone Press the Back softkey or the button to exit the menu Auto Answer For incoming calls the phone can automatically engage the speakerphone or headset To enable disable Auto Answer Press the button then sel...

Страница 36: ...ength DIRECTORY Phone Book The phone supports 80 contacts that can be entered via the phone or via the web interface Each contact can have a ring type assigned When a call is received from the contact the specified ring signal is used to override the default ring type The Phone Book menu is accessed through the LCD menu or when assigned a Phone Book flexible button From the Phone Book menu records...

Страница 37: ...ntries to ensure they are properly imported If the file did not upload please check the file contents to ensure no conditions exist that might cause the phone to reject the file To add entries to the Phone Book using the telephone interface Press the button then select 5 Directory then 1 Phone Book Press the Add softkey Enter a name for the new contact then press the OK softkey Enter a phone numbe...

Страница 38: ... the contact and press the OK softkey Deleting a Phone Book Record To delete a Phone Book record Press the button then select 5 Directory then 1 Phone Book Select a contact to delete using the Down softkey Press the Right navigation button to scroll to the additional softkey options Press the Delete softkey Confirm by selecting the Yes softkey Caution this action deletes the record from the Phone ...

Страница 39: ... press the OK softkey The search result displays showing the Speed Number Name and number Dialing from the Phone Book To dial a number from the Phone Book Press the button then select 5 Directory then 1 Phone Book Select a contact to dial using the Down softkey or search using the Find softkey Press the Dial softkey to place the call To dial a contact using a flexible button programmed for Phone B...

Страница 40: ...sed and Received call logs the Access Code Prefix is automatically inserted if configured This is important if you normally are required to dial a hunt group to access an outside line For the Outgoing Calls log the number is dialed exactly as shown To dial from a log While viewing an entry press the Dial softkey To edit an entry before placing a call While viewing an entry press the Right navigati...

Страница 41: ...e to factory defaults or press No to cancel LOCK UNLOCK CONFIG If required some of the critical configuration parameters can be locked to prevent accidental changes These include Network settings SIP setting and Flexible key assignments To lock portions of the configuration Press the button then select 7 Lock Unlock Config Enter a password then press OK Confirm the password then press OK Store the...

Страница 42: ...ersion Press the button then select 8 Information Press the Up or Down softkeys to scroll through the parameters Press the button to exit the menu REBOOT After changing certain parameters the phone will require a reboot to utilize the settings These settings include the following Network Configuration settings TFTP Server Address settings Software Update settings Default settings After a FortiVoic...

Страница 43: ...O R T I F O N E 5 5 0 i T E L E P H O N E U S E R G U I D E 43 Press the Yes softkey to reboot the phone or press No to cancel this menu If you press No any parameter changes will only update after the next reboot FortiFone 550i screen ...

Страница 44: ... with a FortiVoice phone system or other system which automatically provides the configuration for the phone then many key parameters should not be changed as they will revert to their preconfigured settings after the phone is rebooted and retrieves a configuration file LOGIN SITE MAP Point your browser at the IP address currently assigned to the FortiFone 450i FortiFone 550i phone Example http 10...

Страница 45: ...I D E 45 Once logged in the following Site Map page is loaded The Site Map page is divided into 2 sections the left hand navigation menu and page content on the right side for the various sections Select the desired page from either the navigation menu or the site map FortiFone 550i screen ...

Страница 46: ... D E VOIP CONFIGURATION At the top of the VoIP Configuration page is a table indicating the SIP lines available Selecting a line from the list will display the characteristics assigned for the line If the phone is provisioned with a FortiVoice system these values will automatically be assigned ...

Страница 47: ...nabled the phone will automatically enter speakerphone mode for incoming calls on this line Registration Status Shows the registration status of the phone Refresh the page if it doesn t match the status indicated on the phone General Parameters Outbound Proxy Address The IP address or FQDN of the outbound proxy server to receive SIP requests in place of the line based Proxy Server Outbound Proxy P...

Страница 48: ...sages for the registered voicemail system When done press the Save button to store settings to the phone LAN CONFIGURATION The LAN Configuration page is used to set the network parameters required for proper operation when connected to a LAN If using DHCP then the values should be automatically filled and no edits required For manual configuration see the network administrator for IP information L...

Страница 49: ...ll follow the busy response configuration Call Waiting Tone When enabled a tone is played to the user along with Caller ID information to announce the new call Call Hold Ringback When enabled the phone rings if the user has taken a 2nd call then terminated the call with another caller still on hold Message Waiting Tone When enabled a stutter dial tone is played when first going off hook and a new ...

Страница 50: ...r defines the destination for a direct call Direct Call Timer sets a delay timer for Warm Line operation The timer specifies the period before placing a direct call The timer supports 1 second increments from zero 0 to ten 10 seconds For Hotline operation set the timer to zero 0 seconds To modify parameters on the Call Preferences screen Select the desired parameter and enter or select the new val...

Страница 51: ...en digit number is dialed or if the Operator is dialed 0 From the above table if the user dials 0 as the first digit the phone will pause for additional digits After the pause if no additional digits are dialed the phone places a call to the Operator In addition after the user dials any seven digits the call is processed Complex Dial Plan Customer requirements Process the call after the local Oper...

Страница 52: ...able under the Dial Plan Type Enter the desired values into the respective boxes Select the Add Entry button To delete an entry from the Current Routing Table Select the check box in front of the desired entry Click the Delete Entry button To delete all the entries Enter all as the index Click the Delete Entry button 91 0 NULL NULL NULL 0 0 0 0 0 9011 0 NULL NULL NULL 0 0 0 0 Number TRNC Pre Post ...

Страница 53: ...gits to insert in front of the number including if truncated Post Defines the digits to insert at the end of the number including if truncated The following are examples of dial plans using the digit map tables Simple Dial Plan Customer requirement Process the call after any seven digit number is dialed or if the Operator is dialed 0 Digit map routing entry The digit map of this Dial Plan is 0T xx...

Страница 54: ...or an international number starting with 9011 is dialed Digit map routing entry The dial plan for this is 0T 00T 3 5 xxx 8xxxxxxx xx 91xxxxxxxxxx 9011x T 2nd Dial Tone A second 512 character string map is employed to provide 2nd Dial Tone Customer requirements To provide second dial tone after a 9 is dialed establish a Dial Plan as below In the Digit Map 2nd Dial Tone text box the dial plan for th...

Страница 55: ...ys useful information for the FortiFone 450i FortiFone 550i phone In addition it is possible to change the Web Manager password from this page To change the phone name Enter the desired name When complete press the Save button To change the password Enter the existing password Enter the new password then confirm When complete press the Save button ...

Страница 56: ...stand the settings DTMF Payload Configure the payload type for DTMF signals according to RFC 2833 Do not change this value if you do not understand the settings DTMF Duration Configure the duration of DTMF signals sent from the phone in milliseconds Do not change this value if you do not understand the settings The Number of Lines Sets the number of flexible buttons allocated for lines The minimum...

Страница 57: ...he button is pressed a second time Display DTMF If disabled digits entered after a call is placed will not appear This is useful for security purposes where a PIN code or Access Code is required to gain access to external lines or features Ring Settings Ringer Type Sets the default ring type from one of 14 ring signals Ringer Set to On to enable the ringer or Off for no ring The phone will still s...

Страница 58: ...Information is purely an optional field For example you might enter company names or e mail addresses if desired When complete select the Save button to store the record To modify an entry Select Modify for the desired record and enter the new values in the Phone Book Entry screen When complete select Save to store the modified record To place a call using the Phone Book Click the Dial button for ...

Страница 59: ...ally be prepended with 0 Example 1 will be stored as speed dial 01 The number of entries cannot exceed 80 An optional header can be included at the beginning of the CSV file as shown above It is not required Downloading the phone book to a file on a PC using a web browser To backup the phone book to a file Press the Download button to save the records in a CSV format We recommend you select the op...

Страница 60: ...he case where the phone is already in use the user will see softkey options to accept or reject the page Paging Prefix Enter the prefix that will be sent from the phone when initiating a group page Priority Paging Group A priority page will override any general page in progress For example one might want to configure all phones to accept a priority page in case of a fire When a page is made to thi...

Страница 61: ...r defined in FortiVoice software shown as None in the web interface of the phone these keys can be programmed from the phone or web interface and will not be overwritten when a configuration file is loaded onto the phone via the FortiVoice system To change key functions Select the function from the drop down menu next to the key For a Speed dial key enter the contact number For a Message key enter...

Страница 62: ...all established NOK From the Call log the user can call a contact or store a record directly to the Phone Book To add a number from the Call Log to the Phone Book list Select the Add button If an Access Code Prefix such as a Hunt Group has been programmed into the phone then it will be inserted when an outbound call is placed from the Phone Book Do not add to the phone book entry To delete all Cal...

Страница 63: ...rver Address Enter the URL or IP address of the SNTP server that will be used to synchronize the date and time for the phone Example time nrc ca Time Zone Select the time zone that matches the location of the phone DST Daylight Savings Time Enable DST if applicable in your region Ensure DST configuration parameters are properly configured for the start and end of the DST cycle Time Format Sets the...

Страница 64: ...n be configured to start and end on specific dates or switch according to a day of the week in a certain month typically used in North America Known public SNTP servers that can be used ntp nasa gov pool ntp org tick ucla edu time nrc ca To modify parameters on the Network Time screen select the desired parameter and enter new values or select values from the drop down menus When complete press th...

Страница 65: ...On the Upgrade Configuration page the results of the most recent download attempt are displayed at the top In addition the following parameters can be modified TFTP HTTPS Select the protocol that will be used to connect to the server where configuration and software files are stored TFTP Server Address Enter the IP address or FQDN of the TFTP server where configuration and firmware files are locat...

Страница 66: ...CA from the server When the CA is not available in the phone memory paste the Root CA in this area of web page File to Upgrade Select the S W check box if the phone should check for new firmware files on bootup Select the Configuration check box if the phone should check and download during bootup We recommend you leave both enabled If no new files are found no changes are made Decryption Key If r...

Страница 67: ...ly supported The phone PC and LAN voice ports use separate VLAN tags With a VLAN ID assigned only frames with the ID are accepted and frames sent from the phone include the LAN port ID and priority In addition the PC LAN ports and the default gateway must be assigned to employ the VLAN tags for proper operation Jitter Buffer Configuration A jitter buffer stores incoming packets to allow for re seq...

Страница 68: ...o set the phone to the default configuration Select the Load button Note All settings will be lost The phone will load the default configuration and automatically reboot REBOOT To reboot the phone Select the Reboot button The phone will reboot Modifications made to the IEEE 802 1p Q configuration require a reboot of the phone If CDP is enabled manual VLAN settings are overwritten during a reboot o...

Страница 69: ...n be placed with the handset on hook or off hook This is similar to a mobile phone The phone supports a technique called store and forward dialing After you dial a digit the IP phone waits about 5 seconds for additional digits If you do not dial additional digits the phone sends the digits you dialed to the phone system for processing When done dialing press the Dial softkey or key to place the ca...

Страница 70: ...ing the transfer To transfer an active call Press the button or the Transfer softkey The active call status changes to hold and you receive dial tone to dial an alternate extension number Dial the extension or phone number or press a preprogrammed flexible key linked to an extension Wait for the remote party to answer and announce the transfer Hang up the handset to complete the transfer or press ...

Страница 71: ...red in the phone system for Call Waiting while on a call the line button flashes and a beep tone is played to you over the active conversation to indicate the new call In addition the LCD displays the incoming Caller ID so you know who is calling before deciding to interrupt the current call To answer an incoming call while on a call Press the Answer softkey The first call will be placed on hold a...

Страница 72: ...of an incoming call thus allowing you to work without interruptions from incoming calls Calls will be routed according to the settings programmed for your extension or service To activate DND While the phone is idle press the button When active the button LED illuminates red and Do not disturb is displayed on the LCD To deactivate DND Press the illuminated button again MUTING A CALL Mute toggles t...

Страница 73: ... extension Press the flexible key associated with the extension you wish to call For privacy lift the handset or press the button To blind transfer a call Press the flexible key associated with the extension The phone will transfer the call To answer a call ringing at a monitored extension Press the flexible key associated with the extension that is ringing flashing green For privacy lift the hand...

Страница 74: ...ciated with the call in the queue Otherwise dial 7 to retrieve the next caller in your queue Answer FortiVoice call waiting Press the Answer softkey or press the flashing line appearance key Screened transfer Press the button extension or outside number To complete the transfer press the Transfer softkey or hang up To cancel transfer press the EndCall softkey and then the Resume softkey to connect...

Страница 75: ...g extension PA overhead paging Press the programmed Overhead Paging key or dial 0 Attach account code to last call At dial tone dial 88 When prompted enter Account code CDR logging must be active VOICEMAIL Access Mailbox Locally Press the Vmail softkey or the button Access Mailbox Remotely Press mailbox number Change greeting options Dial 2 Change personal options password date stamp remote notifi...

Страница 76: ...ill be required once the update is complete Clear the current entry and enter tsphones talkswitch com Once changed the phone will request a reboot Select Yes After the Update Press the button Press 3 for Phone Settings then select 7 Firmware Update Press 2 to access the TFTP Server Address Enter the IP address that was previously entered to point the phone back to your FortiVoice phone system Once...

Страница 77: ...s IP address default gateway address and subnet mask server IP addresses SIP servers TFTP server and SNTP server results of the last file download attempt boot version and hardware and firmware version This information may be useful if calling Fortinet Support Press the button then select 8 Information Press the Up or Down softkeys to scroll through the parameters Press the button to exit the menu...

Страница 78: ...dress or reboot the phone to try having the DHCP server assign an IP address No audio during a call If the phone is outside the LAN where the phone system resides then ensure the proper ports are open on the firewall to ensure calls can make it through The phone has locked up or the screen is blank but there is power A phone lock up may be caused by a communications error during a firmware upgrade...

Страница 79: ...icators Message indicator speakerphone mute DND headset red LEDs 10 programmable buttons with multi colored LEDs FortiFone 450i 22 programmable buttons with multi colored LEDs FortiFone 550i LCD 240 x 42 dot graphic FortiFone 450i 240 x 56 dot graphic FortiFone 550i Physical Size H x W x D 20 8 x 22 3 x 10 5 cm 8 1 x 9 25 x 2 inches Weight 1 3 Kg AC DC Adapter Output 48VDC 0 3A max Input 100 240 V...

Страница 80: ... FortiFone 450i FortiFone 550i supports a special character mode for en terni ng non numeric characters The table below covers all possible character options Digit DIal Pad Mode Upper Case A Lower Case a Symbols 1 2 A B C a b c 3 D E F d e f _ 4 G H I g h i 5 J K L j k l 6 M N O m n o 7 P Q R S p q r s 8 T U V t u v 9 W X Y Z w x y z 0 Space Space ...

Страница 81: ...ns However there is no guarantee that interference will not occur in a particular installation If this equipment does cause harmful interference to radio or television reception which can be determined by turning the equipment off and on the user is encouraged to try to correct the interference by one of the following measures Reorient or relocate the receiving antenna Increase the separation betw...

Страница 82: ...Compliance with IEC for Electrical Equipment IECEE Safety of Information Technology Equipment CAN CSA C22 2 No 60950 1 UL 60950 1 E 911 AND USE OF THE FORTIFONE 450i FORTIFONE 550i WITH MULTI LINE TELEPHONE SYSTEMS Please note the use and operation of this phone as part of a multi line telephone system MLTS may be subject to state and or federal E 911 MLTS laws that require the MLTS to provide a c...

Страница 83: ... http www fortinet com fortivoice WARRANTY REPAIR SERVICES Should the set fail during the warranty period In North America please call 1 866 393 9960 for further information Outside North America contact your sales representative for return instructions You will be responsible for shipping charges if any When you return this telephone for warranty service you must present proof of purchase ...

Страница 84: ...8 4 F O R T I F O N E 4 5 0 i A N D F O R T I F O N E 5 5 0 i T E L E P H O N E U S E R G U I D E ...

Страница 85: ...www fortinet com ...

Отзывы: