ForTheRecord DMX8 Скачать руководство пользователя страница 7

Page 3 

Recording Equipment 

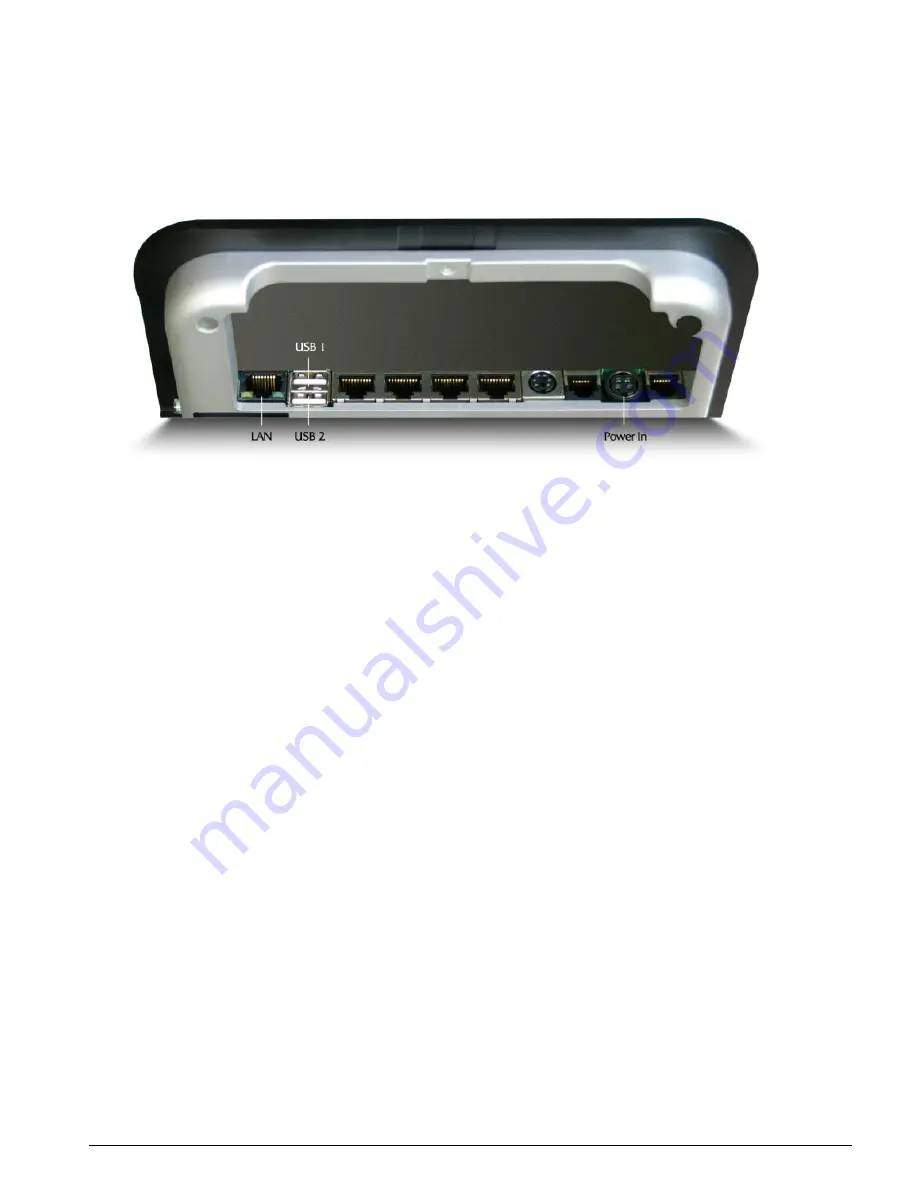
Connect the USB output of the DMX8 USB Mixer directly to 

USB 1

 on the rear panel of the FTR 

Touch unit - using the supplied USB cable. 

Monitoring Equipment 

The Monitor outputs on the DMX8 USB Mixer may be used for a range of different purposes 
including telephone and/or video conferencing, public address via an amplifier and/or powered 
speakers or for an analog audio feed for backup or other archival requirements. 

Testing 

Have another person speak into each microphone at normal to loud levels.  Watch the 
corresponding Input Level LED on the front panel of the DMX8 USB Mixer.  As each microphone 
is tested the LED should flash green.  It is acceptable for the LED to flash red occasionally with 
loud speech.  If the microphones are placed close together the voice test should be accompanied by 
a “scratch” test.  Before speaking, lightly scratch each microphone and observe which LED on the 
front panel lights.  This ensures the correct microphone is being tested.  If devices other than 
microphones are connected to the inputs of the DMX8 USB Mixer, perform a similar test on these 
devices. 

The DMX 8 drivers are preinstalled on FTR Touch.  However, the driver may need to be 
configured in FTR Touch settings.  See the 

Configuring FTR Touch Recording Settings 

in the next 

section of this guide. 

Содержание DMX8

Страница 1: ...DMX8 USB Mixer Installation Guide for use with FTR Touch ...

Страница 2: ...CLAIMER FTR Pty Ltd makes a sincere effort to ensure the accuracy of the material described herein however except as set forth in the license documentation applicable to each product of FTR Pty Ltd makes no warranty express or implied with respect to the quality correctness reliability currentness accuracy or freedom from error of this document or the products referred to herein and specifically d...

Страница 3: ...ded with this equipment To reduce the risk of electric shock never disable this important safety feature Canadian Deviations clause 1 1 1 All equipment installations are required to be in accordance with the Canadian Electrical Code CEC Part 1 CAN CSA C22 1 US Deviations clause 1 1 1 All equipment installations are required to be in accordance with the National Electrical Code NEC ANSI NFPA 70 and...

Страница 4: ... Product Outline 1 Installing the DMX8 USB Mixer 1 Voltage Selection 1 Location 2 Environment 2 Software 2 Connections 2 Testing 3 Configuring FTR Touch Recording Settings 4 DMX8 Configuration Panel 5 Settings 6 Adjusting Levels 7 Troubleshooting 8 Specifications 9 Appendix A 11 ...

Страница 5: ...ion make sure you have the following DMX8 USB Mixer DMX8 USB Mixer Installation Guide for FTR Touch this guide Hi Speed rated USB cable to connect DMX8 USB Mixer to computer supplied Power cable suitable for your region supplied Microphones or other input sources as required Microphone cables wired correctly for the DMX8 XLR connectors Note DMX 8 drivers are pre installed on FTR Touch The standard...

Страница 6: ...s detail the procedures for installing the hardware and configuring the pre installed device drivers on the FTR Touch unit Connections Connecting the equipment involves the placement and connection of microphones or other input devices and cables connection to FTR Touch and any monitoring equipment and the testing of the complete system Microphones Place microphones as close as practical to the us...

Страница 7: ...t Level LED on the front panel of the DMX8 USB Mixer As each microphone is tested the LED should flash green It is acceptable for the LED to flash red occasionally with loud speech If the microphones are placed close together the voice test should be accompanied by a scratch test Before speaking lightly scratch each microphone and observe which LED on the front panel lights This ensures the correc...

Страница 8: ...uration panel make the required changes See DMX8 Configuration Panel in the following section for details 4 When all required changes are made touch the close button in the top right corner of the configuration panel Note Scene controls are not available from FTR Touch If you touch the scene controls your current settings are saved and the configuration panel is closed 5 If all other settings are ...

Страница 9: ...ntom power on or off as required Set input levels to suit the connected input device Assign the eight inputs to any combination of four recording channels which are captured by FTR Touch Set recording channel levels Assign the eight inputs to any combination of 4 monitoring channels which are accessed from the rear panel of the DMX8 Set monitor output levels ...

Страница 10: ...1 or 2 as required For 4 channel recording switch inputs to Recording Channels 1 4 as required Monitor Channel Select the Monitor channels that the inputs will be mixed to Input Level Adjust the level of each input Recording Channel Level Adjust the level of each Recording channel using the level meter as a guide Monitor Channel Level Adjust the level of each Monitor channel Scenes Scenes are not ...

Страница 11: ... channels that each input will be mixed to Each input can be mixed to any of the 4 recording channels 2 For each recording channel adjust the Recording Channel Level slider It is important to adjust these sliders so that an adequate signal level well above any background noise but below the clipping threshold is obtained To adjust the recording channel levels 3 Start with all the Recording Channel...

Страница 12: ...eck and adjust the input and recording channel levels using the DMX8 Configuration Distortion is usually caused when the input or recording level is set too high Ensure the input type is correct for the type of microphone you are using Hum or buzz in the recording Usually caused by electrical interference to the microphones or cables Ensure all cables and microphones are moved away from possible s...

Страница 13: ...able Noise Gating Available Trim Control Software controllable 90dB range 0 5dB steps Mixer Recording Device Source Selection Any combination of the 8 inputs for each of 4 Recording outputs to USB Monitor Source Selection 1 to 4 Any combination of the 8 inputs for each of the Monitor outputs 1 to 4 Monitor Source Selection All All 8 inputs mixed down to 1 output A D and D A Conversion Conversion 1...

Страница 14: ...for power on One LED per input channel Green indicates audio activity Red indicates compression threshold is reached Computer Interface Operating System Support Windows XP Home SP1 Windows XP Professional SP1 USB Hi Speed USB USB 2 0 required for full functionality Audio Wave Devices 2 or 4 mono recording devices 1 or 2 stereo Mixer Control Full function software control running on host computer G...

Страница 15: ...8 Front and Rear Panels 1 2 3 4 5 6 7 8 POWER DMX8 USB Mixer Input Levels ForTheRecord FTR Pty Ltd Front Panel Rear Panel 8 7 6 5 4 3 2 1 MONITOR All USB Ch 1 Ch 2 Ch 3 Ch 4 ANTEX ELECTRONICS UN2468 3 INPUTS 115 230V 50 60Hz 25 WATTS ...

Страница 16: ... Environment 2 Location 1 Microphones 2 Monitoring Equipment 3 Recording Equipment 2 Testing 3 Levels Input 7 Monitor Channel 7 Recording Channel 7 Mode Dial 4 Safety Notices iii Voltage Selection iii Warning iii Scenes 6 Settings 4 Specifications 9 11 Troubleshooting 8 ...

Отзывы: