background image


76 

IB956 User’s Manual


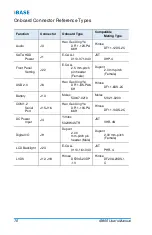
Onboard Connector Reference Types 


Function 

Connector  

Onboard Type 

Compatible  

Mating Type 

Audio 

J3 

Hao Guo Xing Ye  

DF11-12S-PA
66H 

Hirose  

DF11-12DS-2C 

SATA HDD 

Power  

J1 

E-CALLl  

0110-071-040 

JST  

XHP-4 

Front Panel 

Setting 

J22 

E-CALL  

2.5 mm-pitch 
pin header 
(Female) 

Dupont  

2.0 mm-pitch 
(Female) 

USB 2.0 

J8 

Hao Guo Xing Ye 

DF11-8S-PA6
6H 

Hirose  

DF11-8DS-2C 

Battery 

J13 

Molex  

53047-0210 

Molex  

51021-0200 

COM1,2  

Serial 
Port 

J15,J16 

Hao Guo Xing Ye  

DF11-10S-PA
66H 

Hirose  

DF11-10DS-2C 

DC Power 

Input  

J4 

Yimtex  

532VW4STR 

JST  

VHR-4N 

Digital I/O  

J9 

Dupont  

2.00 
mm-pitch pin 
header (Male) 

Dupont  

2.00 mm-pitch 
(Female) 

LCD Backlight  

J23 

E-CALL  

0110-161-040 

JST  

PHR-4. 

LVDS  

J12, J18 

Hirose  

DF20G-20DP
-1V 

Hirose  

DF20A-20DS-1


Содержание iBase IB956

Страница 1: ......

Страница 2: ...diate or consequential resulting from the use of the information provided herein Our products are not intended for use in systems in which failures of product could result in personal injury All trademarks mentioned herein are property of their respective owners All specifications are subject to change without notice Manual iBase IB956 11th Gen Intel Core Celeron 3 5 Single Board Computer ...

Страница 3: ...IB956 11th Generation Intel Core i7 i5 i3 Celeron 3 5 Disk Size SBC User s Manual Version 1 0 November 2021 ...

Страница 4: ...to the products described in this document without prior notice Every effort has been made to ensure the information in the document is correct however IBASE does not guarantee this document is error free IBASE assumes no liability for incidental or consequential damages arising from misapplication or inability to use the product or the information contained herein nor for any infringements of rig...

Страница 5: ...adio frequency energy and if not installed and used in accordance with manufacturer s instructions may cause harmful interference to radio communications WEEE This product must not be disposed of as normal household waste in accordance with the EU directive of for waste electrical and electronic equipment WEEE 2012 19 EU Instead it should be disposed of by returning it to a municipal recycling col...

Страница 6: ...not use this product near water Do not spill water or any other liquids on this product Do not place heavy objects on the top of this product Anti static precautions Wear an anti static wrist strap to avoid electrostatic discharge Place the PCB on an anti static kit or mat Hold the edges of PCB when handling Touch the edges of non metallic components of the product instead of the surface of the PC...

Страница 7: ...MERS SHALL BE BILLED FOR REPAIR AND SHIPPING CHARGES Technical Support Services 1 Visit the IBASE website at www ibase com tw to find the latest information about the product 2 If you need any further assistance from your distributor or sales representative prepare the following information of your product and elaborate upon the problem Product model name Product serial number Detailed description...

Страница 8: ...S Data JP3 14 2 4 3 LVDS Panel Power Brightness Selections JP4 JP5 15 2 4 4 AT ATX Selection JP6 16 2 5 Connectors Quick Reference 17 2 5 1 SATA Connectors CN1 CN2 18 2 5 2 DP Connectors CN9 CN10 19 2 5 3 SATA Power Connector J1 20 2 5 4 Audio Connector J3 21 2 5 5 DC In Connector J4 22 2 5 6 USB2 7 8 J8 23 2 5 7 Digital I O Connector J9 24 2 5 8 LVDS Connector J12 2nd J18 1st 25 2 5 9 M 2 M Key 2...

Страница 9: ...ation 38 3 6 Intel Management Engine Components Drivers Installation 40 Chapter 4 BIOS Setup 43 4 1 Introduction 44 4 2 BIOS Setup 44 4 3 Main Settings 45 4 4 Advanced Settings 46 4 5 Chipset Settings 60 4 6 Security Settings 64 4 7 Boot Settings 67 4 8 Save Exit Settings 68 Appendix 69 A I O Port Address Map 70 B Interrupt Request Lines IRQ 71 C Watchdog Timer Configuration 72 D Onboard Connector...

Страница 10: ...viii IB956 User s Manual This page is intentionally left blank ...

Страница 11: ...1 Chapter 1 General Information The information provided in this chapter includes Features Packing List Optional Accessories Specifications Block Diagram Board Pictures Board Dimensions ...

Страница 12: ...es including DisplayPort and 24 bit dual channel LVDS With two RJ45 for Gigabit Ethernet the I O on board also include 6x USB3 1 2x USB2 0 2x SATA III 2x COM and 2x M 2 sockets Photo of IB956 1 2 Features Onboard 11th Gen Intel CoreTM i7 i5 i3 processor 1x DDR4 SO DIMM Max 32GB DisplayPort and 24 bit dual channel LVDS interface 2x Intel 2 5 Gigabit LAN 6x USB3 1 2x USB2 0 2x SATA III 2x COM 2x M 2...

Страница 13: ...om you purchased the product IB956 SBC x 1 Disk x 1 including chipset drivers and flash memory utility This User s Manual x 1 1 4 Optional Accessories IBASE provides the following optional accessories Cable Kit IB92 Including DC In power cable PW595 x 1 COM ports cable PK1H x 1 SATA HDD power cable SATA 53A x 1 Audio cable Audio 18 USB 2 0 cable USB29 Heat spreader HSIB956 1 Heat sink HSIB956 A ...

Страница 14: ...tu Fedora Memory 1 x DDR4 3200 SO DIMM Max 32GB Storage NVMe Graphics Processor Integrated Graphics Network 1st LAN IB956AF Intel I225 LM 2 5G IB956EF Intel I225 V 2 5G 2nd LAN IB956AF Intel I225 V 2 5G IB956EF Intel I225 V 2 5G Super I O Fintek F81804U I Audio Codec Controller Built in HD with Realtek AL888S VD2 GR Power Requirement 12V 10 tolerance 24V 10 tolerance DC in TPM 2 0 Watchdog Timer Y...

Страница 15: ...2x USB3 1 GEN1 Serial 1x RS232 422 485 1x RS232 COM2 SATA 2 x SATA III Audio Built in HD audio with Realtek ALC888S Digital IO 4 In 4 Out Expansion Slots 1x M 2 M Key Type 2280 Supports NVMe with PCIe 4x signal only 1x M 2 E Key Type 2230 Supports CNVi Environment Temperature Operation 0 60 C 32 140 F Storage 20 80 C 4 176 F Relative Humidity 0 90 non condensing at 60 C All specifications are subj...

Страница 16: ...6 IB956 User s Manual 1 6 Block Diagram ...

Страница 17: ...General Information IB956 User s Manual 7 1 1 7 Board Pictures Top View Bottom View The photos above are for reference only Some minor components may differ ...

Страница 18: ...8 IB956 User s Manual I O View Connector Function CN3 CN4 2 5 GbE Ports CN6 CN7 CN8 CN5 USB 3 1 Ports CN9 CN10 DisplayPort 1 8 Dimensions ...

Страница 19: ... on jumper settings and connectors on the IB956 in order to set up a workable system On top of that you will also need to install crucial pieces such as the CPU and the memory before using the product The topics covered are Essential installations Jumpers and connectors ...

Страница 20: ...rd and perform the following steps 1 Align the key of the memory module with that on the memory slot and insert the module slantwise 2 Gently push the module in an upright position until the clips of the slot close to hold the module in place when the module touches the bottom of the slot To remove the module press the clips outwards with both hands and the module will pop up ...

Страница 21: ... several metal pins with a non conductive base mounted on the circuit board Jumper caps are used to have the functions and features enabled or disabled If a jumper has 3 pins you can connect either PIN1 to PIN2 or PIN2 to PIN3 by shorting Pin 1 2 3 A 3 pin jumper A jumper cap Refer to the illustration below to set jumpers Pin closed Jumper Setting Open 1 2 3 1 2 1 2 3 2 3 1 2 3 When two pins of a ...

Страница 22: ...12 IB956 User s Manual 2 3 Jumper Connector Locations ...

Страница 23: ...ers Quick Reference Function Jumper Clear RTC Data JP2 Clear CMOS Data JP3 AT ATX Selection JP6 LVDS Panel Power Brightness Selections JP4 For power JP5 For brightness 2 4 1 Clear RTC Data JP2 Function Pin closed Setting Normal default 1 2 1 Clear RTC 2 3 1 ...

Страница 24: ...14 IB956 User s Manual 2 4 2 Clear CMOS Data JP3 Function Pin closed Setting Normal default 1 2 1 Clear CMOS 2 3 1 ...

Страница 25: ...nfiguration IB956 User s Manual 15 2 2 4 3 LVDS Panel Power Brightness Selections JP4 JP5 Jumper Function Pin closed Setting JP4 For power 3 3V default 1 2 1 5V 2 3 1 JP5 For Brightness 3 3V default 1 2 1 5V 2 3 1 ...

Страница 26: ...16 IB956 User s Manual 2 4 4 AT ATX Selection JP6 Function Pin closed Setting ATX 1 2 1 AT 2 3 1 ...

Страница 27: ...C Connector CN8 USB 3 1 Connector CN5 Dual USB 3 1 Ports CN6 CN7 Two 2 5 GbE Ports CN3 CN4 M 2 E Key with CNVi J17 SATA Connectors CN1 CN2 SATA Power Connector J1 DP Connectors CN9 CN10 Audio Connector J3 USB2 7 8 J8 DC In Connector J4 LVDS CHA Connector 1st 2nd J18 J12 LVDS Backlight Connector J23 Digital I O Connector J9 Front Panel Setting Connector J22 COM1 COM2 Serial Ports J15 J16 CPU Fan Po...

Страница 28: ...18 IB956 User s Manual 2 5 1 SATA Connectors CN1 CN2 Pin Assignment Pin Assignment 1 Ground 5 RX 2 TX 6 RX 3 TX 7 Ground 4 Ground ...

Страница 29: ...s Manual 19 2 2 5 2 DP Connectors CN9 CN10 Pin Assignment Pin Assignment 1 LAN0_P 11 GND 2 GND 12 LAN3_N 3 LAN0_N 13 CONFIG 4 LAN1_P 14 GND 5 GND 15 AUXP 6 LAN1_N 16 GND 7 LAN2_P 17 AUXN 8 GND 18 Hot Plug 9 LAN2_N 19 GND 10 LAN3_P 20 5V ...

Страница 30: ...20 IB956 User s Manual 2 5 3 SATA Power Connector J1 Remarks E CALL_0110 071 040 Pin Assignment 1 5V 2 GND 3 GND 4 12V ...

Страница 31: ... IB956 User s Manual 21 2 2 5 4 Audio Connector J3 Remarks HK_DF11 12S PA66H Pin Assignment Pin Assignment 1 LINE OUT_L 2 LINE OUT_R 3 FRONT_JD 4 GND 5 LINE IN_L 6 LINE IN_R 7 LINE _JD 8 GND 9 MIC_L 10 MIC_R 11 MIC_JD 12 GND ...

Страница 32: ...22 IB956 User s Manual 2 5 5 DC In Connector J4 Pin Assignment 1 12V 24V 2 12V 24V 3 GND 4 GND ...

Страница 33: ...Hardware Configuration IB956 User s Manual 23 2 2 5 6 USB2 7 8 J8 Remarks HK_DF11 8S PA66H Pin Assignment Pin Assignment 1 5V 2 GND 3 USB_PN 4 USB_PP 5 USB_PP 6 USB_PN 7 GND 8 5V ...

Страница 34: ...24 IB956 User s Manual 2 5 7 Digital I O Connector J9 Remarks 4 in 4 out Pin Assignment Pin Assignment 1 Ground 2 5V 3 Out3 4 Out1 5 Out2 6 Out0 7 IN3 8 IN1 9 IN2 10 IN0 ...

Страница 35: ...nector J12 2nd J18 1st Remarks Hirose DF20G 20DP 1V 56 Pin Assignment Pin Assignment 1 TX0P 2 TX0N 3 GND 4 GND 5 TX1P 6 TX1N 7 GND 8 GND 9 TX2P 10 TX2N 11 GND 12 GND 13 CLKP 14 CLKN 15 GND 16 GND 17 TX3P 18 TX3N 19 3 3V or 5V 20 3 3V or 5V 2 5 9 M 2 M Key 2280 J14 ...

Страница 36: ... PERn2 18 3 3V 19 PERp2 20 NC 21 GND 22 NC 23 PETn2 24 NC 25 PETp2 26 NC 27 GND 28 NC 29 PERn1 30 NC 31 PERp1 32 NC 33 GND 34 NC 35 PETn1 36 NC 37 PETp1 38 NC 39 GND 40 NC 41 PERn0 42 NC 43 PERp0 44 NC 45 GND 46 NC 47 PETn0 48 NC 49 PETp0 50 PERST 51 GND 52 CLKREQ 53 REFCLKn 54 PEWAKE 55 REFCLKp 56 NC 57 GND 58 NC M KEY M KEY 67 NC 68 SUSCLK 69 NC 70 3 3V 71 GND 72 3 3V 73 GND 74 3 3V 75 GND ...

Страница 37: ...r s Manual 27 2 2 5 10 COM2 RS 232 Port J15 Pin Signal Name Pin Signal Name 1 Data carrier detect 2 Receive data 3 Transmit data 4 Data terminal ready 5 Ground 6 Data set ready 7 Request to send 8 Clear to send 9 Ring indicator 10 Key ...

Страница 38: ...5 11 COM1 RS 232 422 485 Port J16 Remarks HK_DF11 10S PA66H Pin Assignment RS 232 RS 422 RS 485 1 DCD TX DATA 2 RX TX DATA 3 TX RX NC 4 DTR RX NC 5 Ground Ground Ground 6 DSR NC NC 7 RTS NC NC 8 CTS NC NC 9 RI NC NC 10 NC NC NC ...

Страница 39: ...ch on the case When pressed the power switch will force the system to power on When pressed again it will power off the system Hard Disk Drive LED Connector Pins 3 and 4 This connector connects to the hard drive activity LED on control panel This LED will flash when the HDD is being accessed Reset Switch Pins 5 and 6 The reset switch allows you to reset the system without turning the main power sw...

Страница 40: ...30 IB956 User s Manual 2 5 13 LVDS Backlight Connector J23 Remarks E CALL_0110 161 040 Pin Assignment 1 12V 2 Backlight Enable 3 Brightness Control 4 Ground ...

Страница 41: ...Hardware Configuration IB956 User s Manual 31 2 2 5 14 CPU Fan Power Connector CPU_FAN1 Remarks PWM only Pin Assignment 1 Ground 2 12V 3 Rotation detection 4 Control ...

Страница 42: ...32 IB956 User s Manual 2 5 15 Smart Battery J20 Remarks JST B5B PH K S Pin Assignment 1 RST 2 ICHSWI 3 Ground 4 SMB_DATA 5 SMB_CLK ...

Страница 43: ...hapter 3 Drivers Installation This chapter introduces installation of the following drivers Intel Chipset Software Installation Utility VGA Driver HD Audio Driver LAN Driver Intel Management Engine Drivers ...

Страница 44: ...r Windows operating system you must install the Intel Chipset Software Installation Utility first before proceeding with the drivers installation 3 2 Intel Chipset Software Installation Utility The Intel Chipset drivers should be installed first before the software drivers to install INF files for Plug Play function for Intel chipset components Follow the instructions below to complete the install...

Страница 45: ...3 When the Welcome screen to the Intel Chipset Device Software appears click Next to continue 4 Accept the software license agreement and proceed with the installation process 5 On the Readme File Information screen click Install 6 After completing the installation click Finish to complete the setup process ...

Страница 46: ...ane and then Intel R TigerLake H Chipset Drivers on the right pane 2 Click Intel R HD Graphics Driver 3 When the Welcome screen appears click Next to continue 4 Click Yes to accept the license agreement 5 On the Readme File Information screen click Next until the installation starts 6 When Setup is Complete click Finish ...

Страница 47: ...Click Intel on the left pane and then Intel R TigerLake H Chipset Drivers on the right pane 2 Click Realtek High Definition Audio Driver 3 On the Welcome screen of the InstallShield Wizard click Next 4 Click Next until the installation starts 5 After the installation click Finish to restart the computer for changes to take effect ...

Страница 48: ...on 1 Insert the drivers disk in the disk drive Click Intel on the left pane and then Intel R TigerLake H Chipset Drivers on the right pane 2 Click Intel R PRO LAN Network Drivers 3 On the Network Connections screen click Install Drivers and Software ...

Страница 49: ...rs click Next 5 On the next screen accept the license agreement and click Next 6 On the Setup Options screen click the checkbox to select the desired driver s for installation Then click Next to continue 7 On the Ready to Install the Program screen click Install to begin the installation When the Install wizard hascompleted click Finish ...

Страница 50: ...ntel Management Engine Components Drivers Installation 1 Insert the disk enclosed in the package with the board Click Intel on the left pane and then Intel R TigerLake H Chipset Drivers on the right pane 2 Click Intel R ME Drivers ...

Страница 51: ...tion IB956 Series User s Manual 41 3 3 When the Welcome screen appears click Next 4 Accept the license agreement and click Next 5 After Intel Management Engine Components have been successfully installed click Finish ...

Страница 52: ...42 IB956 User s Manual This page is intentionally left blank ...

Страница 53: ...hapter describes the different settings available in the AMI BIOS that comes with the board The topics covered in this chapter are as follows Main Settings Advanced Settings Chipset Settings Security Settings Boot Settings Save Exit ...

Страница 54: ...st will continue with its test routines thus preventing you from invoking the Setup If you still need to enter Setup restart the system by pressing the Reset button or simultaneously pressing the Ctrl Alt and Delete keys You can also restart by turning the system Off and back On again The following message will appear on the screen Press DEL to Enter Setup In general press the arrow keys to highli...

Страница 55: ... User s Manual 45 4 4 3 Main Settings BIOS Setting Description System Date Sets the date Use the Tab key to switch between the data elements System Time Set the time Use the Tab key to switch between the data elements ...

Страница 56: ...46 IB956 Series User s Manual 4 4 Advanced Settings This section allows you to configure system features according to your preference ...

Страница 57: ...olution CNVi will be enabled Disable Integrated disables Integrated Solution Preboot BLE This will be used to enable Preboot Bluetooth function Discrete Bluetooth Module Seiral IO UART0 needs to be enabled to select BT Module Default Disabled Advanced Settings Configure ACPI objects for wireless devices Default Disabled WWAN Configuration Configure WWAN related options WWAN Device enable or disabl...

Страница 58: ...g Description Intel VMX Virtualization Technology When enabled a VMM can utilize the additional hardware capabilities provided by Vanderpool Technology Active Processor Cores Number of cores to enable in each processor package Hyper Threading Options Enabled or Disabled AES Enable Disable AES Advanced Encryption Standard ...

Страница 59: ... BIOS Setting Description Intel Speedstep Allows more than two frequency ranges to be supported Intel Speed Shift Technology Enable Disable Intel Speed Shift Technology support Enabling will expose the CPPC v2 interface to allow for hardware controlled P states ...

Страница 60: ...g Description ME State When disabled ME will be put into ME Temporarily Disabled Mode AMT BIOS Features When disabled AMT BIOS Features are no longer supported and user is no longer able to access MEBx Setup Note This option does not disable Manageability Features in FW ...

Страница 61: ...Support Enables Disables BIOS support for security device OS will not show security device TCG EFI protocol and INT1A interface will not be available Pending operation Schedule an operation for the security device Note Your computer will reboot during restart in order to change state of security device ...

Страница 62: ...Setting Description Enable Hibernation Enables Disables the system ability to hibernate OS S4 Sleep State This option may be not effective with some OS ACPI Sleep State Select the highest ACPI sleep state the system will enter when SUSPEND button is pressed ...

Страница 63: ...l color depth Options 18 bit 24bit VESA JEIDA LVDS Channel Type Chooses the LVDS as single or dual channel Panel Type Panel Type Resolution Options 640 x 480 800 x 600 1024 x 768 1280 x 768 1280 x 800 1280 x 960 1280 x 1024 1366 x 768 1440 x 900 1600 x 900 1600 x 1200 1680 x 1050 1920 x 1080 1920 x 1200 LVDS Brightness Level Control Options Level 1 to Level 8 ...

Страница 64: ...ser s Manual 4 4 8 F81804 Super IO Configuration BIOS Setting Description Serial Ports Configuration Sets parameters of serial ports Enables Disables the serial port and select an optimal setting for the Super IO device ...

Страница 65: ...BIOS Setup IB956 User s Manual 55 4 ...

Страница 66: ...iption CPU Fan Smart Fan Control Enables Disables smart fan control Temperatures Voltages These fields are the parameters of the hardware monitoring function feature of the motherboard The values are read only values as monitored by the system and show the PC health status ...

Страница 67: ...SB mass storage driver USB Transfer time out The time out value 1 5 10 20 secs for Control Bulk and Interrupt transfers Device reset time out Gives seconds 10 20 30 40 secs to delay execution of Start Unit command to USB mass storage device Device power up delay Max time the device will take before it properly reports itself to the Host Controller Auto uses default value for a Root port it is 100m...

Страница 68: ...abled IPv4 HTTP boot support will not be available Ipv6 PXE Support If disabled IPv6 PXE boot support will not be available Ipv6 HTTP Support If disabled IPv6 HTTP boot support will not be available PXE boot wait time Wait time in seconds to press ESC key to abort the PXE boot Use either or numeric keys to set the value Media detect count Number of times the presence of media will be checked Use e...

Страница 69: ...BIOS Setup IB956 User s Manual 59 4 4 4 12 NVMe Configuration ...

Страница 70: ...60 IB956 Series User s Manual 4 5 Chipset Settings 4 5 1 System Agent SA Configuration 4 5 1 1 Graphics Configuration ...

Страница 71: ...BIOS Setup IB956 User s Manual 61 4 ...

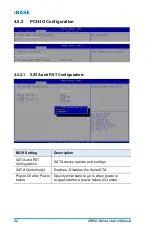
Страница 72: ... and RST Configuration BIOS Setting Description SATA and RST Configuration SATA device options and settings SATA Controller s Enables Disables the Serial ATA Power On after Power failure Specify what state to go to when power is re applied after a power failure G3 state ...

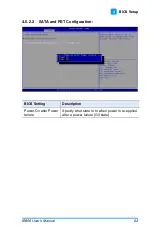
Страница 73: ...OS Setup IB956 User s Manual 63 4 4 5 2 2 SATA and RST Configuration BIOS Setting Description Power On after Power failure Specify what state to to when power is re applied after a power failure G3 state ...

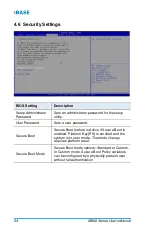
Страница 74: ...ord Sets a user password Secure Boot Secure Boot feature is Active if Secure Boot is enabled Platform Key PK is enrolled and the system is in user mode The mode change requires platform reset Secure Boot Mode Secure Boot mode options Standard or Custom In Custom mode Secure Boot Policy variables can be configured by a physically present user without full authentication ...

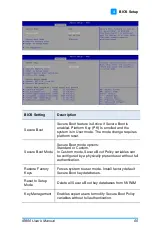
Страница 75: ...ot Mode Secure Boot mode options Standard or Custom In Custom mode Secure Boot Policy variables can be configured by a physically present user without full authentication Restore Factory Keys Forces system to user mode Install factory default Secure Boot key databases Reset to Setup Mode Delete all Secure Boot key databases from NVRAM Key Management Enables expert users to modify Secure Boot Polic...

Страница 76: ...66 IB956 Series User s Manual ...

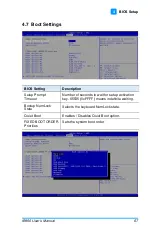
Страница 77: ...iption Setup Prompt Timeout Number of seconds to wait for setup activation key 65535 0xFFFF means indefinite waiting Bootup NumLock State Selects the keyboard NumLock state Quiet Boot Enables Disables Quiet Boot option FIXED BOOT ORDER Priorities Sets the system boot order ...

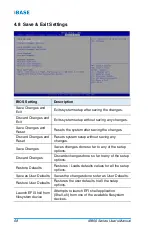
Страница 78: ...etup without saving any changes Save Changes Saves changes done so far to any of the setup options Discard Changes Discards changes done so far to any of the setup options Restore Defaults Restores Loads defaults values for all the setup options Save as User Defaults Saves the changes done so far as User Defaults Restore User Defaults Restores the user defaults to all the setup options Launch EFI ...

Страница 79: ...69 Appendix This section provides the mapping addresses of peripheral devices and the sample code of watchdog timer configuration ...

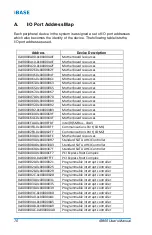
Страница 80: ...urces 0x0000EFA0 0x0000EFBF Intel R SMBus 43A3 0x000003F8 0x000003FF Communications Port COM1 0x000002F8 0x000002FF Communications Port COM2 0x00001800 0x000018FE Motherboard resources 0x00003090 0x00003097 Standard SATA AHCI Controller 0x00003080 0x00003083 Standard SATA AHCI Controller 0x00003060 0x0000307F Standard SATA AHCI Controller 0x00000000 0x00000CF7 PCI Express Root Complex 0x00000D00 0...

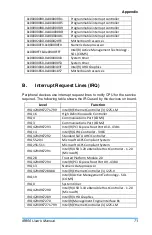
Страница 81: ...the IRQ used by the devices on board Level Function IRQ 4294967271 799 Intel R Ethernet Controller 3 I225 LM IRQ 16 High Definition Audio Controller IRQ 4 Communications Port COM1 IRQ 3 Communications Port COM2 IRQ 4294967293 Intel R PCI Express Root Port 10 43B1 IRQ 14 Intel R GPIO Controller 34C6 IRQ 4294967292 Standard SATA AHCI Controller IRQ 55 204 Microsoft ACPI Compliant System IRQ 256 511 ...

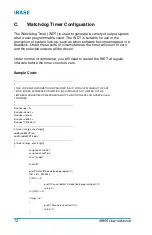
Страница 82: ... the timer counts to zero Sample Code THIS CODE AND INFORMATION IS PROVIDED AS IS WITHOUT WARRANTY OF ANY KIND EITHER EXPRESSED OR IMPLIED INCLUDING BUT NOT LIMITED TO THE IMPLIED WARRANTIES OF MERCHANTABILITY AND OR FITNESS FOR A PARTICULAR PURPOSE include dos h include conio h include stdio h include stdlib h include F81804 H int main int argc char argv voidEnableWDT int void DisableWDT void int...

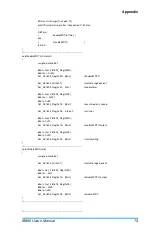
Страница 83: ...enable timer bBuf Get_ F81804_Reg 0xF5 bBuf 0x0F bBuf 0x52 Set_ F81804_Reg 0xF5 bBuf count mode is second Set_ F81804_Reg 0xF6 interval set timer bBuf Get_ F81804_Reg 0xFA bBuf 0x01 Set_ F81804_Reg 0xFA bBuf enable WDTO output bBuf Get_ F81804_Reg 0xF5 bBuf 0x20 Set_ F81804_Reg 0xF5 bBuf start counting void DisableWDT void unsigned charbBuf Set_ F81804_LD 0x07 switch to logic device 7 bBuf Get_ F8...

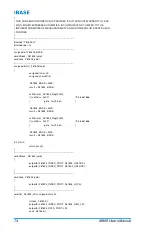
Страница 84: ...igned charucDid F81804_BASE 0x4E result F81804_BASE ucDid Get_ F81804_Reg 0x20 if ucDid 0x07 Fintek81866 goto Init_Finish F81804_BASE 0x2E result F81804_BASE ucDid Get_ F81804_Reg 0x20 if ucDid 0x07 Fintek81866 goto Init_Finish F81804_BASE 0x00 result F81804_BASE Init_Finish return result void Unlock_ F81804 void outportb F81804_INDEX_PORT F81804_UNLOCK outportb F81804_INDEX_PORT F81804_UNLOCK voi...

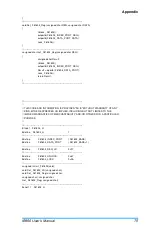
Страница 85: ...DE AND INFORMATION IS PROVIDED AS IS WITHOUT WARRANTY OF ANY KIND EITHER EXPRESSED OR IMPLIED INCLUDING BUT NOT LIMITED TO THE IMPLIED WARRANTIES OF MERCHANTABILITY AND OR FITNESS FOR A PARTICULAR PURPOSE ifndef F81804_H define F81804_H 1 define F81804_INDEX_PORT F81804_BASE define F81804_DATA_PORT F81804_BASE 1 define F81804_REG_LD 0x07 define F81804_UNLOCK 0x87 define F81804_LOCK 0xAA unsigned i...

Страница 86: ...tch pin header Female Dupont 2 0 mm pitch Female USB 2 0 J8 Hao Guo Xing Ye DF11 8S PA6 6H Hirose DF11 8DS 2C Battery J13 Molex 53047 0210 Molex 51021 0200 COM1 2 Serial Port J15 J16 Hao Guo Xing Ye DF11 10S PA 66H Hirose DF11 10DS 2C DC Power Input J4 Yimtex 532VW4STR JST VHR 4N Digital I O J9 Dupont 2 00 mm pitch pin header Male Dupont 2 00 mm pitch Female LCD Backlight J23 E CALL 0110 161 040 J...

Страница 87: ...tec de Germany Distec GmbH Augsburger Str 2b 82110 Germering Phone 49 89 894363 0 E Mail info distec de Internet www distec de Switzerland ALTRAC AG Bahnhofstraße 3 5436 Würenlos Phone 41 44 7446111 E Mail info altrac ch Internet www altrac ch United Kingdom Display Technology Ltd Osprey House 1 Osprey Court Hinchingbrooke Business Park Huntingdon Cambridgeshire PE29 6FN Phone 44 1480 411600 E Mai...

Отзывы: