background image

Avvertenze

Prima  di  procedere  all’installazione,  verificare  che  il  modello  ricevuto  sia  conforme  a  quello  ordinato,  controllando 
l’etichetta sulla confezione. Prima di procedere all’installazione, verificare che la vasca dove si andrà a montare la cabina sia 
in bolla (orizzontale, planare). 
In caso di montaggio su vasche storte o non planari Forte non garantisce il corretto funzionamento della cabina. Manovrare 
con cautela le parti vetrate poiché trattandosi di cristalli temperati l’urto con una superficie dura o con spigoli potrebbe 
causare la frantumazione del cristallo (secondo le norme UNI EN 14428). 
Prima di procedere al montaggio del sopravasca accertarsi che non siano state richieste modifiche all’installazione standard 
(come sostituzione di braccetti, misure particolari, profili particolari, ecc.). 
Qualora non si fosse certi di ciò, contattare chi ha trasmesso l’ordine.

I

GB

Warning

Before to proceed with the installation, check that the model received is as per the one ordered, checking the label on the 
packaging. Before proceeding to the installation, check that the bath-tub where the enclosure will be installed is levelled ( 
horizontal and planar). 
In case of installing on bath-tub not straight or levelled FORTE does not guarantee the correct functioning of the enclosure. 
Handle with care the glass part since they tempered glass the impact with solid surface or corners can cause the shattering 
of the glass (according to the UNI EN 14428 norm)
Before proceeding to the installation of the bath’tub enclosure make sure that have not been made request of changes to 
the standard installation ( like replacement of brackets, particular measures, etc.).
If you are not sure of this, contact the person that has transmitted the order.

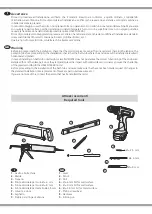
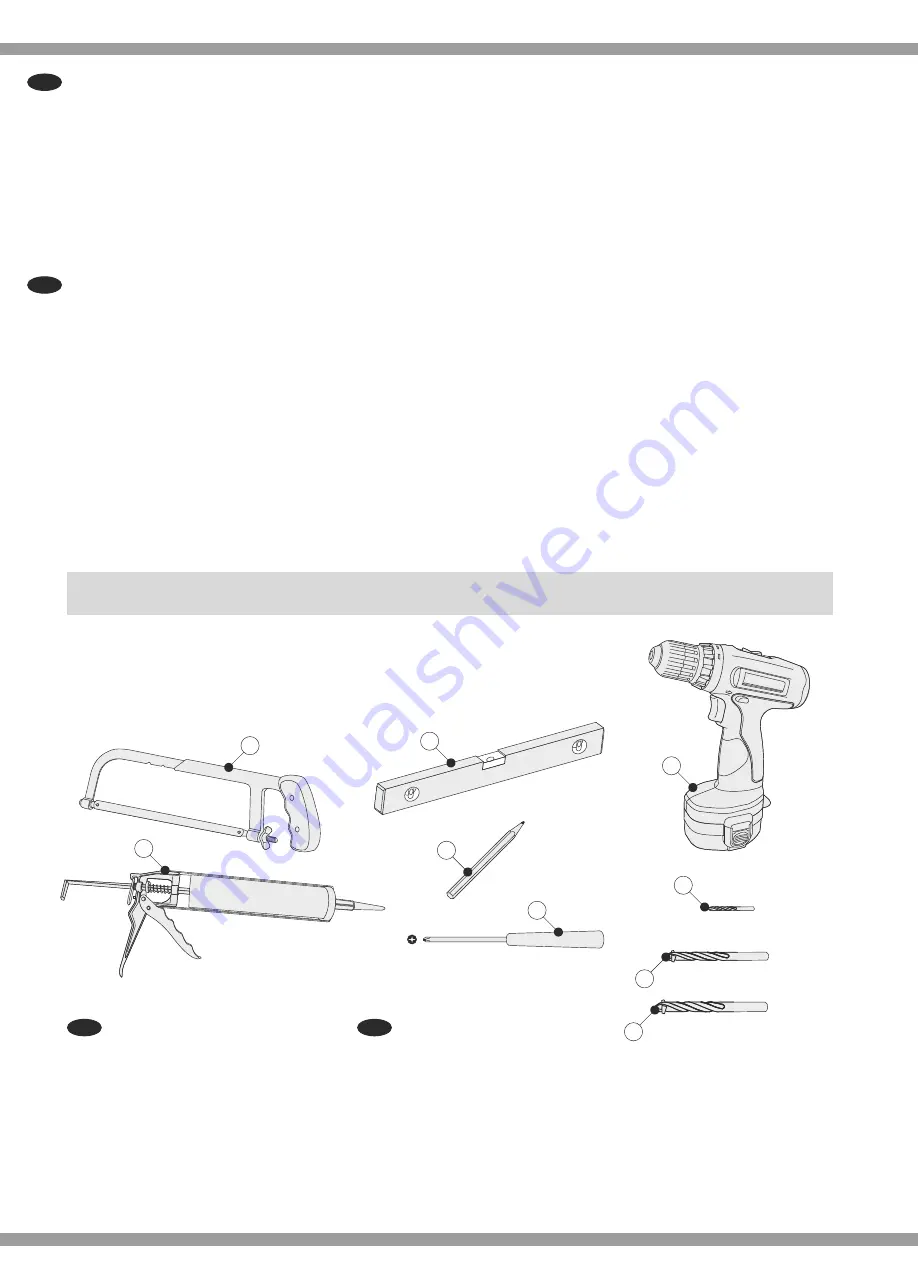
 Ø= 2,5 mm

 Ø= 6 mm

8

9

1

2

7

6

3

4

I

GB

1

 - Livello a bolla d’aria

2

 - Matita 

3

 - Trapano

4

 - Punta elicoidale per muro Ø= 6 mm

5

 - Punta elicoidale per muro Ø= 8 mm

6

 - Punta elicoidale per metallo Ø=2,5 mm

7

 - Giravite a croce

8

 - Seghetto

9

 - Pistola per siringa di silicone

1

 - Level 

2

 - Pencil 

3

 - Drill

4

 - Ø= 6 mm bit for wall surface

5

 - Ø= 8 mm bit for wall surface

6

 - Ø= 2,5 mm bit for metal surface

7

 - Phillip screwdriver

8

 - Hacksaw

9

 - Silicon gun

Attrezzi occorrenti 

Required tools

 Ø= 8 mm

5

Содержание Aqva NEWTIRRENO

Страница 1: ...montaggio riportate nel presente manuale For a correct installation of the product and for the validity of the guarantee follow carefully assembly instruction reported in the present manual NEWTIRRENO...

Страница 2: ...ng the label on the packaging Before proceeding to the installation check that the bath tub where the enclosure will be installed is levelled horizontal and planar In case of installing on bath tub no...

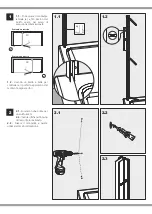
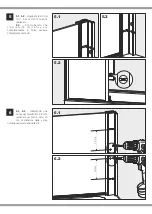
Страница 3: ...mmissionato 1 2 Usando un livello a bolla per controllare il prefetto appiombo del montante segnare i fori 2 1 Forare con una punta per muro 6 mm 2 2 Inserire il fisher all interno di ciascun foro rea...

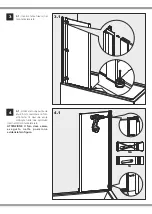
Страница 4: ...ante laterale 4 1 Utilizzando una punta da 2 5 mm realizzare un foro all interno di ciascuna asola collocata nelle due estremit interne del montante laterale ATTENZIONE Il foro deve essere e s e g u i...

Страница 5: ...ati 5 3 Controllando che l e s t r e m i t d e l l a n t a s i a completamente in bolla avvitare completamente le viti 5 2 10 cm 10 cm 6 1 6 2 6 6 1 6 2 Utilizzando una punta per metallo 2 5 mm realiz...

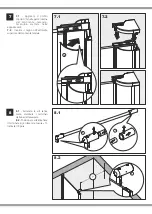
Страница 6: ...olo scattare nelle apposite sedi 7 2 Inserire il tappo nell estremit superiore del montante laterale 7 2 h Y q 8 1 8 2 8 8 1 Svitando le viti senza testa smontare i terminali della barra trasversale 8...

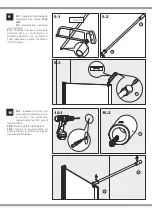
Страница 7: ...ppiombo con un livello a bolla disegnare a parete il perimetro del terminale r q r Y 3 cm r 9 1 9 2 9 3 10 10 1 Realizzare un foro con una punta per muro 8 mm al centro del perimetro segnato nella fas...

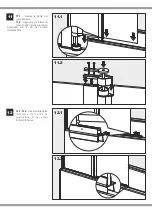
Страница 8: ...o r e d e l l a n t a l a guarnizione i nel verso indicato in figura 12 1 12 2 i 11 11 1 Inserire la porta nel pivot inferiore 11 2 Applicare gli elementi componenti il pivot superiore fissandoli con...

Страница 9: ...l anta fissa sia dalla parte esterna che dalla parte interna 11 2 Inserire nell apposita sede interna ed esterna il profilo di copertura f f 11 1 11 2 12 12 1 Applicare un sottile strato di silicone n...

Страница 10: ...un panno morbido leggermente inumidito Quando il trattamento va esaurendosi disponibile il kit di ripristino trattamento AQVACLEAN in vendita presso i Rivenditori Autorizzati Non usare assolutamente d...

Страница 11: ...is available the restoration AQVACLEAN treatment kit Available to Authorized sellers It is forbidden the use of abrasive soap or cloth ei Scoth bride solvent or other aggressive chemical substance WA...

Отзывы: