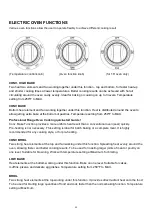
Heat Settings:
Hi
Ignites the burners.
Simmer
Melting small quantities, steaming rice, warming food, melting chocolate or butter.
Low
Melting large quantities.
Low-Medium
Low-temperature frying, simmering large quantities, heating milk, cream sauces,
gravies.
Medium
Sauting and browning, braising, pan-frying, maintaining slow boil on large quantities.
Medium-Hi
High-temperature frying, pan boiling, maintaining slow boil on large quantities.
Hi
Boiling liquid quickly, deep frying.
CAUTION
Never leave pans on a high setting unattended. Be careful when cooking food in
fat or grease; it can become hot enough to ignite.
Simmer and Boil
A smaller flame will give the best results when simmering. Small flames offer precise cooking performance for
delicate foods, keeping food warm, melting chocolate or butter, and for cooking over low heat for long period of
time.
The highest (larger) flame settings provide the maximum heat that is available on your range. This setting should
be used for heavy cooking jobs such as boiling water and cooking pasts.
flame intensity
• When you adjust the flame intensity, watch the flame when you turn the knob.
• Any flame engulf the cookware is wasted.
• The flame should stay steady and blue in color. Impurity in the gas supply may cause an orange flame during
initial operation.
Power Failure
• If the gas does not ignite within four seconds, turn off the valve and allow at least five minutes for any gas to
dissipate. Repeat the lighting procedure.
• In the event of a power failure, the surface burners can be lighted manually. Hold a lighted match near a burner
and turn the knob counter-clockwise to “HI”. After burner lights, turn knob to the desired setting.
Burner Grills
1. The grills must be properly positioned before cooking. Improper
installation of the grills may result in scratching of the cooktop and / or
poor combustion.
2. Do not operate the burners without a pan or utensil on the grills.
Griddle Operation
(Only available on the 48” range)
Before Using the Griddle
1. Clean the griddle thoroughly with warm, soapy water to remove
dust or any protective coating.
2. Rinse with clean water and wipe off to dry with soft, clean, lint-free towel/cloth.
21
Содержание FFSGS6156-30
Страница 1: ...FFSGS6156 30 FFSGS6156 36 FFSGS6156 48 09 03 21 dd mm yy...
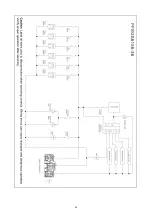
Страница 28: ...Wire Diagram 28...
Страница 29: ...29...
Страница 30: ...30...


