background image

DUOCUT 10 Ton Manual Log Splitter

Assembly

8

Before commencing assembly, check that you have all the 
required parts and the correct nuts and bolts and ensure 
you have read and understood these assembly instructions. 
Ensure the assembly area is clean and free of obstructions.

Note that throughout these instructions, the terms left and 
right refer to the users left and right when facing the front of 
the splitter as in operation.

The initial stages of assembly are easier to carry out if the 
log splitter is on it’s back. Stand behind the splitter and 
holding the Duocut by the top of the vertical post, carefully 
tilt it backwards and lie it on it’s back.

Step 1

Insert a wheel spacer(5) into 
a wheel(6) then using an 
M8x60 button head bolt(7) 
and an M8 nut(8), attach 
the wheel assembly to the 
rear of the base as shown. 
Tighten the nut and bolt 
until they pinch the spacer.  
Repeat for the opposite 
wheel.

M8 x 40

M8 nut

Содержание DUOCUT

Страница 1: ...DUOCUT 10 Ton Manual Log Splitter IMPORTANT Read this manual fully before assembly and use and observe all safety rules and operating instructions Patent Pending...

Страница 2: ...ration 19 Maintenance 22 Warranty 24 2 Technical Specification Preset maximum force 8 US ton Approximate lift per stroke left pedal 9 11 mm Approximate lift per stroke right pedal 3 6 mm Maximum log l...

Страница 3: ...DUOCUT 10 Ton Manual Log Splitter 3 Exploded Diagram 1 19 2 3 5 7 8 9 10 11 14 15 16 18 4 6 13 12 17...

Страница 4: ...Wheel Spacer 2 6 Wheel 2 7 M8 x 40 mm socket button head bolt 2 8 M8 nyloc nut 6 9 M8 x 20 mm socket button head bolt 4 10 Right stabilising foot 1 11 Right foot pedal 1 12 Grub Screw 1 13 Return Valv...

Страница 5: ...log splitter DO NOT top up hydraulic unit using brake fluid Use hydraulic jack oil only DO NOT operate the log splitter if damaged Replace or repair damaged parts Workshop Environmental Safety Locate...

Страница 6: ...lways be operated by one person only Keep hands away from moving parts of the log splitter Keep hands away from splits and cracks which open in logs They may close suddenly which could cause serious p...

Страница 7: ...yond its specified capacity Ensure that there are no nails screws or other foreign objects in logs to be split WARNING The warnings cautions and instructions referred to in this manual cannot cover al...

Страница 8: ...rs left and right when facing the front of the splitter as in operation The initial stages of assembly are easier to carry out if the log splitter is on it s back Stand behind the splitter and holding...

Страница 9: ...y Step 2 Attach the right stabilising foot 10 to the base using 2 M8x16 button head bolts 9 and 2 M8 nuts 8 Step 3 Attach the left stabilising foot 14 to the base using 2 M8x16 button head bolts 9 and...

Страница 10: ...entation is the valve stem and the grub screw in the valve knob should be aligned with this before tightening Step 5 Hook one end of a spring 4 through the hole in the lug on the forward end of the ri...

Страница 11: ...ce of the platform should be just above the edge of the lower axe blade If it is not open the jack release valve and check that the lower axe blade is fully returned M6x15 CSK M6 nut Step 7 Insert the...

Страница 12: ...itioned pointing to the inside as shown Tab Step 9 Insert the left foot pedal 14 into the left hand jack arm and secure with the bolt in the top Ensure that the tab on the right hand lever is located...

Страница 13: ...DUOCUT 10 Ton Manual Log Splitter 13 Know your Duocut 1 2 3 5 4 6 7 8 10 3 2 9...

Страница 14: ...ual Log Splitter Know your Duocut 14 1 Upper axe blade 2 Locking pin 3 Log support rail 4 Hand lever 5 Lower axe blade 6 Right foot pedal 7 Return valve 8 Left foot pedal 9 Hydraulic fluid filler plug...

Страница 15: ...he machine as this could be dangerous for the operator and could seriously damage the splitter Never attempt to split a log if it is sitting at an angle WARNING Never fully unscrew the return valve On...

Страница 16: ...sure the log is stable on the platform Step 2 Pull outwards simultaneously on the ring pulls for both of the upper axe blade locking pins and lower the blade so it rests on the top of the log A video...

Страница 17: ...ed Check that the jack return valve is closed Step 3 Use the left pedal to gently raise the lower blade and lift the log this will in turn lift the upper blade Continue raising the log until the locki...

Страница 18: ...ping with the right pedal to apply the full 10 tons of force and split the log Step 5 Once the log begins to split the resistance will drop and you can switch back to the left pedal to finish splittin...

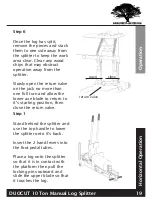
Страница 19: ...he jack no more than one full turn and allow the lower axe blade to return to it s starting position then close the return valve return valve open close Horizontal Operation Step 1 Stand behind the sp...

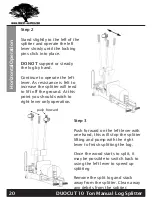
Страница 20: ...increase the splitter will tend to lift off the ground At this point you should switch to right lever only operation Step 3 Push forward on the left lever with one hand this will stop the splitter li...

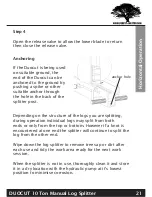
Страница 21: ...ndividual logs may split from both ends or only from the top or bottom However if a knot is encountered at one end the splitter will continue to split the log from the other end Wipe down the log spli...

Страница 22: ...ll funnel to avoid spilling oil Use a good quality hydraulic jack oil Replace the rubber oil plug and close the release valve After one year the hydraulic oil should be replaced in order to extend the...

Страница 23: ...he front surface of the beam and lightly lubricate it Hydraulic pump will not lift The oil level may be low Check oil level as described and top up if necessary The pump may have air trapped in the sy...

Страница 24: ...rts without prior notice Manufactured under license for Forest Master Limited Registered Office Forest Master Ltd Industry Road Heaton Newcastle Upon Tyne NE6 5XB United Kingdom Tel 44 191 2966939 ema...

Отзывы: