background image

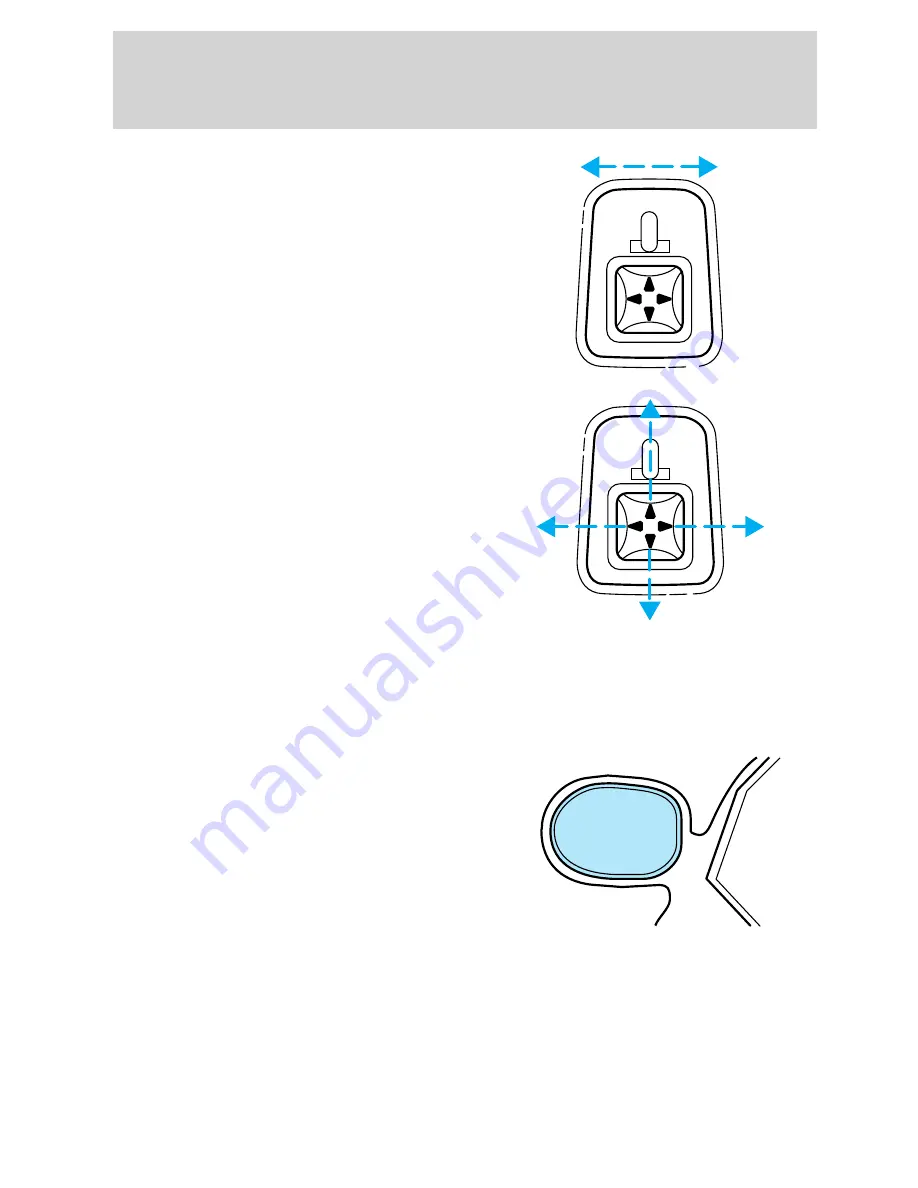
1. Select L to adjust the left mirror
or R to adjust the right mirror.

2. Move the control in the direction
you wish to tilt the mirror.

3. Return to the center position to lock mirrors in place.

4. Adjust spotter mirrors (if equipped) manually.

Heated outside mirrors (if equipped)

Both mirrors are heated
automatically to remove ice, mist
and fog when the rear window
defrost is activated.

Do not remove ice from the mirrors
with a scraper or attempt to
readjust the mirror glass if it is
frozen in place. These actions could
cause damage to the glass and
mirrors.

MIRRORS

L            R

MIRRORS

L            R

Driver controls

81

Содержание 2002 Expedition

Страница 1: ...2 20 AM www carburetor manual com Would you like some Free Manuals http carburetor manual com free shop manual club t 13 html Also visit http freeshopmanual com for more Free Manuals Also Visit my web...

Страница 2: ...ette CD changer compatible 18 AM FM stereo with CD 30 Rear seat controls 39 CD changer 42 Climate controls 47 Manual heating and air conditioning 47 Electronic automatic temperature control 50 Lights...

Страница 3: ...e emergencies 186 Hazard flasher switch 187 Fuses and relays 189 Changing tires 196 Jump starting 202 Wrecker towing 207 Customer assistance 208 The dispute settlement board 211 Utilizing the mediatio...

Страница 4: ...ensions 266 Accessories 269 Index 273 All rights reserved Reproduction by any means electronic or mechanical including photocopying recording or by any information storage and retrieval system or tran...

Страница 5: ...inted with your vehicle by reading this handbook The more you know and understand about your vehicle the greater the safety and pleasure you will derive from driving it For more information on Ford Mo...

Страница 6: ...ing triangle symbol These comments should be read and observed Warning symbols on your vehicle When you see this symbol it is imperative that you consult the relevant section of this guide before touc...

Страница 7: ...s Guide Special instructions For your safety your vehicle is fitted with sophisticated electronic controls By operating other electronic equipment e g mobile telephone without exterior aerial electro...

Страница 8: ...ration Package Notice to owners of pickup trucks and utility type vehicles Utility vehicles have a significantly higher rollover rate than other types of vehicles Before you drive your vehicle please...

Страница 9: ...ild Seat Installation Warning Child Seat Tether Anchorage Brake System Anti Lock Brake System Brake Fluid Non Petroleum Based Traction Control Master Lighting Switch Hazard Warning Flasher Fog Lamps F...

Страница 10: ...l Engine Coolant Engine Coolant Temperature Do Not Open When Hot Battery Avoid Smoking Flames or Sparks Battery Acid Explosive Gas Fan Warning Power Steering Fluid Maintain Correct Fluid Level MAX MIN...

Страница 11: ...and will not require towing Light turns on solid Temporary malfunctions may cause the light to illuminate Examples are 1 The vehicle has run out of fuel 2 Poor fuel quality or water in the fuel 3 The...

Страница 12: ...d Also momentarily illuminates at start up to ensure the circuit is functional If the brake warning lamp does not illuminate at these times or illuminates after releasing the parking brake seek servic...

Страница 13: ...the ON position and the engine is OFF The light also illuminates when the air suspension switch is turned OFF or the air suspension system requires servicing For information on the air suspension sys...

Страница 14: ...he hazard lights are turned on If the lights stay on continuously or flash faster check for a burned out bulb High beams Illuminates when the high beam headlamps are turned on Door ajar Illuminates wh...

Страница 15: ...int system SRS warning chime Sounds when a malfunction in the supplemental restraint system front or side airbags has been detected Have the supplemental restraint system inspected immediately Headlam...

Страница 16: ...evel If the coolant is not at its proper level the gauge indication will not be accurate If the gauge enters the red section the oil pressure engine coolant and Check Engine Service Engine Soon indica...

Страница 17: ...is in motion or on a grade When refueling the vehicle from empty indication the amount of fuel that can be added will be less than the advertised capacity due to the reserve fuel A minimum of 22 2 L...

Страница 18: ...lease the reset button until a T appears in the display this represents the trip mode Press and hold the button for three seconds to reset Tachometer Indicates the engine speed in revolutions per minu...

Страница 19: ...CHANGER COMPATIBLE SCAN VOL PUSH ON REW 1 FF 2 SIDE 1 2 3 4 COMP 5 SHUFF 6 AUTO TUNE SEEK SEL BAL FADE MUTE FM AM EJ BASS TREB CD TAPE RDS SCAN VOL PUSH ON REW 1 FF 2 SIDE 1 2 3 4 COMP 5 SHUFF 6 AUTO...

Страница 20: ...off Turn the control to raise or lower volume If the volume is set above a certain level and the ignition is turned off the volume will come back on at a nominal listening level when the ignition swit...

Страница 21: ...of bass Treble adjust The treble adjust control allows you to increase or decrease the audio system s treble output Press the TREB control Use the SEL control to increase or decrease the amount of tr...

Страница 22: ...band Seek function in tape mode Press to listen to the previous selection on the tape or return to the beginning of the current selection Press to listen to the next selection on the tape Seek functio...

Страница 23: ...site side of the tape To stop on a particular selection press the SCAN control again Scan function in CD mode Press the SCAN control to hear a short sampling of all selections on the CD The CD will sc...

Страница 24: ...you selected Autoset memory preset Autoset allows you to set strong radio stations without losing your original manually set preset stations This feature is helpful on trips when you travel between ci...

Страница 25: ...ed there Hold the control to move through the frequencies quickly Press to move to the next frequency up the band whether or not a listenable station is located there Hold for quick movement Tune adju...

Страница 26: ...occur Rewind The rewind control works in tape and CD modes In tape mode radio play will continue until rewind is stopped with the TAPE control or the beginning of the tape is reached In CD mode pressi...

Страница 27: ...te Dolbyt noise reduction The Dolbyt noise reduction system is manufactured under license from Dolby Laboratories Licensing Corporation Dolbyt and the double D symbol are registered trademarks of Dolb...

Страница 28: ...eive station identification or program type from RDS equipped FM radio stations The Federal Communications Commission FCC and the Canadian Radio and Telecommunications Commission CRTC recommend FM rad...

Страница 29: ...S markets Program type Press the RDS control until the FIND program type is displayed Use the SEL control to select the program type With the feature on use the SEEK or SCAN control to find the desir...

Страница 30: ...ur listening needs Press the control to turn the feature on or off Use the SEL control to select the desired signal mode the selected mode will appear in the display The following signal modes can be...

Страница 31: ...are illuminated During the operation of any selected mode lighting for the individual function controls will either illuminate or turn off Those controls which have a function for the specific mode of...

Страница 32: ...on switch is turned back on Speed sensitive volume if equipped With this feature radio volume changes automatically and slightly with vehicle speed to compensate for road and wind noise The recommende...

Страница 33: ...t Treble adjust The treble adjust control allows you to increase or decrease the audio system s treble output Speaker balance adjust Speaker sound distribution can be adjusted between the right and le...

Страница 34: ...k forward to the next track of the current disc After the last track has been completed the first track of the current disc will automatically replay Scan function The scan function works in radio CD...

Страница 35: ...p to six preset AM stations and twelve FM stations six in FM1 and six in FM2 Setting memory preset stations 1 Select the frequency band with the AM FM select control 2 Select a station Refer to Tune a...

Страница 36: ...tations press the AUTO control again Setting the clock Press the RDS control until SELECT HOUR or SELECT MINS is displayed Use the SEL control to manually set the time Press to increase hours minutes...

Страница 37: ...last Press the CD control again to toggle between CD and CD changer mode if equipped Do not insert any promotional odd shaped or sized discs or discs with removable labels into the CD player as jammin...

Страница 38: ...ying media Press the control again to return to the playing media Radio data system RDS feature This feature allows your audio system to receive station identification or program type from RDS equippe...

Страница 39: ...a traffic report if it is broadcasting RDS data Program type Press the RDS control until FIND program type is displayed Use the SEL control to select the program type With the feature on use the SEEK...

Страница 40: ...isten to two different radio stations at the same time To turn on the rear seat controls press the memory preset controls 3 and 5 at the same time The will appear in the display Pressing 3 and 5 at th...

Страница 41: ...THE VOLUME Press the control to increase volume Press the control to decrease volume From the rear seat controls volume control can be set no higher than the current radio setting unless the speakers...

Страница 42: ...and the fade control is enabled For the Personal Audio System to be enabled the rear seat controls must be active and illuminated in the radio display MODE SELECT Push the MODE control to toggle betwe...

Страница 43: ...band In tape mode use the SEEK function to access the next or previous selection In CD mode if equipped use the SEEK function to access the next or previous selection CD CHANGER IF EQUIPPED Your CD c...

Страница 44: ...the label side is facing up If you pull too hard on the disc holder the disc holder may come completely out of the magazine If this happens reinsert the disc holder back into the magazine 3 Insert ea...

Страница 45: ...dd shaped or sized discs or discs with removable labels into the CD player as jamming may occur TROUBLESHOOTING THE CD CHANGER IF EQUIPPED The laser beam used in the compact disc player is harmful to...

Страница 46: ...into the CD player as jamming may occur CLEANING CASSETTE PLAYER IF EQUIPPED Clean the tape player head with a cassette cleaning cartridge after 10 to 12 hours of play in order to maintain the best so...

Страница 47: ...stations Terrain Hills mountains and tall buildings between your vehicle s antenna and the radio station signal can cause FM reception problems Static can be caused on AM stations by power lines elec...

Страница 48: ...or higher Since the air conditioner removes considerable moisture from the air during operation it is normal if clear water drips on the ground under the air conditioner drain while the system is wor...

Страница 49: ...imum heating by distributing outside air through the floor ducts However the air will not be cooled below the outside temperature because the air conditioning does not operate in this mode FLR DEF Dis...

Страница 50: ...icle if driven for two or three minutes with the windows open This will force most of the hot stale air out of the vehicle Once the vehicle has been aired out operate the climate control system as des...

Страница 51: ...ess OFF The outside temperature function will continue to operate until the ignition is turned off Automatic operation Press AUTOMATIC and select the desired temperature The selected temperature and t...

Страница 52: ...ture function AUTO or one of the override controls and manual control of fan speed if automatic fan speed is not desired To control the temperature select any temperature between 18 C 65 F and 29 C 85...

Страница 53: ...fan operation press AUTOMATIC Manual override controls The manual override controls allow you to determine where airflow is directed To return to full automatic control press AUTOMATIC The air condit...

Страница 54: ...panel registers FLOOR Distributes outside air through the floor ducts However the air cannot be cooled below the outside temperature because the air conditioning does not operate in this mode FLR DEF...

Страница 55: ...s not moving The readings that you get may not agree with temperatures given on the radio due to differences in vehicle and station locations Operating tips In humid weather conditions place the clima...

Страница 56: ...duce your ability to see through your windshield Avoid placing small objects on top of the instrument panel These objects may fall down into the defroster outlets and block airflow in addition to dama...

Страница 57: ...y A C controls they may be located in the floor console or located in the overhead console If your vehicle is equipped with a moon roof and a navigation system you will not have a front auxiliary A C...

Страница 58: ...seat floor vent located in the driver s side rear quarter trim panel When the auxiliary A C heater control is set to PANEL airflow occurs from the overhead 2nd and 3rd row vents Turn the fan speed co...

Страница 59: ...og A small LED will illuminate when the rear defroster is activated The ignition must be in the ON position to operate the rear window defroster The defroster turns off automatically after 10 minutes...

Страница 60: ...The foglamp indicator light will illuminate Autolamp control The autolamp system provides light sensitive automatic on off control of the exterior lights normally controlled by the headlamp control Th...

Страница 61: ...not provide adequate lighting during these conditions Failure to activate your headlamps under these conditions may result in a collision High beams Push forward to activate Pull toward you to deacti...

Страница 62: ...your vehicle has been in an accident the alignment of your headlamps should be checked by a qualified service technician TURN SIGNAL CONTROL Push down to activate the left turn signal Push up to activ...

Страница 63: ...the courtesy lamps come on any of the remote entry controls are pressed and the ignition is OFF With the ignition key in the ACC or ON position the rear dome lamp can be turned ON or OFF by sliding t...

Страница 64: ...p performance light brightness and pattern and safe visibility The correct bulbs will not damage the lamp assembly or void the lamp assembly warranty and will provide quality bulb burn time Function N...

Страница 65: ...mp lens 2 To remove the old bulb twist 1 4 turn and pull it out 3 Twist in a new bulb 4 Align and press the map lamp lens back on and test the lamp operation Replacing headlamp bulbs 1 Make sure that...

Страница 66: ...mp assembly When the grooves in the plastic base are aligned push the bulb into the lamp assembly until the plastic base contacts the rear of the lamp assembly 9 Install bulb retaining ring over the p...

Страница 67: ...tail lamp backup lamp bulbs The tail lamp backup lamp bulbs are located in the same portion of the tail lamp assembly one just below the other Follow the same steps to replace either bulb 1 Open the l...

Страница 68: ...amp bulbs For bulb replacement see a dealer or qualified technician High mount brakelamp To change the high mount brakelamp bulbs 1 Remove the four screws from the high mount brakelamp assembly 2 Care...

Страница 69: ...cense plate lamp bulbs 1 Reach behind the rear bumper to locate the bulb 2 Twist the bulb socket counterclockwise and carefully pull to remove it from the lamp assembly 3 Pull out the old bulb from th...

Страница 70: ...conds Rear window wiper washer controls For rear wiper operation rotate the rear window wiper and washer control to the desired position Select INT 1 3 5 second interval rear wiper INT 2 10 5 second i...

Страница 71: ...an water To avoid damaging the blades do not use fuel kerosene paint thinner or other solvents Changing the wiper blades To replace the wiper blades 1 Pull the wiper arm away from the windshield and l...

Страница 72: ...to the desired position then release the control Never adjust the steering wheel when the vehicle is moving ILLUMINATED VISOR MIRROR IF EQUIPPED To turn on the visor mirror lamps lift the mirror cove...

Страница 73: ...rage door opener if equipped The storage compartment can be converted to accommodate a variety of aftermarket garage door openers Place Velcro hook onto back side of aftermarket transmitter opposite o...

Страница 74: ...oon roof control to close To halt motion at any point during one touch opening press the control a second time The moon roof has a sliding shade that can be manually opened or closed when the glass pa...

Страница 75: ...n adjustment Most geographic areas zones have a magnetic north compass point that varies slightly from the northerly direction on maps This variation is four degrees between adjacent zones and will be...

Страница 76: ...d on the center rear view mirror post 3 Turn ignition to the ON position 4 Press and hold the RESET button on top of the compass module until the message display in the trip computer shows the current...

Страница 77: ...el structures and high voltage lines For optimum calibration turn off all electrical accessories heater air conditioning wipers etc and make sure all vehicle doors are shut 1 Start the vehicle With tr...

Страница 78: ...s and release 2 Drive the vehicle slowly less than 5 km h 3 mph in circles until CAL indicator turns off in about 2 3 complete circles 3 The compass is now calibrated Power quarter rear windows if equ...

Страница 79: ...e damage not covered by your warranty The auxiliary power point is located on the instrument panel Do not plug optional electrical accessories into the cigarette lighter Use the power point Power outl...

Страница 80: ...e bottom portion of the rocker switch to open One touch down Press AUTO completely down and release quickly The driver s window will open fully Depress again to stop window operation One touch down ca...

Страница 81: ...will change from the normal state to the non glare state when bright lights glare reach the inside rear view mirror When the inside rear view mirror detects bright light from in front of or behind the...

Страница 82: ...t spotter mirrors if equipped manually Heated outside mirrors if equipped Both mirrors are heated automatically to remove ice mist and fog when the rear window defrost is activated Do not remove ice f...

Страница 83: ...row space like an automatic car wash POWER ADJUSTABLE FOOT PEDALS The accelerator and brake pedal should only be adjusted when the vehicle is stopped and the gearshift lever is in the P Park position...

Страница 84: ...eed control in heavy traffic or on roads that are winding slippery or unpaved To turn speed control off Press OFF or Turn off the vehicle ignition Once speed control is switched off the previously pro...

Страница 85: ...ngage This is normal Pressing RES will re engage it Do not use the speed control in heavy traffic or on roads that are winding slippery or unpaved To set a higher set speed Press and hold SET ACCEL Re...

Страница 86: ...Down function Each press will decrease the set speed by 1 6 km h 1 mph or Depress the brake pedal When the desired vehicle speed is reached press SET ACCEL To disengage speed control Depress the brake...

Страница 87: ...ed control OFF control is pressed the brake or clutch is applied or the ignition is turned to the OFF position HOMELINKT UNIVERSAL TRANSCEIVER IF EQUIPPED The HomeLinkt Universal Transceiver located o...

Страница 88: ...vehicle parked in the garage 1 Prepare for programming the HomeLinkt Universal Transceiver by erasing the three factory default codes by holding down the two outside buttons until the red light begins...

Страница 89: ...om a slow to a fast flash Operating the HomeLinkT Universal Transceiver Once programmed the HomeLinkt Universal Transceiver can be used in place of hand held transmitters To operate simply press and r...

Страница 90: ...me garage door openers may require this procedure to be done a third time to complete the training The 2nd or 3rd press from step 3 will activate the door The HomeLinkt Universal Transceiver has now b...

Страница 91: ...s just been programmed TRIP COMPUTER IF EQUIPPED The trip computer tells you about the condition of your vehicle through a constant monitor of vehicle systems You may select display features on the tr...

Страница 92: ...e function will flash for 5 seconds when you have approximately the following distance you can drive before the fuel tank is empty 80 km 50 miles 40 km 25 miles 16 km 10 miles Average fuel economy The...

Страница 93: ...e To return to normal overdrive mode press the Transmission Control Switch again The TCIL the word OFF will no longer be illuminated When you shut off and re start your vehicle the transmission will a...

Страница 94: ...r the brake pedal To remove the floor mat reverse the installation procedure LIFTGATE To open the rear window turn the liftgate handle to the right To open the liftgate turn the liftgate handle to the...

Страница 95: ...ar does not move To adjust the luggage rack push the adjustment lever forward toward the front of the vehicle then slide the cross bar forward and lock the adjusting levers by pushing them down toward...

Страница 96: ...e in the Remote entry section in this chapter Press U to unlock all doors and L to lock all doors Childproof door locks When these locks are set the rear doors cannot be opened from the inside The rea...

Страница 97: ...e the personal alarm The remote entry features only operate with the ignition in the LOCK position This system will disable the power door lock controls These will not work until the vehicle is disarm...

Страница 98: ...locked by the key fob key pad or power door switch if pressed while the door was open The UNLOCK function will operate again after you unlock the vehicle using the key fob or key pad turn the ignitio...

Страница 99: ...ating range can be caused by weather conditions nearby radio towers structures around the vehicle other vehicles parked next to the vehicle To replace the battery 1 Twist a thin coin between the two h...

Страница 100: ...ht times in rapid succession within 10 seconds with the eighth turn ending in the 4 ON position The doors will lock unlock to confirm that programming mode has been entered Within 20 seconds program a...

Страница 101: ...s Press the SET control The SET control indicator light will briefly illuminate While the light is illuminated press control 1 To program position two repeat the previous procedure using control 2 To...

Страница 102: ...e and liftgate window are closed the engine is running you shift into any gear putting the vehicle in motion Relock The autolock feature repeats when any door except the drivers is opened then closed...

Страница 103: ...the middle of the controls to ensure a good activation This system will disable the power door lock controls These will not work until the vehicle is disarmed Refer to Power door locks in the Driver...

Страница 104: ...ad inactivity the keyfob UNLOCK button is pressed the ignition is turned to the ON position Unlocking the doors with the keyless entry system To unlock the driver door enter either the factory set cod...

Страница 105: ...re activate autolock repeat steps 1 4 SECURILOCKY PASSIVE ANTI THEFT SYSTEM SecuriLocky passive anti theft system is an engine immobilization system This system prevents the engine from being started...

Страница 106: ...do it yourself refer to Programming spare keys Large metallic objects electronic devices on the key chain that can be used to purchase gasoline or similar items or a second key on the same key ring a...

Страница 107: ...coded key may lead to a NO START condition If an unprogrammed key is used in the ignition it will cause a NO START condition Programming spare keys A maximum of eight keys can be coded to your vehicl...

Страница 108: ...tion 5 Within 10 seconds of removing the second coded key insert the new unprogrammed key new key valet key into the ignition and turn the ignition from 3 OFF to 4 ON maintain ignition in 4 ON for at...

Страница 109: ...tion as possible Refer to the following to raise and lower the head restraints The head restraints can be moved up and down Adjusting the front manual seat Never adjust the driver s seat or seatback w...

Страница 110: ...ull lever up to adjust seatback 60 40 split bench seat if equipped Lift the release bar to move the seat forward or backward Ensure the seat is relatched into place Pull the seatback handle up to recl...

Страница 111: ...lumbar support control toward the rear of vehicle to move the lumbar support back for less direct support Adjusting the front power seat if equipped Never adjust the driver s seat or seatback when the...

Страница 112: ...collision The control is located on the outboard side of the seat cushion Press to raise or lower the front portion of the seat cushion Press to raise or lower the rear portion of the seat cushion Pr...

Страница 113: ...t the previous procedure using control 2 To program position three repeat the previous procedure but press controls 1 and 2 simultaneously A position can only be recalled when the transmission gearshi...

Страница 114: ...the head restraints Push or pull the head rests to the desired position Rear folding bench seat if equipped Folding down the rear seats Ensure that the headrest is in the down position and no objects...

Страница 115: ...Always latch the vehicle seat to the floor whether the seat is occupied or empty If not latched the seat may cause injury during a sudden stop 1 Rotate the closeout panel onto the seatback and press t...

Страница 116: ...nts refer to Safety Restraints in this chapter The third row seat may be removed from the vehicle for additional cargo space Accessing the third row seat Your vehicle is equipped with an easy entry se...

Страница 117: ...areas are clear Folding down the third row seat Pull the seat release lever located on the lower right side of the seatback while pushing the seatback down into the seat cushion The seatback will lat...

Страница 118: ...located on the lower right side of the seatback while pushing the seatback down into the seat cushion The seatback will latch into place 4 Lift the seat release bar located at the center of the seat...

Страница 119: ...ard guide the seat positioners over the front pins of the floor tubs 2 Guide the positioners around each pin and lower the seat When the rear of the seat is 10 13 cm 4 5 in above the rear pins let the...

Страница 120: ...ide of the seatback while pushing the seatback down into the seat cushion 2 The seatback will latch into place 3 To release the rear floor latches of the 3rd row seat lift the seat release bar located...

Страница 121: ...into the floor SAFETY RESTRAINTS Safety restraints precautions Always drive and ride with your seatback upright and the lap belt snug and low across the hips To reduce the risk of injury make sure chi...

Страница 122: ...ty belt assembly which is made up of one buckle and one tongue that are designed to be used as a pair 1 Use the shoulder belt on the outside shoulder only Never wear the shoulder belt under the arm 2...

Страница 123: ...fety restraints in the vehicle are combination lap and shoulder belts The front passenger and rear seat outboard safety belts have two types of locking modes described below Vehicle sensitive mode The...

Страница 124: ...matically pre locked The belt will still retract to remove any slack in the shoulder belt The automatic locking mode is not available on the driver safety belt When to use the automatic locking mode A...

Страница 125: ...belt is now in the automatic locking mode How to disengage the automatic locking mode Ford Motor Company recommends that all safety belt assemblies and attaching hardware should be inspected by a qua...

Страница 126: ...ase the risk of injury in collisions Safety belt pretensioner Your vehicle is equipped with safety belt pretensioners at the driver and front passenger seating positions The safety belt pretensioner i...

Страница 127: ...down To raise the height of the shoulder belt slide the height adjuster up Pull down on the height adjuster to make sure it is locked in place Position the shoulder belt height adjusters so that the...

Страница 128: ...across the hips Shorten and fasten the belt when not in use 2nd row center seating position if equipped The lap belt will adjust automatically To fasten grasp the tongue and with a continuous motion...

Страница 129: ...e driver s safety belt is unbuckled by intermittently sounding a chime and illuminating the safety belt warning lamp in the instrument cluster If Then The driver s safety belt is not buckled approxima...

Страница 130: ...y 60 in light trucks Traffic is light Nearly 1 of 2 deaths occur in single vehicle crashes many when no other vehicles are around Belts wrinkle my clothes Possibly but a serious crash can do much more...

Страница 131: ...FF position If vehicle is equipped with Autolamps this will not affect the procedure To reduce the risk of injury do not deactivate activate the Belt Minder feature while driving the vehicle 1 Turn th...

Страница 132: ...of the webbing on the label Also use the safety belt extension only if the safety belt is too short for you when fully extended Do not use extensions to change the fit of the shoulder belt across the...

Страница 133: ...d impact severity This information will assist Ford Motor Company in the servicing vehicle and helping to better understand real world collisions and further improve the safety of future vehicles FOR...

Страница 134: ...is provided Always transport children 12 years old and under in the back seat and always properly use appropriate child restraints National Highway Traffic Safety Administration NHTSA recommends a min...

Страница 135: ...is not designed to offer protection to occupants in the center front seating position Modifications to the front end of the vehicle including frame bumper front end body structure and tow hooks may af...

Страница 136: ...e a forward facing child seat in the front seat move the seat all the way back How does the air bag supplemental restraint system work The air bag SRS is designed to activate when the vehicle sustains...

Страница 137: ...njuries such as fractures facial and eye injuries or internal injuries particularly to occupants who are not properly restrained or are otherwise out of position at the time of air bag deployment Thus...

Страница 138: ...will be heard The tone pattern will repeat periodically until the problem and or light are repaired If any of these things happen even intermittently have the SRS serviced at your dealership or by a...

Страница 139: ...used for the front air bags Two crash sensors located under the outboard side of the front seats attached to the floor Side air bags in combination with seat belts can help reduce the risk of severe i...

Страница 140: ...will increase the risk of injury in a collision Determining if the system is operational The SRS uses a readiness light in the instrument cluster or a tone to indicate the condition of the system Ref...

Страница 141: ...r hold a child on his or her lap while the vehicle is moving The passenger cannot protect the child from injury in a collision Always follow the instructions and warnings that come with any infant or...

Страница 142: ...e used if the shoulder belt rests in front of the child s face or neck or if the lap belt does not fit snugly on both thighs or if the thighs are too short to let the child sit all the way back on the...

Страница 143: ...ntal unbuckling Place seat back in upright position Put the safety belt in the automatic locking mode Refer to Automatic locking mode passenger side front and outboard rear seating positions if equipp...

Страница 144: ...air bag If you must use a forward facing child seat in the front seat move the seat all the way back 1 Position the child safety seat in a seat with a combination lap and shoulder belt Children 12 an...

Страница 145: ...ction the tongue is coming from for that seating position until you hear a snap and feel the latch engage Make sure the tongue is latched securely by pulling on it 5 To put the retractor in the automa...

Страница 146: ...ll more belt out If the retractor is not locked unbuckle the belt and repeat steps two through nine Check to make sure the child seat is properly secured before each use Installing child safety seat i...

Страница 147: ...amount of belt by turning the tongue at a right angle to the belt and pulling on it until it reaches the buckle Be sure the belt webbing is not twisted 3 Insert the tongue into the correct buckle for...

Страница 148: ...e hardware kits part number 613D74 including instructions may be obtained at no charge from any Ford or Lincoln Mercury dealer Tighten the anchor according to specifications Otherwise the safety seat...

Страница 149: ...shown The tether strap may not work properly if attached somewhere other than the correct tether anchor 1 Position the child safety seat on the seat cushion 2 Route the child safety seat tether strap...

Страница 150: ...ther strap is clipped incorrectly the child safety seat may not be retained properly in the event of a collision 5 Refer to the Installing child safety seats in combination lap and shoulder belt seati...

Страница 151: ...n control system This system meets all Canadian Interference Causing Equipment standard requirements regulating the impulse electrical field strength of radio noise When starting a fuel injected engin...

Страница 152: ...ystem controls the engine s idle revolutions per minute RPM When the engine starts the idle RPM runs faster to warm the engine If the engine idle speed does not slow down automatically have the vehicl...

Страница 153: ...il the key turns freely This condition may occur when front wheels are turned front wheel is against the curb steering wheel is turned when getting in or out of the vehicle Make sure the corresponding...

Страница 154: ...e key to START position 4 When the engine starts release the key then release the accelerator pedal gradually as the engine speeds up 5 After idling for a few seconds apply the brake and release the p...

Страница 155: ...f component wear contain or emit chemicals known to the State of California to cause cancer and birth defects or other reproductive harm Important ventilating information If the engine is idling while...

Страница 156: ...ile braking the vehicle should be inspected by a qualified service technician The ABS operates by detecting the onset of wheel lockup during brake applications and compensates for this tendency The wh...

Страница 157: ...e warning light also remains illuminated with parking brake released If your brake warning lamp illuminates have your vehicle serviced immediately Parking brake Apply the parking brake whenever the ve...

Страница 158: ...ng uses energy from the engine to help steer the vehicle To prevent damage to the power steering pump Never hold the steering wheel to the extreme right or the extreme left for more than a few seconds...

Страница 159: ...e at its lowest height when ignition is OFF to provide easy entry and exit Whenever a door is opened including the liftgate the system memorizes and maintains the height of the vehicle until all doors...

Страница 160: ...illuminates again turn the air suspension switch off and have the vehicle serviced by a dealer or qualified service technician If the vehicle is loaded beyond the recommended maximum payload the CK S...

Страница 161: ...d four wheel drive vehicles are not designed for cornering at speeds as high as passenger cars any more than low slung sports cars are designed to perform satisfactorily under off road conditions Avoi...

Страница 162: ...y Refer to Fuses and relays in the Roadside emergencies chapter Do not drive your vehicle until you verify that the brakelamps are working If your vehicle gets stuck in mud or snow it may be rocked ou...

Страница 163: ...mperature or if the downshifts and other throttle conditions do not function normally see your dealer or a qualified service technician as soon as possible Understanding gearshift positions To put you...

Страница 164: ...TCIL the word OFF on the end of the gearshift lever will illuminate Drive Not shown on the display Activate by pressing the transmission control switch TCS on the end of the gearshift lever with the...

Страница 165: ...Overdrive or Drive O D OFF when passing another vehicle push the accelerator to the floor The transmission will downshift to the appropriate gear third second or first gear Shift strategy 4R100 automa...

Страница 166: ...t weather It is the driver s responsibility for ensuring that their path is clear when operating the vehicle To help avoid personal injury always use caution when in reverse and when using the reverse...

Страница 167: ...he gear selector is placed in R Reverse and the ignition is ON A reverse sensing control allows the driver to disable the reverse sensing system only when the ignition is ON and the gear selector is i...

Страница 168: ...sengagement of the transfer case damage to the transfer case increased tire wear decreased fuel economy and difficulty turning Control Trac automatic four wheel drive system if equipped Your 4x4 featu...

Страница 169: ...ese vehicles Using the Control Trac system Shifting from A4WD to 4H Move the 4WD control from A4WD to 4H at any forward speed up to 88 km h 55 mph At temperatures below 0 C 32 F shifts from A4WD to 4H...

Страница 170: ...le also make it handle differently than an ordinary passenger car Maintain steering wheel control at all times especially in rough terrain Since sudden changes in terrain can result in abrupt steering...

Страница 171: ...ide sideways out of control or roll over Remember your safety and the safety of others should be your primary concern If your vehicle gets stuck If the vehicle is stuck it may be rocked out by shiftin...

Страница 172: ...ving the vehicle 4WD Systems if equipped 4WD when you select the 4WD mode uses all four wheels to power itself This increases traction enabling you to drive over terrain and road conditions that a con...

Страница 173: ...nition system gets wet the vehicle may stall Once through water always try the brakes Wet brakes do not stop the vehicle as effectively as dry brakes Drying can be improved by moving your vehicle slow...

Страница 174: ...er lies in losing traction slipping sideways and possibly rolling over Whenever driving on a hill determine beforehand the route you will use Do not drive over the crest of a hill without seeing what...

Страница 175: ...l Avoid sudden applications of power and quick changes of direction on snow and ice Apply the accelerator slowly and steadily when starting from a full stop Avoid sudden braking as well Although a 4WD...

Страница 176: ...commends you should not use these tires for highway driving If you use any tire wheel combination not recommended by Ford it may adversely affect vehicle handling and could cause steering suspension a...

Страница 177: ...rmance whether loaded or empty and durable load carrying capability For this reason Ford strongly recommends that you do not make modifications such as adding or removing parts such as lift kits or st...

Страница 178: ...ket equipment Payload Combined maximum allowable weight of cargo occupants and optional equipment The payload equals the gross vehicle weight rating minus base curb weight GVW Gross Vehicle Weight Bas...

Страница 179: ...tions Replacement tires with a higher limit than the originals do not increase the GVWR and GAWR limitations The Safety Certification Label found on the driver s door pillar lists several important ve...

Страница 180: ...cars Depending upon the type and placement of the load hauling cargo and people may raise the center of gravity of the vehicle Calculating the load your vehicle can carry tow 1 Use the appropriate max...

Страница 181: ...equently if you tow a trailer Refer to the severe duty schedule in the scheduled maintenance guide Do not tow a trailer until your vehicle has been driven at least 800 km 500 miles Refer to the instru...

Страница 182: ...0 0 3 357 0 7 400 5 4L 3 55 43 2 17 5 760 12 500 0 3 130 0 6 900 Maximum frontal area of trailer is 5 6 square meters 60 square feet Do not exceed the maximum loads listed on the Safety Compliance Cer...

Страница 183: ...ed control to OFF 3 Measure the height of a reference point on the front and rear bumpers at the center of the vehicle 4 Attach the trailer to the vehicle and adjust the hitch equalizers so that the f...

Страница 184: ...quipment for hooking up trailer lamps Using a step bumper The rear bumper is equipped with an integral hitch and requires only a ball with a 25 4 mm one inch shank diameter The bumper has a 1 814 kg 4...

Страница 185: ...ot weather place the gearshift in P Park and increase idle speed This aids engine cooling and air conditioner efficiency Vehicles with trailers should not be parked on a grade If you must park on a gr...

Страница 186: ...um distance is 80 km 50 miles If a distance of 80 km 50 miles or a speed of 56 km 35 mph must be exceeded the drive shaft will have to be removed before the vehicle is towed Ford recommends the drives...

Страница 187: ...getting stuck in the mud or snow are covered some exclusions apply such as impound towing or repossession Canadian customers refer to your Roadside Assistance supplement for exact fuel amounts USING R...

Страница 188: ...294 2582 or visit our website at www ford ca HAZARD FLASHER Use only in an emergency to warn traffic of vehicle breakdown approaching danger etc The hazard flashers can be operated when the ignition i...

Страница 189: ...1 Turn the ignition to the OFF position 2 Check the fuel system for leaks 3 If no fuel leak is apparent reset the fuel pump shut off switch by pushing in on the reset button 4 Turn the ignition to th...

Страница 190: ...e with a higher amperage rating can cause severe wire damage and could start a fire Standard fuse amperage rating and color COLOR Fuse rating Mini fuses Standard fuses Maxi fuses Cartridge maxi fuses...

Страница 191: ...use Relay Location Fuse Amp Rating Passenger Compartment Fuse Panel Description 1 25A Audio 2 5A Overhead Trip Computer Electronic Automatic Temperature Control EATC Powertrain Control Module PCM Clus...

Страница 192: ...odule 9 Not Used 10 Not Used 11 30A Front Washer Pump Relay Wiper Run Park Relay Wiper Hi LO Relay Windshield Wiper Motor Rear Washer Pump Relay 12 15A Air Suspension Switch 13 20A Stop Lamp Switch La...

Страница 193: ...System 4WABS Module 24 10A EATC Module EATC Blower Relay Climate Control Switch Assembly Feeds Fuse 7 25 Not Used 26 10A Right Side Low Beam Headlamp 27 5A Foglamp Relay and Foglamp Indicator 28 10A L...

Страница 194: ...ance and specifications chapter MAXI FUSE 115 MAXI FUSE 116 MAXI FUSE 117 MAXI FUSE 118 MAXI FUSE 111 MAXI FUSE 112 MAXI FUSE 113 MAXI FUSE 114 MAXI FUSE 107 MAXI FUSE 108 MAXI FUSE 109 MAXI FUSE 110...

Страница 195: ...ps DRL Fog Lamps 10 20A Fuel Pump 11 20A Alternator Field 12 10A Rear Wipers 13 15A A C Clutch 14 Not Used 15 10A Running Board Lamps 16 Not Used 17 10A Flip Windows 18 15A Powertrain Control Module F...

Страница 196: ...odule 113 40A Ignition Switch Battery Feed Run and Accessory Circuits 114 30A Climate Control Auxiliary Blower 115 Not Used 116 40A Rear Window Defroster Heated Mirrors 117 Not Used 118 Not Used 201 T...

Страница 197: ...ring wheel firmly and slowly move to a safe place on the side of the road Spare tire information Your vehicle is equipped with a spare tire that may be used as a spare or a regular tire The spare is i...

Страница 198: ...g the thumbwheel counterclockwise to relieve tension against the stowage bracket 4 If equipped with a two piece lug wrench assemble the lug wrench as shown in the illustration To assemble screw the pa...

Страница 199: ...stall access plug if removed Tire change procedure To prevent the vehicle from moving when you change a tire be sure the parking brake is set then block in both directions the wheel that is diagonally...

Страница 200: ...n engine OFF 3 Block the diagonally opposite wheel 4 Obtain the spare tire and jack from their storage locations 5 Use the tip of the lug wrench to remove any wheel trim 6 Loosen each wheel lug nut on...

Страница 201: ...ansmission alone will not prevent the vehicle from moving or slipping off the jack even if the transmission is in P Park To prevent the vehicle from moving when you change the tire be sure that the pa...

Страница 202: ...the tire Never use the front or rear differential as a jacking point 9 Remove the lug nuts with the lug wrench 10 Replace the flat tire with the spare tire making sure the valve stem is facing outwar...

Страница 203: ...r may become damaged Preparing your vehicle When the battery is disconnected or a new battery is installed the transmission must relearn its adaptive strategy As a result of this the transmission may...

Страница 204: ...otect any electrical surges Turn all other accessories off Connecting the jumper cables 1 Connect the positive booster cable to the positive terminal of the discharged battery Note In the illustration...

Страница 205: ...he intake manifold as grounding points Do not connect the end of the second cable to the negative terminal of the battery to be jumped A spark may cause an explosion of the gases that surround the bat...

Страница 206: ...jumper cables Remove the jumper cables in the reverse order that they were connected 1 Remove the jumper cable from the ground metal surface Note In the illustrations lightning bolts are used to desig...

Страница 207: ...ery 4 Remove the jumper cable from the positive terminal of the disabled vehicle s battery After the disabled vehicle has been started and the jumper cables removed allow it to idle for several minute...

Страница 208: ...o the OFF position On 4x2 vehicles it is acceptable to tow the vehicle with the front wheels on the ground without dollies and the rear wheels off the ground On 4x4 vehicles it is recommended that you...

Страница 209: ...erns or are unsatisfied with the service you are receiving follow these steps 1 Contact your Sales Representative or Service Advisor at your selling servicing dealership 2 If your inquiry or concern r...

Страница 210: ...48121 1 800 521 4140 TDD for the hearing impaired 1 800 232 5952 In Canada Customer Relationship Centre Ford Motor Company of Canada Limited P O Box 2000 Oakville Ontario L6J 5E4 1 800 565 3673 FORD I...

Страница 211: ...e following Benefits during the warranty period depending on the plan you purchase such as reimbursement for rentals coverage for certain maintenance and wear items Protection against covered repair c...

Страница 212: ...ord dealership sales disputes between customer and dealer except those associated with warranty repairs or concerns with the vehicle s performance as designed a request for reimbursement of consequent...

Страница 213: ...ledgment indicating The file number assigned to your application The toll free phone number of the DSB s independent administrator Your dealership and a Ford Motor Company representative will then be...

Страница 214: ...y the Board Since the Board generally meets once a month it may take longer for the Board to consider some cases After a case is reviewed the Board mails you a decision letter and a form on which to a...

Страница 215: ...ices are available in all territories and provinces For more information without charge or obligation call your CAMVAP Provincial Administrator directly at 1 800 207 0685 GETTING ASSISTANCE OUTSIDE TH...

Страница 216: ...O Box 07150 Detroit Michigan 48207 Or call For a free publication catalog order toll free 1 800 782 4356 Monday Friday 8 00 a m 6 00 p m EST Items in this catalog may be purchased by credit card hold...

Страница 217: ...st 1 Two or more repair attempts are made on the same nonconformity likely to cause death or serious bodily injury OR 2 Four or more repair attempts are made on the same nonconformity a defect or cond...

Страница 218: ...if it finds that a safety defect exists in a group of vehicles it may order a recall and remedy campaign However NHTSA cannot become involved in individual problems between you your dealer or Ford Mo...

Страница 219: ...ve and do cause damage to the vehicle Items such as gasoline diesel fuel bird droppings and insect deposits should be washed and sponged off as soon as possible Deposits not removed promptly can cause...

Страница 220: ...leaners or cleaning chemicals in combination with brush agitation to remove brake dust and dirt could wear away the clearcoat finish over time Do not use hydrofluoric acid based or high caustic based...

Страница 221: ...Engine Shampoo and Degreaser F4AZ 19A536 A on all parts that require cleaning and pressure rinse the area with cool water Cover the highlighted areas to prevent water damage when cleaning the engine N...

Страница 222: ...kerosene or paint thinner to clean the windshield rear window or the wiper blades as damage may occur Clean the outside of the windshield or rear window with a non abrasive cleaner such as Ultra Clea...

Страница 223: ...function correctly and not provide injury reduction benefits CLEANING THE INTERIOR FABRIC CARPETS AND CLOTH SEATS Remove dust and loose dirt with a vacuum cleaner Remove light stains and soil with Ex...

Страница 224: ...with a clean soft cloth and Ultra Clear Spray Glass Cleaner E4AZ 19C507 AA Dry the area by wiping with a dry soft clean cloth CLEANING THE INSIDE WINDOWS Use Ultra Clear Spray Glass Cleaner E4AZ 19C50...

Страница 225: ...lish Ford Custom Silicone Gloss Polish Ford Custom Vinyl Protectant not available in Canada Motorcraft Vinyl Conditioner Canada only Ford Deluxe Leather and Vinyl Cleaner not available in Canada Motor...

Страница 226: ...and built to provide the best performance in your vehicle PRECAUTIONS WHEN SERVICING YOUR VEHICLE Be especially careful when inspecting or servicing your vehicle Do not work on a hot engine When the e...

Страница 227: ...P Park 2 Block the wheels to prevent the vehicle from moving unexpectedly Note Do not start your engine with the air cleaner removed and do not remove it while the engine is running OPENING THE HOOD 1...

Страница 228: ...Automatic transmission fluid dipstick 3 Engine oil filler cap 4 Engine oil dipstick 5 Power steering fluid reservoir 6 Brake fluid reservoir 7 Power distribution box 8 Air filter assembly 9 Engine co...

Страница 229: ...nly if they provide cold weather protection without damaging the vehicle s paint finish wiper blades or washer system Note Do not put washer fluid in the engine coolant reservoir Washer fluid placed i...

Страница 230: ...il level is between the MIN and MAX marks the oil level is acceptable DO NOT ADD OIL If the oil level is below the MIN mark add enough oil to raise the level within the MIN MAX range Oil levels above...

Страница 231: ...tor and or the engine oil filler cap removed Engine oil and filter recommendations Look for this certification trademark SAE 5W 20 engine oil is recommended Only use oils Certified For Gasoline Engine...

Страница 232: ...not use hard water water with a high mineral or alkali content If possible however try to only fill the battery cells with distilled water If the battery needs water often have the charging system ch...

Страница 233: ...nd get prompt medical attention If acid is swallowed call a physician immediately Battery posts terminals and related accessories contain lead and lead compunds Wash hands after handling For informati...

Страница 234: ...the brake pedal and with the A C on put the vehicle in D Drive and allow the engine to idle for at least one minute 7 Drive the vehicle to complete the relearning process The vehicle may need to be d...

Страница 235: ...nt per the instructions in the Adding Engine Coolant section Your vehicle was factory filled with a 50 50 engine coolant and water concentration If the concentration of coolant falls below 40 or above...

Страница 236: ...burn you badly Also you can be burned if you spill coolant on hot engine parts Do not put engine coolant in the windshield washer fluid container If sprayed on the windshield engine coolant could make...

Страница 237: ...ecycled Engine Coolant section For vehicles with overflow coolant systems with a non pressurized cap on the coolant recovery system add coolant to the coolant recovery reservoir when the engine is coo...

Страница 238: ...ter 1 0 quart of engine coolant per month have your dealer check the engine cooling system Your cooling system may have a leak Operating an engine with a low level of coolant can result in engine over...

Страница 239: ...oncentration below 40 Decreased engine coolant concentrations below 40 will decrease the corrosion protection characteristics of the engine coolant and may cause engine damage Decreased engine coolant...

Страница 240: ...effort will increase Once the engine temperature cools the engine can be re started Take your vehicle to a service facility as soon as possible to minimize engine damage When fail safe mode is activa...

Страница 241: ...fuel system may be under pressure If the fuel filler cap is venting vapor or if you hear a hissing sound wait until it stops before completely removing the fuel filler cap Otherwise fuel may spray ou...

Страница 242: ...ek medical attention Failure to seek proper medical attention could lead to permanent injury Fuels can also be harmful if absorbed through the skin If fuel is splashed on the skin and or clothing prom...

Страница 243: ...r vehicle 1 Turn the engine off 2 Carefully turn the filler cap counterclockwise 1 8 of a turn until it stops 3 Pull to remove the cap from the fuel filler pipe 4 To install the cap align the tabs on...

Страница 244: ...g MMT Repairs to correct the effects of using a fuel for which your vehicle was not designed may not be covered by your warranty Octane recommendations Your vehicle is designed to use Regular unleaded...

Страница 245: ...supplier about gasolines that meet the World wide Fuel Charter In Canada look for fuels that display the Auto Makers Choicey logo Cleaner air Ford endorses the use of reformulated cleaner burning gaso...

Страница 246: ...ertised capacity is the amount of the indicated capacity and the empty reserve combined Indicated capacity is the difference in the amount of fuel in a full tank and a tank when the fuel gauge indicat...

Страница 247: ...00 then divide by total kilometers traveled Divide total miles traveled by total gallons used Keep a record for at least one month and record the type of driving city or highway This will provide an a...

Страница 248: ...ize stop and go driving Maintenance Keep tires properly inflated and use only recommended size Operating a vehicle with the wheels out of alignment will reduce fuel economy Use recommended engine oil...

Страница 249: ...PG expected on the vehicle under optimum conditions Your fuel economy may vary depending upon the method of operation and conditions EMISSION CONTROL SYSTEM Your vehicle is equipped with various emiss...

Страница 250: ...le s emission system is on the Vehicle Emission Control Information Decal located on or near the engine This decal identifies engine displacement and gives some tune up specifications Please consult y...

Страница 251: ...um Power Steering Fluid 1 Start the engine and let it run until it reaches normal operating temperature the engine coolant temperature gauge indicator will be near the center of the normal area betwee...

Страница 252: ...DOT 3 brake fluid certified to meet Ford specification ESA M6C25 A Refer to Lubricant specifications in this chapter Brake fluid is toxic If brake fluid contacts the eyes flush eyes with running water...

Страница 253: ...icle on a level surface and engage the parking brake 3 With the parking brake engaged and your foot on the brake pedal start the engine and move the gearshift lever through all of the gear ranges Allo...

Страница 254: ...ement concerns and or possible damage High fluid levels can be caused by an overheating condition Adjusting automatic transmission fluid levels Before adding any fluid make sure the correct type is us...

Страница 255: ...priate intervals for changing the air filter element When changing the air filter element use only the Motorcraft air filter element listed Refer to Motorcraft Part Numbers Note Do not start your engi...

Страница 256: ...e sidewall between tread shoulder and maximum section width For example Treadwear 200 Traction AA Temperature A These Tire Quality Grades are determined by standards that the United States Department...

Страница 257: ...d on straight ahead braking traction tests and does not include acceleration cornering hydroplaning or peak traction characteristics Temperature A B C The temperature grades are A the highest B and C...

Страница 258: ...can also be found on the Tire Information label located on the inside of the fuel filler door Improperly inflated tires can affect vehicle handling and can fail suddenly possibly resulting in loss of...

Страница 259: ...w these precautions your vehicle may not drive properly and safely Make sure that all replacement tires are of the same size type load carrying capacity and tread design e g All Terrain etc as origina...

Страница 260: ...ns rub or bang against your vehicle stop and re tighten the chains If this does not work remove the chains to prevent damage to your vehicle If possible avoid fully loading your vehicle Remove the tir...

Страница 261: ...ank N A 4X2 with standard suspension 98 6L 26 0 gallons 4X4 and 4X2 with rear load level suspension 113 6L 30 0 gallons Power steering fluid Motorcraft MERCON t ATF All Fill to line on reservoir Trans...

Страница 262: ...tor 24 1L 25 5 quarts 4 6L V8 engine with 1 row radiator and aux rear heat 21 7L 22 9 quarts 4 6L V8 engine with 2 row radiator and aux rear heat 23 5L 24 8 quarts 5 4L V8 engine with 1 row radiator a...

Страница 263: ...ssion application requiring MERCONt may cause transmission damage Use of any fluid other than the recommended fluid may cause transmission damage 2 Indicates only approximate dry fill capacity Some ap...

Страница 264: ...L 1 none Brake fluid High Performance DOT 3 Motor Vehicle Brake Fluid C6AZ 19542 AB ESA M6C25 A and DOT 3 Driveshaft slip spline double Cardan joint center ball Premium Long Life Grease XG 1 K or XG 1...

Страница 265: ...raft SAE 75W 140 High Performance Synthetic Rear Axle Lube F1TZ 19580 B WSL M2C192 A Front axle 4X4 Motorcraft SAE 75W 90 Premium 4x4 Front Axle Lubricant XY 75W90 TQL WSP M2C201 A Transfer case 4X4 M...

Страница 266: ...in an automatic transmission application requiring MERCONt may cause transmission damage Use of any fluid other than the recommended fluid may cause transmission damage 2 Add 118 ml 4 oz of Additive...

Страница 267: ...293 90 3 2 293 90 3 with optional running boards 2 071 81 5 2 071 81 5 3 Overall height2 1 943 0 76 5 1 992 0 78 4 4 Wheelbase 3 023 0 119 0 3 023 0 119 0 5 Track Front 1 661 0 65 4 1 661 0 65 4 5 Tra...

Страница 268: ...4 1 3 5 2 Maintenance and specifications 267...

Страница 269: ...ont door latch pillar on the driver s side Vehicle identification number The vehicle identification number is attached to a metal tag and is located on the driver side instrument panel Please note tha...

Страница 270: ...nty period as well as any component damaged by the defective accessory The accessory will be warranted for whichever provides you the greatest benefit 12 months or 20 000 km 12 000 miles whichever occ...

Страница 271: ...emovable luggage rack Track rider bars Removable luggage rack adapters Running boards Molded and tubular Seatback organizer Ski snowboard carrier Snow traction cables Soft luggage cover Towing mirrors...

Страница 272: ...mpass and temperature display Leather steering wheel Locking gas cap Molded splash guards Molded vinyl floor mats Moonroof deflector Outside signal mirror requires power mirrors Rear air deflectors Si...

Страница 273: ...s Any such equipment installed in your vehicle should comply with FCC or CRTC regulations and should be installed only by a qualified service technician Mobile communications systems may harm the oper...

Страница 274: ...162 fluid adding 252 fluid checking 252 fluid refill capacities 260 fluid specification 265 Auxiliary power point 78 Axle lubricant specifications 263 265 refill capacities 260 traction lok 159 B Bat...

Страница 275: ...and adding 234 refill capacities 237 260 specifications 263 265 Cruise control see Speed control 83 Customer Assistance 186 Ford accessories for your vehicle 224 Ford Extended Service Plan 210 Getting...

Страница 276: ...el Drive vehicles 14 167 control trac 167 description 167 driving off road 169 electronic shift 168 indicator light 14 preparing to drive your vehicle 160 Fuel 240 calculating fuel economy 245 cap 242...

Страница 277: ...9 warning chime 14 Heating 50 heating and air conditioning system 47 HomeLink universal transceiver see Garage door opener 86 89 Hood 226 I Ignition 150 265 266 Infant seats see Safety seats 141 Inspe...

Страница 278: ...g 177 Loading instructions 179 Locks autolock 101 childproof 95 doors 95 Lubricant specifications 263 265 Lumbar support seats 110 M Message center 74 90 english metric button 90 menu button 91 Mirror...

Страница 279: ...28 Safety seats for children 141 Seat belts see Safety restraints 120 Seats 108 child safety seats 141 cleaning 222 memory seat 100 112 SecuriLock passive anti theft system 104 106 Servicing your vehi...

Страница 280: ...sions 266 Vehicle Identification Number VIN 268 Vehicle loading 177 Ventilating your vehicle 154 W Warning chimes 14 Warning lights see Lights 10 Washer fluid 228 Water Driving through 176 Windows pow...

Страница 281: ...280...

Отзывы: