background image

•  

ΕΛΛΗΝΙΚΗ

 •

121

ΤΟΠΟΘΕΤΗΣΗ ΕΝΤΟΣ ΤΟΥ ΟΧΗΜΑΤΟΣ

ΤΟΠΟΘΕΤΗΣΗ ΕΝΤΟΣ ΤΟΥ ΟΧΗΜΑΤΟΣ

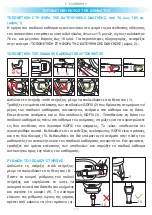
ΣΥΣΤΗΜΑ ΡΥΘΜΙΣΗΣ ΤΟΥ ΠΑΙΔΙΚΟΥ ΚΑΘΙΣΜΑΤΟΣ ΑΥΤΟΚΙΝΗΤΟΥ 
Κλίση του παιδικού καθίσματος

Πιέστε  τη  χειρολαβή  κλίσης  που  βρίσκεται  στο  μπροστινό  μέρος  της  έδρας  του 
καθίσματος και ρυθμίστε την έδρα στην επιθυμητή θέση.
Αφήστε  τη  χειρολαβή  και  βεβαιωθείτε  ότι  η  έδρα  του  καθίσματος  κλειδώθηκε  στην 
θέση που επιλέξατε.
IMPORTANTE:  Στη φορά της κατεύθυνσης οδήγησης (από 76 έως 105 εκ.), υπάρχουν 
διαθέσιμες τρεις θέσεις ανάκλισης με κόκκινο χρώμα.
Στην  αντίθετη  φορά  της  κατεύθυνσης  οδήγησης  (από  40  έως  105  εκ.),  για  παιδιά 
ηλικίας  έως  4  ετών  περίπου,  το  κάθισμα  πρέπει  να  βρίσκεται  μόνο  στη  θέση  με  τη 
μεγαλύτερη ανάκλιση (οριζόντια) με το μπλε χρώμα.

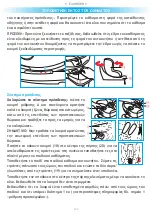
ΣΤΡΑΜΜΕΝΟ ΣΤΗΝ ΑΝΤΙΘΕΤΗ ΦΟΡΑ ΤΗΣ ΚΑΤΕΥΘΥΝΣΗΣ ΟΔΗΓΗΣΗΣ ΓΙΑ ΠΑΙΔΙΑ ΑΠΟ 
ΤΗ ΓΕΝΝΗΣΗ ΚΑΙ ΥΨΟΥΣ ΑΠΟ 40 ΕΩΣ 105 ΕΚ. (μέρος 2)

ΝΑ  ΜΗΝ  ΧΡΗΣΙΜΟΠΟΙΕΙΤΑΙ ΕΑΝ  ΥΠΑΡΧΕΙ  ΕΝΕΡΓΟΠΟΙΗΜΕΝΟΣ  ΜΠΡΟΣΤΙΝΟΣ 

ΑΕΡΟΣΑΚΟΣ ΣΤΟ ΜΠΡΟΣΤΙΝΟ ΚΑΘΙΣΜΑ ΕΠΙΒΑΤΗ.

Πιέστε  το  κουμπί  περιστροφής  και  τοποθετήστε  το  παιδικό  κάθισμα  με  κατεύθυνση 
αντίθετα από τη φορά του αυτοκινήτου. Βεβαιωθείτε ότι κλειδώθηκε.
ΠΡΟΣΟΧΗ: Πριν ενεργοποιήσετε το αυτοκίνητο, στρέψτε το παιδικό κάθισμα προς ις δύο 
κατευθύνσεις, για να βεβαιωθείτε ότι έχει ακινητοποιηθεί ο μηχανισμός περιστροφής.
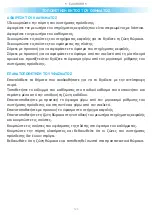
ΣΗΜΕΙΩΣΗ:  Το  παιδικό  κάθισμα  αυτοκινήτου  πρέπει  να  χρησιμοποιείται  με  τον 
μειωτήρα για τους πρώτους μήνες για παιδιά ύψους έως 60 εκ.
ΣΗΜΕΙΩΣΗ:  η  χρήση  του  παιδικού  καθίσματος  αυτοκινήτου  στην  αντίθετη  φορά  της 
κατεύθυνσης οδήγησης ενδείκνυται για παιδιά ύψους έως 105 εκ.

Ρυθμίστε το στήριγμα κεφαλής 

(13): το στήριγμα κεφαλής μπορεί να ρυθμιστεί σε 13 

διαφορετικά ύψη. Τραβήξτε τον δακτύλιο του ιμάντα ρύθμισης (12) και ανασηκώστε ή 
χαμηλώστε το στήριγμα κεφαλής στη σωστή θέση (για περισσότερες λεπτομέρειες, βλ. 
«Ρύθμιση του συστήματος πρόσδεσης»).

ένδειξη ανάκλισης πλάτης

Содержание Logik I-Size

Страница 1: ...m 18 kg SEGGIOLINO AUTO Istruzioni di montaggio CAR SEAT Assembly instructions SI GE AUTO Notice d utilisation SILLA DE COCHE Manual de instrucciones CADEIRA AUTO Manual de instru es AUTOSJEDALICA Upu...

Страница 2: ...RIMENTO IMPORTANT READ THE INSTRUCTIONS CAREFULLY AND KEEP FOR FUTURE REFERENCE IMPORTANT LIRE ATTENTIVEMENT ET CONSERVER SOIGNEUSEMENT A PORTEE DE MAIN POUR UNE UTILISATION ULTERIEURE IMPORTANTE LEER...

Страница 3: ...3 IMPORTANTE LER ATENTAMENTE E GUARDAR PARA FUTURA CONSULTA VA NO PA LJIVO PRO ITAJTE UPUTE I ZADR ITE IH PT EL RU HR...

Страница 4: ...degli standard europei pi severi ECE R129 e pu essere orientato nella direzione di marcia bambini con altezza da 76 105 cm e in quella opposta al senso di marcia bambini con altezza da 40 105 cm con...

Страница 5: ...enuta per bambini devono essere posizionati e installati in modo tale che nelle condizioni di normale utilizzo non possano bloccarsi sotto un sedile mobile o nella porta del veicolo AVVERTENZA Se in d...

Страница 6: ...are lesioni ferite in caso di incidente AVVERTENZA Non appoggiare bagagli sulla cappelliera senza assicurarli in caso di incidente potrebbero arrecare gravi danni ai passeggeri AVVERTENZA Assicurarsi...

Страница 7: ...viaggi brevi ESPOSIZIONE ALLA LUCE SOLARE GIORNI CALDI AVVERTENZA Non lasciare MAI il bambino collocato nel seggiolino mentre l auto parcheggiata in particolare se esposta alla luce diretta del sole...

Страница 8: ...ne di marcia da 40 a 105 cm parte 1 Installazione nella direzione di marcia da 76 a 105 cm parte 1 Regolazione del piede di sostegno Rimozione del seggiolino auto Inclinazione del seggiolino Orientame...

Страница 9: ...o centrale di regolazione bretelle 8 Cinghia di regolazione bretelle 9 Piede di sostegno 10 Indicatore per la corretta regolazione del piede di sostegno 11 Pulsante di rotazione del seggiolino auto 12...

Страница 10: ...to ad apportare modifiche al seggiolino auto INFORMAZIONI GENERALI Avvertenza Questo un dispositivo di ritenuta per bambini i Size omologato ai sensi del regolamento n 129 per essere utilizzato su pos...

Страница 11: ...unte di modelli di autovetture L elenco aggiornato consultabile nel nostro sito internet www foppapedretti it Leggere il manuale dell autoveicolo prima dell installazione del dispositivo di ritenuta I...

Страница 12: ...NO In senso opposto alla direzione di marcia Con cinture di sicurezza a 2 punti Con cinture di sicurezza a 3 punti Con ISOFIX e piede di sostegno Sul sedile del passeggero anteriore Sul sedile latera...

Страница 13: ...oteggere il seggiolino da fonti di calore eccessive ad esempio coprendolo con un rivestimento leggero In caso di lunghi viaggi fate delle soste frequenti Il bambino si stanca molto facilmente Evitare...

Страница 14: ...trata tutti gli oggetti che possono causare danni in caso di incidente siano adeguatamente immobilizzati tutti i passeggeri abbiano le cinture di sicurezza allacciate Operazioni preliminari Assicurate...

Страница 15: ...bambino fino ai 15 mesi di et e 75 cm di altezza L installazione in senso contrario alla direzione di marcia resta la pi sicura anche una volta oltrepassato questo limite si consiglia pertanto di uti...

Страница 16: ...tra lo schienale del sedile del veicolo e il seggiolino auto Se necessario tirare la cinghia di estensione dei connettori e spingere il seggiolino auto verso lo schienale del sedile REGOLAZIONE DEL PI...

Страница 17: ...oraneamente far scorrere i connettori lungo la struttura per retrarli all interno della base rilasciare la cinghia Premere il pulsante 9 e sollevare il piede di sostegno 1 fino a fine corsa Ripiegare...

Страница 18: ...tere in moto il veicolo ruotare il seggiolino in entrambe le direzioni per verificare che il meccanismo di rotazione sia bloccato NOTA Il seggiolino auto deve essere utilizzato con il riduttore primi...

Страница 19: ...o se Il bambino ha un altezza maggiore di 76 cm Il bambino ha almeno 15 mesi di et si consiglia di usare il seggiolino in direzione contraria al senso di marca il pi a lungo possibile Il poggiatesta r...

Страница 20: ...Stringere l imbracatura Tirare la cinghia di regolazione dell imbracatura in modo da tensionarla correttamente contro il corpo del bambino Una corretta tensionatura tale che lo spazio tra l imbracatur...

Страница 21: ...ciare i bottoni automatici del tessuto schienale Rimuovere sfilando con cura il tessuto dal poggiatesta Rimuovere sfilando con cura il tessuto dalla struttura iniziando da un lato prestare attenzione...

Страница 22: ...uanto il tessuto potrebbe staccarsi dall imbottitura Le parti in plastica possono essere pulite con acqua e sapone Non utilizzare detergenti aggressivi come solventi L imbracatura pu essere rimossa e...

Страница 23: ...imperativi del medesimo Consumatore quali previsti dalla legge e o i diritti che il Consumatore pu vantare contro il Venditore Rivenditore del Prodotto ESCLUSIONI DELLA GARANZIA CONVENZIONALE La garan...

Страница 24: ...acing position from 40 to 105 cm part 1 Installation in the forward facing position from 76 to 105 cm part 1 Adjusting the support leg Removing the car seat Inclining the car seat Placing the car seat...

Страница 25: ...children 76 105 cm tall and rearfacing for children 40 105 cm tall with the ISOFIX and support leg anchoring systems IMPORTANT Do not use in the forward facing position until the child has exceeded t...

Страница 26: ...sure they don t get out of the car seat unaided and without supervision WARNING NEVER leave your child unattended your child s safety is your responsibility WARNING Ensure that the child car seat is...

Страница 27: ...your child is in the child car seat SUNLIGHT HOT DAYS WARNING Do not leave your child in the child car seat while parked in direct sunlight or on a hot day WARNING Do not subject the child car seat to...

Страница 28: ...e button 8 Belt adjustment strap 9 Support leg 10 Indicator for the correct adjustment of the support leg 11 Car seat rotation lever 12 Belt to extend the ISOFIX connectors 13 Compartment for user man...

Страница 29: ...manufacturer is authorised to make changes to the car seat GENERAL INFORMATION Warning This is an i Size child restraint device approved under regulation no 129 to be used on the passenger seats of i...

Страница 30: ...with changes and additions of car models The updated list can be viewed on our website https www foppapedretti it en Read the vehicle manual before installing the child restraint device The manual wi...

Страница 31: ...NO NO Rear facing With a 2 point seat belt With a 3 point seat belt With the ISOFIX and support leg On the front passenger seat On the two rear side passenger seat On the rear centre passenger seat C...

Страница 32: ...p in the sun causing burns to the child Protect the car seat from excessive heat for example by using a lightweight cover Take regular breaks when travelling on long journeys Your child can get tired...

Страница 33: ...t position all objects that can cause damage in the event of an accident are adequately immobilised all passengers have buckled up their seat belts Preliminary steps Make sure that your vehicle is fit...

Страница 34: ...of age and 75 cm in height The rear facing position remains the safest even after exceeding this limit and it is therefore advisable to use the car seat facing backwards for as long as possible NOTE...

Страница 35: ...ackrest of the passenger seat and the car seat If necessary pull the connector extension strap and push the car seat towards the passenger seat backrest ADJUSTING THE SUPPORT LEG Fold down the support...

Страница 36: ...ocks Fold up the support leg under the base 8 CAR SEAT ADJUSTMENT SYSTEM Inclining the car seat Press the reclining handle located on the front part of the seat and adjust the seat to the position des...

Страница 37: ...fore every journey make sure that the rotating part of child seat is fully engaged by trying to turn the seat around in both directions NOTE The car seat must be used with the newborn reducer for chil...

Страница 38: ...ar seat can be installed in the forward facing position only if The child is more than 76 cm tall The child is at least 15 months old it is recommended to use the car seat in the rear facing position...

Страница 39: ...point 1 Adjusting the headrest Tightening the harness Pull the harness adjustment strap so as to tighten it properly against the body of the child The harness is correctly tightened when the gap betwe...

Страница 40: ...Detach the press studs on the backrest fabric Remove the lining carefully pulling the fabric off from the headrest Carefully pull the fabric off from the frame starting from one side paying particular...

Страница 41: ...ched from the padding The plastic parts may be cleaned with water and soap Do not use harsh detergents such as solvents The harness may be removed and washed with soap and warm water WARNING Never rem...

Страница 42: ...s the mandatory rights of the Consumer as provided for by the law and or the rights that the Consumer may have with regard to the Dealer Retailer of the Product EXCLUSIONS TO THE FORMAL GUARANTEE The...

Страница 43: ...le sens de la marche de 40 105 cm partie 1 Installation dans le sens de la marche de 76 105 cm partie 1 R glage de la jambe de force Retrait du si ge auto Inclinaison du si ge auto Orientation dans l...

Страница 44: ...e force Le si ge auto est homologu conform ment aux r glementations europ ennes les plus strictes ECE R129 et peut tre orient dans le sens de la marche pour des enfants d une taille allant de 76 105 c...

Страница 45: ...GE AUTO AVERTISSEMENT Les l ments rigides et en plastique du dispositif de retenue doivent tre positionn s et fix s de sorte qu ils ne restent pas coinc s entre les si ges ou entre les porti res pend...

Страница 46: ...ur le harnais pour r chauffer l enfant En cas d exposition des temp ratures lev es les l ments m talliques et en plastique pourraient tre chauds au toucher Il est donc recommand de couvrir le si ge au...

Страница 47: ...dominale soit positionn e aussi bas que possible pour que le bassin de l enfant soit bien maintenu en cas mouvements brusques AVERTISSEMENT S assurer que tous les passagers de la voiture utilisent leu...

Страница 48: ...ricant s applique exclusivement la premi re utilisation du produit et ne concerne que le premier propri taire AVERTISSEMENT Il est n cessaire de remplacer les ceintures de s curit du v hicule si elles...

Страница 49: ...Bouton du dispositif central de r glage des bretelles 8 Sangle de r glage des bretelles 9 Jambe de force 10 Indicateur pour le bon r glage de la jambe de force 11 Levier de rotation du si ge auto 12...

Страница 50: ...ge auto INFORMATIONS G N RALES Avertissement Il s agit d un dispositif de retenue pour enfants i Size homologu conform ment la r glementation n 129 pour tre utilis sur des banquettes de v hicules comp...

Страница 51: ...de mod les automobiles La liste mise jour est disponible sur notre site web www foppapedretti it Lisez le manuel du v hicule avant d installer le dispositif de retenue Le manuel indiquera les si ges c...

Страница 52: ...ction oppos e au sens de la marche Avec ceintures de s curit 2 points Avec ceintures de s curit 3 points Avec ISOFIX et jambe de force Sur le si ge passager avant Sur l un des deux si ges lat raux arr...

Страница 53: ...er au soleil et causer des br lures l enfant Prot gez le si ge auto contre des sources de chaleur excessives en le recouvrant par exemple avec un l ger rev tement En cas de longs trajets faites des ar...

Страница 54: ...install est r gl dans la position la plus recul e tous les objets pouvant causer des blessures en cas d accident sont immobilis s de fa on ad quate tous les passagers ont attach leur ceinture de s cur...

Страница 55: ...che est obligatoire pour les enfants jusqu 15 mois et 75 cm L installation dans le sens oppos celui de la marche reste la position la plus s re m me une fois que cette limite est d pass e Par cons que...

Страница 56: ...il n y a aucun espace entre le dossier du si ge du v hicule et le si ge auto Si n cessaire tirer la sangle d extension des connecteurs et pousser le si ge auto vers le dossier du si ge R GLAGE DE LA...

Страница 57: ...IX 2 et en m me temps faire glisser les connecteurs le long de la structure pour les r tracter l int rieur de la base puis rel cher la sangle Appuyer sur le bouton 9 et soulever le pied de support 1 j...

Страница 58: ...UN AIRBAG FRONTAL ACTIV Appuyez sur le bouton de rotation et positionnez le si ge auto dans la direction oppos e au sens de la marche Veillez ce qu il soit correctement bloqu ATTENTION Avant de d mar...

Страница 59: ...eut tre install dans le sens de la marche seulement si l enfant mesure plus de 76 cm l enfant a au moins 15 mois il est conseill d utiliser le si ge auto dans le sens oppos celui de la marche le plus...

Страница 60: ...lement positionn es juste au dessus des paules de l enfant et qu il y ait un espace de 1 cm pour plus de d tails voir le point 1 R glage de l appui t te Serrer le harnais Tirez la sangle de r glage du...

Страница 61: ...teur de l assise D tacher les boutons pression de l appuie t te pour extraire les ceintures pectorales D tacher les boutons pression du tissu du dossier Retirer le tissu de l appuie t te en l extrayan...

Страница 62: ...rage Les pi ces en plastique peuvent tre nettoy es avec de l eau et du savon N utilisez pas de d tergents agressifs tels que des solvants Le harnais peut tre retir et lav avec du savon et de l eau ti...

Страница 63: ...i et ou les droits que le consommateur peut vanter contre le vendeur revendeur du produit EXCLUSIONS DE LA GARANTIE CONVENTIONNELLE La garantie conventionnelle exclut les dommages apport s au produit...

Страница 64: ...ecci n de la marcha de 40 a 105 cm parte 1 Instalaci n en la direcci n de la marcha de 76 a 105 cm parte 1 Regulaci n del pie de apoyo Quitar la silla de coche Inclinaci n de la silla de coche Orienta...

Страница 65: ...con los est ndares europeos m s estrictos ECE R129 y puede colocarse en el sentido de la marcha ni os con una altura de 76 105 cm y en el sentido contrario ni os con una altura de 40 105 cm utilizando...

Страница 66: ...erial pl stico del dispositivo de sujeci n para ni os deben colocarse e instalarse de tal manera que en condiciones de uso normal no puedan bloquearse debajo de un asiento m vil o en la puerta del veh...

Страница 67: ...ese de que los objetos m viles como el equipaje o libros en el interior del veh culo est n bien fijados Pueden provocar lesiones y heridas si se produjera un accidente ADVERTENCIA No coloque el equipa...

Страница 68: ...es de seguridad en caso de accidente una persona sin cintur n de seguridad podr a golpearse contra la sillita debido al impacto ADVERTENCIA No use un sistema de paso de cinturones diferente del indica...

Страница 69: ...os cinturones de seguridad del veh culo presentan da os o se ales de desgaste por el uso deben ser sustituidos ADVERTENCIA Hay que sustituir la sillita para coche si ha sufrido un esfuerzo violento de...

Страница 70: ...r los tirantes 8 Correa de regulaci n de los tirantes 9 Pie de apoyo 10 Indicador para la correcta regulaci n del pie de apoyo 11 Palanca para rotaci n de la silla de coche 12 Correa para sacar los co...

Страница 71: ...zada para aportar cambios en la silla de coche INFORMACI N GENERAL Advertencia Este dispositivo de retenci n infantil i Size est homologado de conformidad con el reglamento n 129 para utilizarse en lo...

Страница 72: ...los Podr consultar la lista actualizada en nuestro sitio web www foppapedretti it Lea el manual del veh culo antes de instalar el dispositivo de retenci n en l se indicar n los asientos compatibles pa...

Страница 73: ...ido contrario a la direcci n de marcha Con cinturones de seguridad de 2 puntos Con cinturones de seguridad de 3 puntosi Con ISOFIX y pie de apoyo En el asiento del copiloto En uno de los asientos post...

Страница 74: ...i o Proteja la silla de fuentes de calor excesivas por ejemplo cubri ndola con un revestimiento ligero En caso de viajes largos es conveniente realizar paradas frecuentes ya que el ni o se cansa muy f...

Страница 75: ...Size est regulado en la posici n m s retrasada todos los objetos que puedan ocasionar da os en caso de accidente est n inmovilizados adecuadamente todos los pasajeros tengan el cintur n de seguridad a...

Страница 76: ...asta 15 meses y 75 cm de altura La instalaci n en sentido contrario a la direcci n de la marcha sigue siendo la m s segura incluso pasado este l mite Por ello se recomienda utilizar la silla de coche...

Страница 77: ...os lados 5 Aseg rese de que no haya ning n espacio entre el respaldo del asiento del veh culo y la silla de coche En caso necesario tire de la correa de extensi n de los conectores y empuje la silla d...

Страница 78: ...la figura El indicador ISOFIX pasa a ser de color rojo Tire de la correa de extensi n de los conectores ISOFIX 2 y al mismo tiempo deslice los conectores a lo largo de la estructura para retraerlos ha...

Страница 79: ...LTURA parte 2 NO UTILICE LA SILLA DE COCHE SI EL ASIENTO DEL COPILOTO TIENE EL AIRBAG FRONTAL ACTIVADO Pulse el bot n de rotaci n y coloque la silla en el sentido contrario al de la marcha Aseg rese d...

Страница 80: ...a contramarcha durante el mayor tiempo posible Pulse el bot n de rotaci n y coloque la silla en el sentido contrario al de la marcha Aseg rese de que el bloqueo se ha realizado correctamente ATENCI N...

Страница 81: ...archa intentando girar la silla sin pulsar el bot n de desbloqueo de la rotaci n ARN S Afloje el arn s ulse el bot n de regulaci n A y al mismo tiempo sujete los tirantes cinturones pectorales por la...

Страница 82: ...5 puntos est regulado en funci n del cuerpo del ni o las hombreras 17 no est n retorcidas y el arn s est bloqueado el pie de apoyo 1 est en contacto con el suelo del veh culo y el indicador del mismo...

Страница 83: ...l arn s VOLVER A COLOCAR EL TEJIDO Repita la operaci n de desmontaje al contrario Coloque el revestimiento del asiento sobre la silla de coche e introduzca en la ranura el cintur n separapiernas Con c...

Страница 84: ...ya que el tejido podr a separarse del acolchado Las partes de pl stico se pueden limpiar con agua y jab n No utilice detergentes agresivos como solventes El arn s puede extraerse y lavarse con jab n y...

Страница 85: ...el Consumidor mismo como resultan previstos por la ley y o los derechos que el Consumidor puede exhibir contra el Vendedor Revendedor del Producto EXCLUSIONES DE LA GARANT A CONVENCIONAL La garant a c...

Страница 86: ...preliminares Instala o no sentido da marcha de 40 a 105 cm de altura parte 1 Instala o no sentido da marcha de 76 a 105 cm de altura parte 1 Regula o da perna de apoio Remo o da cadeira auto Inclina...

Страница 87: ...io O produto est homologado nos termos das normas europeias mais rigorosas ECE R129 e poder ser instalado orientado no sentido da marcha crian as com altura entre 76 e 105 cm e no sentido oposto ao da...

Страница 88: ...normal utiliza o n o possam bloquear se sob um banco m vel ou na porta do ve culo ADVERT NCIA Se fornecido com o ve culo utilizar o dispositivo de bloqueio de abertura de portas a partir do interior I...

Страница 89: ...ar se que todos os dispositivos de bloqueio est o corretamente engatados antes da utiliza o ADVERT NCIA N o utilize pe as sobressalentes ou acess rios n o fornecidos ou aprovados pelo fabricante pois...

Страница 90: ...DIAS QUENTES ADVERT NCIA NUNCA deixar a crian a sentada na cadeira enquanto o autom vel est estacionado especialmente se exposta luz direta do sol ou em um dia quente ADVERT NCIA NUNCA deixar a cadei...

Страница 91: ...6 Fivela 7 Bot o do dispositivo central de regula o das al as 8 Correia de regula o das al as 9 Perna de apoio 10 Indicador para a regula o correta da perna de apoio 11 Alavanca para rota o da cadeir...

Страница 92: ...do a efetuar modifica es na cadeira auto INFORMA ES GERAIS Advert ncia Este um dispositivo de reten o para crian as i Size homologado nos termos do regulamento n 129 para ser utilizado nos assentos de...

Страница 93: ...us es de modelos de ve culos autom veis A lista atualizada pode ser consultada no nosso site da internet www foppapedretti it Ler o manual do ve culo autom vel antes da instala o do dispositivo de ret...

Страница 94: ...NO NO No sentido oposto ao da marcha Com cintos de seguran a de 2 pontos Com cintos de seguran a de 3 pontos Com ISOFIX e perna de apoio No assento do passageiro traseiro Nos assentos laterais traseir...

Страница 95: ...stico da cadeira auto podem aquecer ao sol provocando queimaduras na crian a Proteger a cadeira auto de fontes de calor excessivas cobrindo a por exemplo com um revestimento leve Em caso de viagens l...

Страница 96: ...est regulado na posi o mais recuada todos os objetos que possam causar danos em caso de acidente est o devidamente imobilizados todos os passageiros t m os cintos de seguran a colocados Opera es prel...

Страница 97: ...m ximo de 18 kg ADVERT NCIA A utiliza o da cadeira auto no sentido contr rio ao da marcha obrigat ria para uma crian a at aos 15 meses de idade e 75 cm de altura A instala o no sentido contr rio ao d...

Страница 98: ...o do ve culo e a cadeira auto Se necess rio puxar a correia de extens o dos conectores e empurrar a cadeira auto no sentido do encosto do assento REGULA O DA PERNA DE APOIO Dobrar o suporte perna de a...

Страница 99: ...b a base 8 SISTEMA DE REGULA O DA CADEIRA AUTO Inclina o da cadeira auto Premir o bot o de reclina o colocado na parte da frente do banco e regular o banco na posi o desejada Soltar o man pulo e certi...

Страница 100: ...ovimento o autom vel rodar a cadeira auto em ambas as dire es para verificar que o mecanismo de rota o est bloqueado NOTA A cadeira auto deve ser utilizada com o redutor para os primeiros meses com cr...

Страница 101: ...uto s pode ser instalada no sentido da marcha se a crian a tiver mais de 76 cm de altura a crian a tiver pelo menos 15 meses de idade recomenda se a utiliza o da cadeira auto no sentido contr rio ao d...

Страница 102: ...regula o do apoio da cabe a Apertar o arn s Puxar a correia de regula o do arn s de modo a estic la corretamente contra o corpo da crian a A correia est corretamente esticada quando o espa o entre o a...

Страница 103: ...cintos peitorais Desengatar os bot es autom ticos do tecido do encosto Remover fazendo o deslizar cuidadosamente o tecido do apoio da cabe a Remover fazendo o deslizar cuidadosamente o tecido da estr...

Страница 104: ...upa porque o tecido pode soltarse do revestimento As pe as em pl stico podem ser limpas com gua e sab o N o utilizar detergentes agressivos como solventes O arn s pode ser removido e lavado com sab o...

Страница 105: ...la lei e ou direitos que o consumidor pode ter contra o Vendedor Revendedor do produto EXCLUS ESDAGARANTIACONVENCIONAL A garantia convencional exclui os danos decorrentes pelas seguintes causas uso n...

Страница 106: ...106 107 112 113 114 115 117 117 118 119 119 120 121 121 121 122 122 123 124 125 125 126 127 40 105 1 76 105 1 40 105 2 2 360...

Страница 107: ...107 ISOFIX ISOFIX ECE R129 76 105 40 105 ISOFIX 15 76...

Страница 108: ...108...

Страница 109: ...109...

Страница 110: ...110...

Страница 111: ...111...

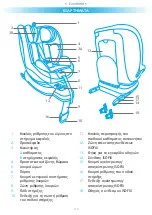
Страница 112: ...112 1 2 3 A B 4 5 6 7 8 9 10 11 12 ISOFIX 13 14 ISOFIX 15 ISOFIX 16 17 ISOFIX 18 ISOFIX 1 3A 5 6 7 8 11 9 15 17 14 18 10 4 2 3B 13 16 12...

Страница 113: ...113 ECE R129 03 i Size 129 i Size UNIKO i Size type KX 88 ECE 40 150 76 105 ECE R129...

Страница 114: ...114 ISOFIX LOGIK i Size i Size ISOFIX www foppapedretti it i Size 3 LOGIK i Size...

Страница 115: ...il bambino ha un peso inferiore a 15 kg Il riduttore serve per garantire un maggior comfort ai bambini piccoli Il riduttore fornisce al vostro bambino un sostegno maggiore durante i primi mesi ATTENZ...

Страница 116: ...116 60...

Страница 117: ...117 ISOFIX i Size ISOFIX ISOFIX ISOFIX ISOFIX ISOFIX ISOFIX fastening points Insert guides D...

Страница 118: ...118 40 cm 105 cm 76 cm 105 cm 1 1 40 105 1 105 18 15 75 1 2...

Страница 119: ...119 76 105 1 15 76 18 2 1 ISOFIX 2 ISOFIX 3 ISOFIX ISOFIX 5 8 9 a A 8 1 3 5 7 8 9 10 10...

Страница 120: ...120 ISOFIX 4 ISOFIX ISOFIX 2 9 1 8 3 54 3 54 1 9 8 A 8...

Страница 121: ...121 IMPORTANTE 76 105 40 105 4 40 105 2 60 105 13 13 12...

Страница 122: ...122 12 13 12 13 2 76 105 15 15 76 76 15 360 360 14...

Страница 123: ...123 14 A 18 20 19 1 1...

Страница 124: ...124 ISOFIX 3 1 5 17 1 10 1 21 61 3...

Страница 125: ...125 S...

Страница 126: ...126 30 C 30 C 30 C...

Страница 127: ...127 01 01 2005 Foppa Pedretti S p A H Foppa Pedretti S p A Grumello del Monte Italia Via Volta 11 12 Foppa Pedretti S p A Foppa Pedretti S p A Foppa Pedretti S p A...

Страница 128: ...128 129 134 135 136 137 139 139 140 140 141 142 142 143 143 144 144 145 146 146 147 148 149 40 105 1 76 105 1 40 105 2 2 360...

Страница 129: ...129 ISOFIX ISOFIX ECE R129 76 105 40 105 ISOFIX 15 76...

Страница 130: ...130 ISOFIX...

Страница 131: ...131...

Страница 132: ...132...

Страница 133: ...133...

Страница 134: ...134 1 2 3 A B 4 5 6 7 8 9 10 11 12 ISOFIX 13 14 ISOFIX 15 ISOFIX 16 17 ISOFIX 18 ISOFIX 1 3A 5 6 7 8 11 9 15 17 14 18 10 4 2 3B 13 16 12...

Страница 135: ...135 ECE R129 03 i Size 129 i Size LOGIK i Size KX 88 ECE 40 105 cm 76 105 cm ECE R129...

Страница 136: ...136 Isofix Logik i Size i Size ISOFIX www foppapedretti it i Size 3 Logik i Size...

Страница 137: ...137 15 1 2 1 1 2 2 3 ISOFIX ISOFIX...

Страница 138: ...138 60...

Страница 139: ...139 ISOFIX i Size ISOFIX ISOFIX ISOFIX ISOFIX ISOFIX ISOFIX fastening points Insert guides D...

Страница 140: ...140 40 105 1 105 18 15 75 1 2 76 105 1 15 76 18 2 40 cm 105 cm 76 cm 105 cm 1 1...

Страница 141: ...141 A 8 1 3 5 7 ISOFIX 2 ISOFIX 3 ISOFIX ISOFIX 7 ISOFIX 5 8 9 10 8 9 10 10...

Страница 142: ...142 ISOFIX 4 ISOFIX ISOFIX 2 9 1 8 3 54 3 54 1 9 8 A 8...

Страница 143: ...143 76 105 40 105 4 40 105 2 60 105 13 13 12 1 1...

Страница 144: ...144 2 76 105 15 15 76 76 15 360 14 12 13 12 13...

Страница 145: ...145 360 14 16 17 18 20 19 1...

Страница 146: ...146 ISOFIX 3 1 5 17 1 10 1 21 61 3...

Страница 147: ...147...

Страница 148: ...148 30 C 30 C 30 C...

Страница 149: ...149 01 01 2005 Foppa Pedretti S p A Foppa Pedretti S p A Grumello del Monte Italia Via Volta 11 12 Foppa Pedretti S p A Foppa Pedretti S p A Foppa Pedretti S p A...

Страница 150: ...i okrenut prema nazad za djecu visoku 40 105 cm s ISOFIX om i sustavima sidrenja potpornih nogu VA NO Ne koristite u polo aju okrenutom prema naprijed dok dijete ne prije e dob od 15 mjeseci i 76 cm v...

Страница 151: ...m dugih putovanja automobilom i pobrinite se da ne iza e iz autosjedalice bez nadzora UPOZORENJE Nikada ne ostavljajte dijete bez nadzora sigurnost va eg djeteta va a je odgovornost UPOZORENJE Provjer...

Страница 152: ...i SUN EVA SVJETLOST VRU I DANI UPOZORENJE Ne ostavljajte dijete u dje joj autosjedalici dok je parkirano na izravnom suncu ili na vru dan UPOZORENJE Ne podvrgajte dje ju autosjedalicu dugotrajnom izra...

Страница 153: ...enut prema naprijed od 40 do 105 cm 1 dio Ugradnja u polo aj okrenut prema naprijed od 76 do 105 cm 1 dio Pode avanje potporne noge Uklanjanje autosjedalice Naginjanje autosjedalica Postavljanje autos...

Страница 154: ...preko ramena 6 Kop a 7 Gumb sredi njeg ure aja za pode avanje remena 8 Remen za pode avanje pojaseva 9 otporna noga 10 Pokazatelj za ispravno pode avanje potporne noge 11 Ru ica rotacije autosjedalic...

Страница 155: ...n mijenjati autosjedalicu OP E INFORMACIJE Upozorenje Rije je o i Size dje joj autosjedalici odobrenoj prema propisu br 129 koji e se koristiti na suvoza kim sjedalima vozila kompatibilnih s i Size ka...

Страница 156: ...dacima modela automobila A urirani popis mo ete pogledati na na oj web stranici https www foppapedretti it en Prije ugradnje ure aja za dr anje djeteta pro itajte priru nik za vozilo Priru nik e nazna...

Страница 157: ...Sa sigurnosnim pojasom u 2 to ke Sa sigurnosnim pojasom u 3 to ke S ISOFIX om i potpornom nogom Na prednjem suvoza evom sjedalu Na dva stra nja bo na suvoza eva sjedala Na suvoza evom sjedalu u stra...

Страница 158: ...dijelovi autosjedalice mogu se zagrijati na suncu uzrokuju i opekline djetetu Za titite autosjedalicu od prekomjerne topline pomo u laganog pokrova Uzmite redovite pauze kada putujete na dugim putovan...

Страница 159: ...osjedalica postavljeno na stra nji polo aj su svi predmeti koji mogu prouzro iti tetu u slu aju nesre e adekvatno imobilizirani su svi putnici su zavezali pojaseve Preliminarni koraci Provjerite je li...

Страница 160: ...5 cm visine Polo aj okrenut prema natrag i dalje je najsigurniji ak i nakon prekora enja tog ograni enja pa je stoga preporu ljivo koristiti autosjedalicu okrenutu unatrag to je du e mogu e IMAJTE NAV...

Страница 161: ...oza evog sjedala i autosjedalice Ako je potrebno povucite produ ni remen konektora i gurnite autosjedalicu prema naslonu suvoza evog sjedala PODE AVANJE POTPORNE NOGE Preklopite potpornu nogu dok se n...

Страница 162: ...lopite potpornu nogu ispod baze 8 SUSTAV PODE AVANJA AUTOSJEDALICA Naginjanje autosjedalice Pritisnite ru ku za pode avanje naslona smje tenu na prednjem dijelu sjedala i prilagodite sjedalo eljenom p...

Страница 163: ...m IMAJTE NAPRILIKU kori tenje autosjedalice u stra njem polo aju pogodno je za djecu visine do 105 cm Podesite nasuk nasuk 13 Naslonjenje za glavu mo e se podesiti na 13 razli itih visina Povucite prs...

Страница 164: ...ta u autosjedalicu i skidanja s nje Pritisnite gumb za rotaciju 14 i okrenite sjedalo prema vratima kako biste dijete lako stavili u autosjedalicu Da biste osigurali dijete pogledajte odjeljak pode av...

Страница 165: ...e prije nego to to postavite ISOFIX konektori 3 pri vr eni su na vozilo a potporna noga 1 pravilno postavljena autosjedalica je zaklju ana u polo aju okrenutom prema naprijed ili prema natrag oslonac...

Страница 166: ...ost na izvla enje tkanine oko ure aja za pode avanje pojasa PONOVNO STAVLJANJE TKANINE Ponovite postupak ra lambe obrnutim redoslijedom Postavite navlaku sjedala na autosjedalicu i u utor umetnite sep...

Страница 167: ...tave Plasti ni dijelovi mogu se o istiti vodom i sapunom Nemojte koristiti jake deterd ente kao to su otapala Pojas se mo e ukloniti i oprati sapunom i toplom vodom UPOZORENJE Nikada ne uklanjajte kra...

Страница 168: ...o e imati u vezi s Prodava em Proizvoda IZUZECI FORMALNOG JAMSTVA Formalna garanciju je isklju ena u slu aju tete na proizvodu iz sljede ih razloga ako se proizvod koristi na na in koji nije u skladu...

Страница 169: ...169 NOTE...

Страница 170: ...170 NOTE...

Страница 171: ......

Страница 172: ...Importato da Foppa Pedretti S p A Via A Volta 11 24064 Grumello del Monte Bergamo Italy tel 39 035 830497 fax 39 035 831283 www foppapedretti it LOGIK i Size R2...

Страница 173: ...Logik I Size Isofix I Size universal da 40 a 105 cm 18 kg LISTA AUTOVETTURE VEHICLE LIST LISTE DES VOITURES LISTA AUTOM VILES LISTA DE AUTOM VEIS POPIS VOZILA IT EN FR ES PT EL RU HR ECE R129 03...

Страница 174: ......

Страница 175: ...e del veicolo per quanto riguarda i punti di ancoraggio ISOFIX In base alla posizione dei sedili del veicolo si deve prestare particolare attenzione al corretto aggancio del Dispositivo di Ritenuta pe...

Страница 176: ...ththe veichle chassis Please consult with the vehicle manufacturer regarding access to ISOFIX points Because of the vehicle seat position care must be taken to correctly attach the child restraint sys...

Страница 177: ...nsulte con el fabricante del vehiculo sobre el acceso a los puntos ISOFIX Debido a la posicion del asiento del vehiculo hay que fijar correctamente el sistema de retencion del nino a los puntos ISOFIX...

Страница 178: ...nsulte con el fabricante del vehiculo sobre el acceso a los puntos ISOFIX Debido a la posicion del asiento del vehiculo hay que fijar correctamente el sistema de retencion del nino a los puntos ISOFIX...

Страница 179: ...star firme e em perfeito contacto com o chassis do ve culo Informe se junto do Fabricante do ve culo sobre o acesso aos pontos ISOFIX Dada a posi o do banco assegure se que o sistema de reten o correc...

Страница 180: ...8 www foppapedretti it ISOFIX ISOFIX CHECK ISOFIX...

Страница 181: ...9 www foppapedretti it ISOFIX ISOFIX CHECK Isofix...

Страница 182: ...savjetujte se s proizvo a em vozila u vezi s pristupom ISOFIX to kama Zbog polo aja sjedala vozila potrebno je pripaziti na pravilno pri vr ivanje dje je autosjedalice na ISOFIX to ke Sjedalo vozila s...

Страница 183: ...Avant 2008 A4 Saloon 2008 A4 S4 2009 A4 S4 Avant 2009 A5 2007 A5 Sportback 2009 A5 S5 Sportback 2007 A6 2011 A6 Allroad 2011 A6 Avant 2011 A6 S6 2011 A7 Sportback 2011 A8 2011 A8 S8 2011 Q3 2013 Q5 2...

Страница 184: ...upe 2007 3 Series F30 2012 5 Series Saloon 2003 2010 5 Series Touring 2003 2010 5 Series Touring 2011 5 Series Saloon 2011 5 Series 2011 6 Series Coupe 2011 6 Series Convertible 2011 6 Series Gran Cou...

Страница 185: ...Delta 2011 Ypsilon 2011 Citroen SB Berlingo Multispace 2007 C1 2006 C1 2015 C3 5 Door 2009 SB C3 Picasso 2009 C4 2010 SB C4 Picasso 2007 2014 SB C4 Picasso 2014 C5 Saloon 2008 C5 Tourer 2008 C4 Cactu...

Страница 186: ...ax 2003 2010 C Max 2010 2012 C Max 2012 Fiesta 2004 2008 Fiesta 2008 Focus 2010 Focus Electric 2015 SB Galaxy 2006 KA 2009 Kuga 2013 Mondeo Estate 2007 Mondeo Hatchback 2007 Mondeo Saloon 2007 Mondeo...

Страница 187: ...sion 2012 FRV 2006 2011 Insight 2009 Jazz 2008 Odyssey 2010 Hyundai i10 Hatchback 2008 i20 Hatchback 2009 i30 2012 i40 2011 iX20 2011 iX35 2010 SantaFe 2012 Tucson 2010 Veloster 2012 In niti EX 2009 F...

Страница 188: ...kee 2014 Kia SB Carens 2013 Ceed Hatchback 2012 Optima 2011 Picanto 2008 Rio 2012 Sorento 2010 2014 Sorento 2015 Soul 2009 Soul EV 2015 Sportage 2011 Venga 2010 Land Rover Discovery Sport 2015 Discove...

Страница 189: ...GS 2013 GSh 2013 IS Saloon 2005 2012 RX 2010 Mazda CX 5 2011 CX 7 2007 2011 Mazda 2 2009 2015 Mazda 2 2015 3 Hatchback 2009 3 Saloon 2009 3 Hatchback 2014 5 2005 2010 6 Estate 2008 2012 6 Hatchback 2...

Страница 190: ...Estate 2013 E Class Saloon 2013 GL Class 2006 2012 GL Class 2012 M ML Class 2005 2012 M ML Class 2012 R Class 2006 2012 S Class 2006 2013 S Class 2015 SL Class 2012 SLK 2011 V Class 2015 Mini Mini Co...

Страница 191: ...14 Quest MPV 2012 X Trail 2007 Opel Adam 2013 Agila 2008 Ampera 2011 Antara 2007 2015 Astra 5dr 2010 Astra Estate 2010 Astra GTC 2011 Corsa 3dr Hatchback 2006 2015 Corsa 5dr Hatchback 2006 2015 Corsa...

Страница 192: ...307 2001 2007 307 Estate 2002 2007 308 Hatchback 2007 2014 308 SW 2008 308 2014 SB 3008 2009 508 2011 508 SW 2011 508 RXH 2013 SB 5008 2011 RCZ 2011 Porsche Cayenne 2011 Cayenne E Hybrid 2015 Panamer...

Страница 193: ...8 2012 SB Scenic 2009 Twingo 2007 2012 Twingo 2012 2015 Twingo 2015 Saab 9 3 2002 2012 9 3 Sport Wagon 2005 2012 9 3 X 2009 2012 9 5 Estate 2005 2010 9 5 2011 2012 Seat Seat SB Alhambra 2010 Altea 200...

Страница 194: ...2012 Fabia Estate Combi 2008 Fabia Hatchback 2007 Octavia Estate Combi 2005 2013 Octavia Hatchback 2004 2012 Octavia Scout 2007 2013 Octavia Hatchback 2013 Rapid 2013 Roomster 2006 Superb Combi Estat...

Страница 195: ...2011 Toyota Toyota Auris 2007 2012 Auris 2013 Avensis Hatchback 2003 2011 Avensis Tourer 2009 Aygo 2005 2014 Aygo 2014 EZ MPV 2013 GT86 2012 Highlander 2013 Land Cruiser 2003 2009 Land Cruiser 2009 P...

Страница 196: ...sa 3dr Hatchback 2006 2015 Corsa 5dr Hatchback 2006 2015 Corsa 5dr 2015 Corsa VXR 2007 Insignia Hatchback 2009 Insignia Saloon 2009 Insignia Sports Tourer 2009 2010 a v i r e M Mokka 2013 Zafira 2005...

Страница 197: ...2011 Passat Estate 2015 Polo 3dr 2009 Polo 5dr 2009 Scirocco 2011 SB Sharan 2010 Tiguan 2008 Touareg 2012 SB Touran 2010 UP 2012 2014 P U E Volvo C30 2007 2013 S60 2010 S80 2007 V40 2012 V40 Cross Cou...

Страница 198: ...26 NOTE...

Страница 199: ......

Страница 200: ...Importato da Foppa Pedretti S p A Via A Volta 11 24064 Grumello del Monte Bergamo Italy tel 39 035 830497 fax 39 035 831283 www foppapedretti it Lista veicoli LOGIK i Size R2...

Отзывы: