FoodSaver GM2150 Series Скачать руководство пользователя страница 9

E14

www.FoodSaver.ca

and Cleaning of your Vacuum Sealer

Care

To Clean Appliance: 

Remove Power Cord from electrical outlet. Do not immerse in liquid. 
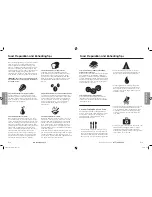
Check Gaskets and around Drip Tray to make sure they are free from 

food materials. Wipe off Gasket with warm soapy cloth if needed. 

Upper and Lower Gaskets may be removed for cleaning. Clean with 

warm, soapy water. 
The Removable Drip Tray makes cleanup easy when small amounts 

of liquids are inadvertently pulled into the Vacuum Channel during 

vacuum process.
Empty Drip Tray after each use. Wash in warm soapy water or place 

on top rack of dishwasher. Dry thoroughly before re-inserting into  

the appliance. 
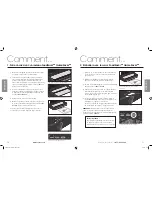
Always leave lid latch in STORE position. 

Never store lid in OPERATE 

position as gaskets may become compressed. When appliance is left 

in OPERATE position, the internal gaskets become compressed and 

the unit may not function properly (see below).

Remove all food 

around gaskets

Lift Drip Tray out

To Store Appliance: 

Clean unit thoroughly as detailed above. 
After the unit has been cleaned and allowed to fully dry, close lid 

and push the Easy Lock Latch into the STORE (middle) position. This 

setting will keep the lid closed but prevents any undue pressure from 

being applied to the internal sealing gaskets of the unit.
Always leave lid latch in STORE position when not in use. 

Never store 

lid in OPERATE position as gaskets may become compressed. When 

appliance is left in closed position, the Gaskets become compressed 

and the unit may not function properly. 

Push the Latch into the 

center position to store.

C

A

RE & C

LE

A

N

IN

G

E15

Customer Service: 

1 (877) 804-5383

Sunbeam Products, Inc. doing business as Jarden Consumer Solutions or if in Canada, Sunbeam 

Corporation (Canada) Limited doing business as Jarden Consumer Solutions (collectively “JCS”) 

warrants that for a period of five years from the date of purchase, this product will be free from defects 

in material and workmanship. JCS, at its option, will repair or replace this product or any component of 

the product found to be defective during the warranty period. Replacement will be made with a new or 

remanufactured product or component. If the product is no longer available, replacement may be made 

with a similar product of equal or greater value. This is your exclusive warranty. Do NOT attempt to 

repair or adjust any electrical or mechanical functions on this product. Doing so will void this warranty.
This warranty is valid for the original retail purchaser from the date of initial retail purchase and is 

not transferable. Keep the original sales receipt. Proof of purchase is required to obtain warranty 

performance. JCS dealers, service centers or retail stores selling JCS products do not have the right to 

alter, modify or in any way change the terms and conditions of this warranty.
This limited warranty does not cover normal wear of parts or damage resulting from any of the following: 

negligent use or misuse of the product, use on improper voltage or current, use contrary to the operating 

instructions, disassembly, repair or alteration by anyone other than JCS or an authorized JCS service 

center or use of this product with non-FoodSaver

®

 branded bags and/or rolls. Further, this limited 

warranty does not cover: Acts of God, such as fire, flood, hurricanes and tornadoes.
What are the limits on JCS’s Liability? 
JCS shall not be liable for any incidental or consequential damages caused by the breach of any express, 

implied or statutory warranty or condition. 
Except to the extent prohibited by applicable law, any implied warranty or condition of merchantability 

or fitness for a particular purpose is limited in duration to the duration of the above warranty. 
JCS disclaims all other warranties, conditions or representations, express, implied, statutory or otherwise. 
JCS shall not be liable for any damages of any kind resulting from the purchase, use or misuse of, 

or inability to use the product including incidental, special, consequential or similar damages or loss 

of profits, or for any breach of contract, fundamental or otherwise, or for any claim brought against 

purchaser by any other party. 
Some provinces, states or jurisdictions do not allow the exclusion or limitation of incidental or 

consequential damages or limitations on how long an implied warranty lasts, so the above limitations or 

exclusion may not apply to you. 
This warranty gives you specific legal rights, and you may also have other rights that vary from province 

to province, state to state or jurisdiction to jurisdiction.
How to Obtain Warranty Service
In the U.S.A. 

If you have any questions regarding this warranty or would like to obtain warranty service, please call 

1-877-777-8042 and a convenient service center address will be provided to you.
In Canada 

If you have any questions regarding this warranty or would like to obtain warranty service, please call 

1 (877) 804-5383 and a convenient service center address will be provided to you.
In the U.S.A., this warranty is offered by Sunbeam Products, Inc. doing business as Jarden Consumer 

Solutions located in Boca Raton, Florida 33431. In Canada, this warranty is offered by Sunbeam 

Corporation (Canada) Limited doing business as Jarden Consumer Solutions, located at 20 B Hereford 

Street, Brampton, Ontario L6Y 0M1. If you have any other problem or claim in connection with this 

product, please write our Consumer Service Department. 
PLEASE DO NOT RETURN THIS PRODUCT TO ANY OF THESE ADDRESSES OR TO THE PLACE OF PURCHASE. 

5-Year Limited Warranty

WA

RR

A

N

TY

GM2150-033_16EFM1.indd   17-18

3/15/16   11:16

Содержание GM2150 Series

Страница 1: ...eford Street Brampton Ontario L6Y 0M1 Printed in China Imprimé en Chine GM2150 033_16EFM1 GCDS FSV44655 JC P N 187321 Registering your appliance is quick and easy at www FoodSaver ca register For important safety information and helpful tips please visit us at www FoodSaver ca to get tips on vacuum sealing and order FoodSaver brand accessories bags and rolls or call 1 877 804 5383 C A Enregistrer ...

Страница 2: ...er GameSaver Bags To Vacuum Seal with FoodSaver Accessories Use Handheld Sealer with FoodSaver FreshSaver Vacuum Zipper Bags Open FoodSaver Accessories After Sealing Guidelines For Successful Sealing E1 0 Care Cleaning E14 Warranty Information E15 Troubleshooting E16 Storage Guide E18 Customer Service 1 877 804 5383 www FoodSaver ca GM2150 033_16EFM1 indd 3 4 3 15 16 11 16 ...

Страница 3: ...y after each use 4 Avoid overfilling always leave at least 3 inches of bag material between bag contents and top of bag This allows room for the bag material to cinch tightly against the food and prevents the bag from pulling out of the Vacuum Channel during the sealing process Then leave at least one additional inch of bag material for each time you plan to reuse bag 5 Do not create your own side...

Страница 4: ... to keep food sealed airtight 7 Vacuum Seal Button This button has two uses 1 Press to vacuum seal and seal food airtight Appliance shuts off automatically 2 Press to pause vacuum process at any point The user friendly intuitive control panel makes it easy for you to get the most out of your FoodSaver System E4 E5 www FoodSaver ca Customer Service 1 877 804 5383 Accessories sold separately FEATURE...

Страница 5: ...cuum Channel J 3 Close lid P and turn Easy Lock Latch E to OPERATE position 4 Press Vacuum Seal Button C to begin vacuum and sealing process Motor will continue to run until bag is fully vacuumed then will automatically seal 5 When Seal Indicator Light turns off turn Latch E to OPEN position lift lid and remove bag Refrigerate or freeze if needed See FoodSaver Storage Guide pages 18 19 for safe fo...

Страница 6: ... 2 inches of space between bag contents food and bottom of zipper The extra space is required to allow the bag to close and vacuum properly 2 Fill zipper bag lay flat with gray circle facing upwards Squeeze air out zip 3 4 of the way closed and squeeze any remaining air out before zipping completely 3 Press Handheld Sealer over gray circle on bag and press Vacuum Seal button C How to How to E8 E9 ...

Страница 7: ...se fresh vacuum seal it after each use Make your FoodSaver Bag extra long allowing one inch of bag material for each time you plan to open and re seal in addition to the 3 inch room you normally leave between contents and seal Simply cut sealed edge and remove cheese When you re ready to re seal the cheese just drop it in bag and re seal IMPORTANT Due to the risk of anaerobic bacteria Soft cheeses...

Страница 8: ...move frozen liquid from pan and vacuum seal in a FoodSaver Bag You can stack these frozen bricks in your freezer When you re ready to use just cut corner of bag and place in a dish in microwave or drop into water at a low simmer below 170 F 75 C To vacuum seal non carbonated bottled liquids you can use a FoodSaver Bottle Stopper with the original container Remember to leave at least one inch of ro...

Страница 9: ...res selling JCS products do not have the right to alter modify or in any way change the terms and conditions of this warranty This limited warranty does not cover normal wear of parts or damage resulting from any of the following negligent use or misuse of the product use on improper voltage or current use contrary to the operating instructions disassembly repair or alteration by anyone other than...

Страница 10: ...wrinkles To prevent wrinkles in the seal gently stretch bag flat while inserting bag into Vacuum Channel No lights on the control panel Make sure unit is plugged in Make sure wall outlet is functional Make sure lid is all the way down and the Latch is in the OPERATE position E16 E17 www FoodSaver ca Customer Service 1 877 804 5383 Troubleshooting TROUBLESHOOTING Problem Solution Nothing happens wh...

Страница 11: ...1 week 1 3 days Harder Berries Blueberries Refrigerator FoodSaver Canister 2 weeks 3 6 days Cranberries Refrigerator FoodSaver Canister 2 weeks 3 6 days Huckleberries Refrigerator FoodSaver Canister 2 weeks 3 6 days Storage Guide Baked Goods Coffee Snacks and Liquids Foods Where to Store Recommended FoodSaver Bag Accessory Storage Life with FoodSaver Bag Accessory Normal Storage Life Baked Goods B...

Страница 12: ...GameSaverMD Employer les accessoires FoodSaverMD Utiliser la scelleuse à main avec les sacs à vide à glissière FoodSaverMD FreshSaverMD Ouvrir les accessoires FoodSaverMD scellés sous vide Directives générales pour bien réussir F 1 0 Soins et entretien F 14 Renseignements de garantie F 15 Dépannage F 16 Guide de conservation F 18 Service à la clientèle 1 877 804 5383 www FoodSaver ca GM2150 033_16...

Страница 13: ... être aspirées dans la rainure d aspiration Videz le ramasse gouttes après chaque emploi 4 Ne remplissez pas les sacs à l excès laissez toujours un vide d au moins 8 cm 3 po entre le contenu et la gueule du sac Ainsi la pellicule moulera le contenu et empêchera le sac de sortir de la rainure pendant la soudure Prévoyez aussi une longueur supplémentaire de 2 5 cm 1 po pour chacune des fois que vous...

Страница 14: ...réserver la fraîcheur du contenu 7 Touche vide et soudure Cette touche remplit deux fonctions 1 vous la pressez pour faire le vide et souder hermétiquement le sac L appareil s éteint alors automatiquement 2 vous la pressez également pour arrêter le processus de vide à tout moment Le tableau de commande convivial et intuitif vous aide à profiter au maximum des avantages FoodSaverMD F4 F5 www FoodSa...

Страница 15: ...ac dans la rainure d aspiration J 3 Fermez le volet P et réglez le loquet de verrouillage E à la position FONCTIONNER 4 Appuyez sur la touche de vide et soudure C pour faire débuter le processus Le moteur tournera jusqu à ce que tout l air soit expulsé puis il scellera le sac automatiquement 5 Lorsque le voyant de soudure s éteint réglez le loquet E à OUVRIR levez le volet et retirez le sac Réfrig...

Страница 16: ...ère Ce vide est requis pour que le sac ferme bien et que tout l air soit expulsé 2 Couchez le sac rempli le cercle gris orienté vers le ciel Pressez pour expulser l air fermez la glissière aux 3 4 puis pressez de nouveau pour évacuer l air qui reste avant de fermer totalement la glissière 3 Appuyez la scelleuse à main sur le cercle gris du sac et pressez la touche de vide et soudure C Comment Comm...

Страница 17: ...u ils restent frais Utilisez un sac FoodSaverMD très long prévoyez un supplément de 2 5 cm 1 po pour chaque fois que vous ouvrirez et rescellerez le sac outre les 8 cm 3 po requis entre le morceau et la soudure Coupez la soudure sortez le fromage replacez le fromage dans le sac et soudez ce dernier IMPORTANT par suite du risque de bactéries anaérobies les fromages à pâte molle ne devraient jamais ...

Страница 18: ...coin du sac et posez le sac dans un plat transparent aux micro ondes ou bien réchauffez le sac dans l eau qui frémit à moins de 75 C 170 F Pour les liquides non gazeux embouteillés utilisez un bouchon FoodSaverMD avec la bouteille d origine N oubliez pas de laisser 2 5 cm 1 po entre le contenu et la partie inférieure du bouchon La bouteille peut être rescellée après chaque utilisation Trucs de pré...

Страница 19: ...llants qui vendent des articles JCS n ont pas le droit d altérer de modifier ou de changer d une manière quelconque les modalités de cette garantie Cette garantie ne couvre pas l usure normale des pièces ou l endommagement attribuable à la négligence à l utilisation abusive du produit au branchement sur un circuit de tension ou courant inapproprié au non respect du mode d emploi au démontage et à ...

Страница 20: ...Soins et entretien Le sac est plissé pour éviter les plis à la soudure étirez délicatement la gueule du sac en l insérant dans la rainure d aspiration Aucun voyant ne luit au tableau de commande Assurez vous que l appareil est branché Vérifiez que la prise de courant est en bon état de fonctionnement Vérifiez que le volet est totalement fermé et le loquet à FONCTIONNER F16 F17 www FoodSaver ca Ser...

Страница 21: ...ts plus durs Bleuets Réfrigérateur Contenant FoodSaverMD 2 semaines 3 à 6 jours Canneberges Réfrigérateur Contenant FoodSaverMD 2 semaines 3 à 6 jours Myrtilles Réfrigérateur Contenant FoodSaverMD 2 semaines 3 à 6 jours Guide de conservation produits de boulangerie café collations et liquides Aliments Lieu de conservation Sac ou accessoire FoodSaverMD recommandé Durée de conservation avec FoodSave...

Отзывы: