Food Network 18008 Скачать руководство пользователя страница 9

1 4

Food Network 

1 5

Food Network 

Setting the AUTO Start Time

1.  Press the PROG button until the word “TIMER” appears in the upper left 

corner of the display window to indicate that you are in the future AUTO 

time setting mode.

2.  Press the HOUR button, then the MIN button to set the future AUTO 

start time; release the buttons to advance one digit at a time. Hold down 

the HR or MIN buttons to fast advance. 

Note: Pay attention to the AM and PM setting.

Note: If no buttons are pressed after 5 seconds, the setting mode will expire and 

the LCD will display the current time.

3.  When the desired future AUTO start time appears in the display window, 

press the AUTO button. The blue AUTO indicator light will illuminate.

WARNING: Make sure the Coffee Maker is set up to brew coffee: Fill the 

water reservoir at least to the 2-cup level, add fresh ground coffee to a 

clean coffee 

fi

 lter and close the lid. Place the empty carafe in position on 

warming plate

4.  When the preset time is reached, the AUTO indicator light will turn off; 

the BREW indicator light will illuminate and the Coffee Maker will begin 

brewing coffee.

5.  When brewing is complete, the Coffee Maker will advance to a 2 hour 

KEEP WARM mode. The BREW indicator light will remain illuminated.

6.  To cancel the preset AUTO start time, press the OFF button to turn the 

Coffee Maker OFF. Press the ON button and the Coffee Maker will begin 

the brew cycle immediately.

7.  To change the preset AUTO start time, simply press the PROG button 

twice until “TIMER” appears in the upper left corner of the display 

window. Then press the HOUR button the MIN button until the new 

AUTO future start time is displayed. Activate the AUTO feature by 

pressing the AUTO button until the blue AUTO indicator light illuminates.

Hints for Great-Tasting Coffee

•  A clean Coffee Maker is essential for making great-tasting coffee. Regular 

cleaning, as described in the Care & Cleaning Instructions and Descaling 

sections of this owner’s manual is highly recommended.

•  Always use fresh, cold water in your Coffee Maker.

•  Finer grinds, such as drip and ADC coffee, promote fuller extraction and 

provide rich, full-bodied coffee. Regular grind will require slightly more 

coffee per cup to provide the strength of a 

fi

 ner grind.

•  Store coffee in a cool, dry place. Once coffee has been opened, keep it tightly 

sealed in the refrigerator to maintain freshness.

•  For optimum coffee, buy whole beans and grind them 

fi

 nely just 

before brewing.

•  Do not re-use coffee grounds since this will greatly impair coffee 

fl

 avor.

•  Reheating coffee is not recommended. Coffee is at its peak 

fl

 avor 

immediately after brewing.

•  Small oil droplets on the surface of brewed, black coffee is due to the 

extraction of oil from the coffee grounds. Oiliness may occur more 

frequently if heavily roasted coffees are used. Overextraction may also cause 

oiliness, indicating a need to clean your Coffee Maker.
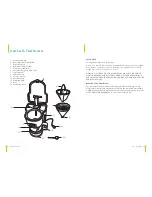
AutoPause & Serve

1.  After approximately 2 cups of coffee have been brewed, the carafe may 

be slowly removed and the coffee will stop dripping.

2. The 

fl

 ow valve is located on the bottom of the 

fi

 lter holder and is activated 

when the carafe is removed. The design makes it possible for you to remove 

the carafe and pour a cup of coffee before the entire carafe is brewed.

3.  IMPORTANT: When replacing the 

fi

 lter holder, the 

fl

 ow valve must be 

properly inserted into the front hole of the machine, so that it can be seen 

as it sits on the top of the carafe lid.

4.  When using this feature, make sure that the carafe is replaced under 

the 

fi

 lter holder within 30 seconds to prevent over

fl

 ow.

Содержание 18008

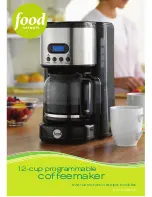
Страница 1: ...STYLE 18008 instruction and recipe booklet 12 cup programmable coffeemaker ...

Страница 2: ...etwork table of contents Important Safeguards 3 Other Consumer Safety Information 6 Parts Features 9 Assembly Use 11 Care Cleaning 16 Warranty Customer Service 18 A Note from Food Network 19 Recipes 20 Notes 23 ...

Страница 3: ... cleaning Allow to cool before putting on or taking off parts and before cleaning the appliance 7 Do not operate any appliance with a damaged cord or plug or after the appliance malfunctions or has been damaged in any manner Bring it to a qualified technician for examination repair or electrical or mechanical adjustment 8 The use of accessories or attachments not recommended by the manufacturer ma...

Страница 4: ...ing Instructions to clean the appliance 4 DO NOT attempt to move an appliance containing hot liquids Allow appliance to cool completely before moving 5 Keep appliance at least 4 inches away from walls or other objects during operation Do not place any objects on top of appliance while it is operating Place the appliance on a surface that is resistant to heat 6 If this appliance begins to malfuncti...

Страница 5: ...of impact Use care when filling with water to avoid hitting faucet 4 Do not place hot carafe on cool or wet surface Allow to cool before washing or adding liquids 5 Do not set empty carafe on a hot heating surface Do not clean with steel wool pads abrasive cleanser or any other materials that may scratch 6 Do not bump scratch or boil dry 7 Discard carafe if it is cracked scratched or heated while ...

Страница 6: ...by most Coffee Maker manufacturers To fill your favorite over sized mug fill Coffee Maker reservoir with enough water for 3 to 4 cups 15 to 20 ounces WARNING TO REDUCE THE RISK OF FIRE OR ELECTRIC SHOCK DO NOT REMOVE THE BOTTOM COVER NO USER SERVICEABLE PARTS INSIDE REPAIR SHOULD BE DONE BY AUTHORIZED SERVICE PERSONNEL ONLY Reusable Nylon Filter Basket The reusable nylon filter basket takes the pl...

Страница 7: ...ly clean the glass carafe with lid measuring scoop and removable filter holder in hot sudsy water Rinse and dry Replace disassembled parts See Care Cleaning Instructions for a detailed description 3 Clean the inside of the Coffee Maker by brewing 2 full carafes of tap water see Brewing Coffee Instructions following Do not add paper filter or ground coffee for this initial cleaning Note At the end ...

Страница 8: ...dicator light will remain illuminated Note The Coffee Maker will turn OFF automatically after 2 hours The BREW indicator light will turn off 10 Press the OFF button to turn the Coffee Maker OFF when the carafe is empty or when unit is not in use Brewing a Second Carafe of Coffee 1 To brew another carafe of coffee press the OFF button It is recommended that the Coffee Maker should be OFF and allowe...

Страница 9: ...ressing the AUTO button until the blue AUTO indicator light illuminates Hints for Great Tasting Coffee A clean Coffee Maker is essential for making great tasting coffee Regular cleaning as described in the Care Cleaning Instructions and Descaling sections of this owner s manual is highly recommended Always use fresh cold water in your Coffee Maker Finer grinds such as drip and ADC coffee promote f...

Страница 10: ... in water can detract from the flavor of the coffee and possibly lengthen brew time 1 Fill carafe with 1 part white vinegar to three parts cold water Pour water and vinegar solution into the water reservoir 2 During cleaning more steam will occur than during normal brewing 3 BREW THE VINEGAR SOLUTION UNTIL CARAFE IS HALF FULL Press the OFF button to turn Coffee Maker OFF When liquid stops dripping...

Страница 11: ...ncluding negligence strict liability or otherwise Some states or provinces do not allow this exclusion or limitation of incidental or consequential losses so the foregoing disclaimer may not apply to you If you have a claim under this warranty please call our Customer Assistance number For faster service please have the model type and series numbers ready for the operator to assist you These numbe...

Страница 12: ...ted iced coffee by freezing some extra coffee into cubes espresso frappe 1 cup strong coffee 1 pint vanilla ice cream 2 cups 4 cups ice Pinch ground cloves Pinch ground cinnamon Garnish Whipped cream Caramel sauce Chopped chocolate covered espresso beans Cocoa powder 1 Put all the ingredients in a blender and pulse just until the ice breaks up into tiny pieces small enough to drink with a straw 2 ...

Страница 13: ...e moist coarse crumbs Set aside Cake 1 Sift flour baking soda and salt into a medium bowl Mix sour cream with vanilla in a small bowl Beat butter and sugar in a large bowl with an electric mixer on medium speed until light about 5 minutes Add eggs 1 at a time beating well after each addition Add flour mixture in 3 parts alternating with sour cream mixture in 2 parts beginning and ending with the flou...

Страница 14: ... rights reserved Distributed by Kohl s Department Stores Menomonee Falls WI 53051 Made in China RN 73277 All recipes contained herein are provided courtesy of Television Food Network G P and shall not be reprinted copied or redistributed without the prior written consent of Television Food Network G P 2009 Television Food Network G P All rights reserved ...

Страница 15: ......

Отзывы: