3.-
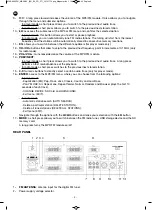
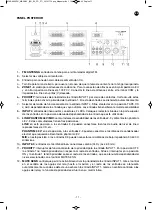
Input for AC mains connection.
4.-
Earth screw, to be used if it is not incorporated in the mains.
5.-
ZONE 1-6
: output for the speakers in each zone. For low impedance 8 Ω speaker connection and high
impedance 100/70 V lines. Connect the speaker line between the COM terminal and the impedance or
line in the required voltage (V).
6.-
PRIORITY
: INPUT 1 priority terminals using contact closure. Shortcircuit these terminals to activate
priority in input 1. The rest of the inputs will be silenced automatically.
7.-
Operating mode selector for INPUT 4. Move the switch to the TAPE, CD or AUX position, depending on
the input you are going to use. The inputs have a different sensitivity level.
8.-
INPUT 4
: aux line inputs, 2 x RCA connectors. Move the switch on the upper part of the inputs to the
appropriate position depending on the input being used.
9.-
LINE/PHANTOM 48 V/MIC
: sensitivity switches for inputs 2-3 and 48 V phantom power. These
switches have three positions:
LINE
: in this position, line level audio sources, CD players, etc. can be connected to inputs 2-3.
PHANTOM 48 V
: in this position, electret condenser microphones that require 48 V phantom power can
be connected to inputs 2-3.
MIC
: in this position, 30-600 Ω low impedance dynamic microphones can be connected to inputs 2-3.
10.-
INPUT 2-3
: entradas de micrófono/línea, conectores combo (XLR y jack 6’3 mm).
11.-
PRIORITY
: interruptor de funcionamiento de la prioridad para la entrada INPUT 1. En la posición OFF,
la entrada 1 no tendrá prioridad con respecto al resto de entradas. Sitúe el interruptor en la posición
ON y la entrada 1 tendrá prioridad sobre el resto de las entradas, que se atenuarán dependiendo del
nivel seleccionado con el control MUTE SENS.
12.-
MUTE SENS
: control for activating/deactivating priority in INPUT 1. Turn the control wheel clockwise
to its maximum and the rest of the inputs will weaken automatically when a signal is detected in INPUT
1. Turn it anti-clockwise and the priority function will go to its minimum level.
CONNECTION
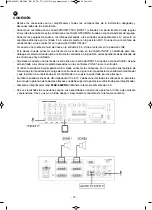
- Make the connections with the amplifier and all the components in the installation switched off and
disconnected from the mains.
- Connect a microphone to the PRIORITY MIC (INPUT 1) on the front panel. The attenuation level for this
input can be regulated using the MUTE SENS control on the back panel of the equipment.
- Connect the required audio equipment or microphones to the corresponding inputs. If a dynamic
microphone is connected to inputs 2 or 3, move the switch to the MIC position. If a condenser microphone
is connected, move the switch to the PHANTOM 48 V position.
If a line level source is connected to input 2 or 3, move the switch to the LINE position.
- If you wish, you can connect a line level source to INPUT 4, which has been prepared for this. Move the
switch that is just above the inputs to the corresponding position, depending on the input you used.
- If you wish, connect a line level source to INPUT 5 on the front panel. Assign this input to the required
output zones using the ZONE 1-6 controls for input 5.
- If you use the 8 Ω low impedance output, you must connect the speakers in a series/parallel circuit so that
the speaker charge impedance is the same as the amplifier output impedance and the power supplied by
the amplifier does not exceed that withstood by the speakers.
- If you use 100 or 70 V high impedance line output, you must connect all the speakers in parallel and the sum
of the power of all the speakers must not exceed the power supplied by the amplifier.
- Power the
MAZ-6600RU
amplifier using the AC mains supply.
- Once the connections have been made according to your needs, connect the equipment to the mains and
switch it on. After use do not forget to switch it off and disconnect the equipment from the mains.
- 5 -
EN
MAZ-6600RU_MANUAL_(EN_ES_FR_PT)_20191119.qxp_Maquetación 1 19/11/19 14:45 Página 5
Содержание MAZ-6600RU
Страница 6: ... 6 EN MAZ 6600RU_MANUAL_ EN_ES_FR_PT _20191119 qxp_Maquetación 1 19 11 19 14 45 Página 6 ...
Страница 26: ... 26 MAZ 6600RU_MANUAL_ EN_ES_FR_PT _20191119 qxp_Maquetación 1 19 11 19 14 45 Página 26 ...
Страница 27: ... 27 MAZ 6600RU_MANUAL_ EN_ES_FR_PT _20191119 qxp_Maquetación 1 19 11 19 14 45 Página 27 ...
Страница 28: ...www fonestar com MAZ 6600RU_MANUAL_ EN_ES_FR_PT _20191119 qxp_Maquetación 1 19 11 19 14 45 Página 28 ...


