background image

10

HARDWARE FEATURES

Front Panel

3

1

1

5

4

6

5

8

10

4

6

2

7

9

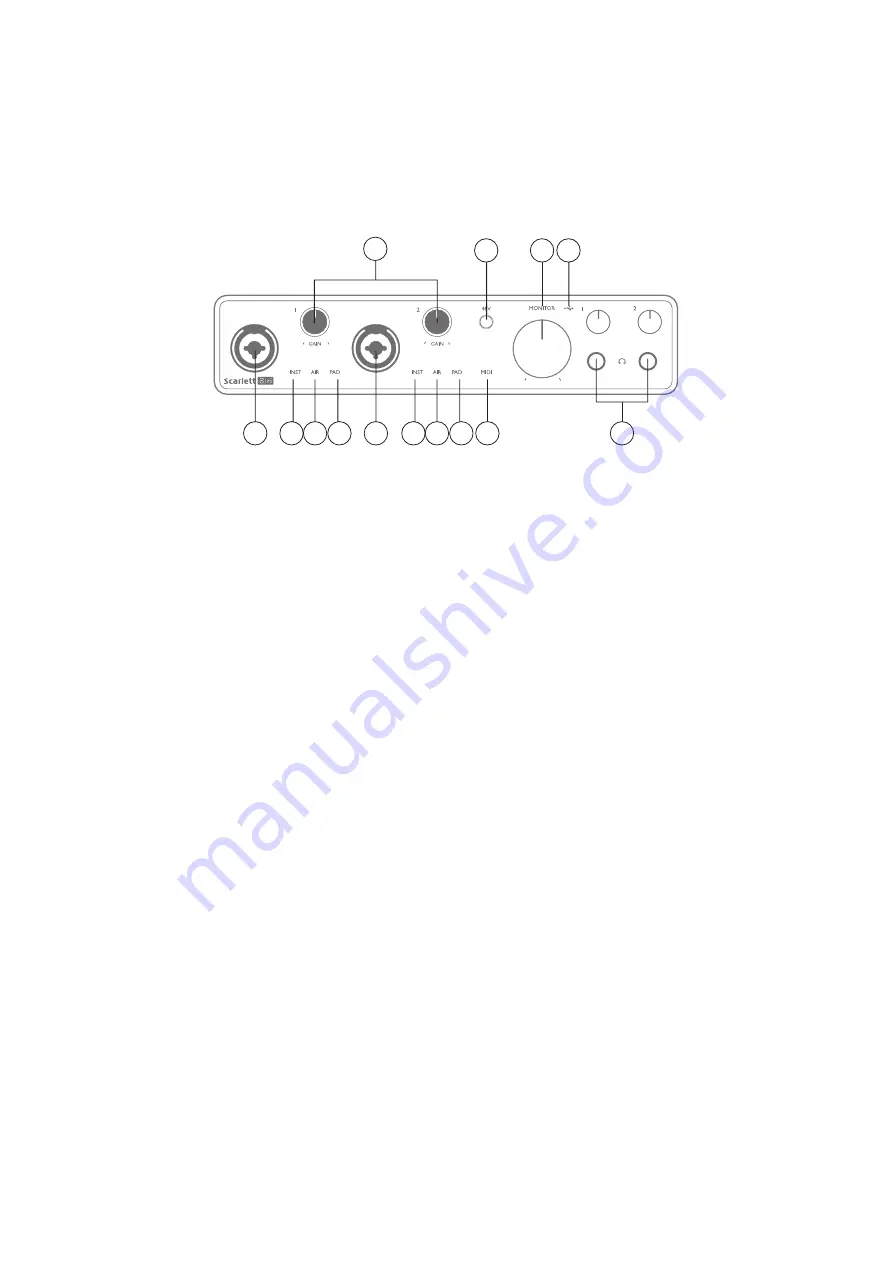
The front panel includes input connectors for Mic, Line and Instrument signals, the input gain and 

monitoring controls, and headphones sockets.

1.  Inputs  1  &  2  –  “Combo”  type  input  sockets  -  connect  microphones,  instruments  (e.g., 

guitar), or line level signals here. Combo sockets accept both XLR and ¼” (6.35 mm) jacks. 

Microphones will normally be connected using XLR plugs: instruments and line level signals 

should be connected via ¼” (6.35 mm) jack plugs of either TR or TRS type. The preamp gain is 

appropriate for microphones when an XLR plug is inserted, and for higher level signals when 

a jack plug is inserted. Do not connect anything other than a microphone - e.g., the output 

of a sound module or FX unit - via an XLR plug, as the signal level will overload the preamp, 

resulting in distortion; also, if phantom power is enabled, the equipment may be damaged. 

2.  48V – press to enable 48 V phantom power at the XLR contacts (mic inputs) of the Combo 

connectors. The 48V indicator illuminates red when phantom power is selected.

3.  GAIN 1 and GAIN 2  - adjust the input gain for the signals at Inputs 1 and 2 respectively. The 

gain controls have concentric tri-colour LED ‘rings’ to confirm signal level: green indicates 

an input level of at least -24 dBFS (i.e., ‘signal present’), the ring then turns amber at -6 dBFS 

to indicate that the signal is close to clipping, and finally to red at 0 dBFS (digital clipping).

4.  INST    –  the  input  configuration  for  the  jack  contacts  at  Inputs  1  and  2  can  be  selected  in 

software from Focusrite Control. The red LEDs illuminate when INST is selected. With INST 

selected, the gain range and input impedance are altered (relative to LINE), and the input is 

made unbalanced. This optimises it for the direct connection of instruments (usually via a 

2-pole (TS) jack plug). When INST is off, the inputs are suitable for the connection of line level 

signals. Line level signals may be connected either in balanced form via a 3-pole (TRS) jack 

or unbalanced, via a 2-pole (TS) jack.

5.  AIR – two yellow LEDs indicating selection of AIR mode for Inputs 1 and 2. AIR mode, selected 

from  Focusrite  Control,  modifies  the  frequency  response  of  the  input  stage  to  model  the 

classic, transformer-based Focusrite ISA microphone preamps.

6.  PAD – two green LEDs; illuminate when PAD is selected from Focusrite Control for Inputs 1 

and 2. PAD decreases the signal level going to your DAW by 10 dB; use when the input source 

has a particularly high level.

Содержание Scarlett 8i6

Страница 1: ...User Guide www focusrite com Version 1 0...

Страница 2: ...ear Panel 12 Connecting your Scarlett 8i6 13 Power 13 USB 13 Audio Setup in your DAW 14 Loopback Inputs 15 Examples of Usage 16 Connecting microphones and instruments 16 Low Latency Monitoring 17 Crea...

Страница 3: ...Control installer for both Mac and Windows platforms The Windows version of the installer contains the driver so in either case you only need to install Focusrite Control to get up and running This Us...

Страница 4: ...USB port and other items of MIDI equipment in your system Box Contents Along with your Scarlett 8i6 you should find External 12 V DC mains Power Supply Unit PSU USB cable Type A to Type C Getting Sta...

Страница 5: ...to your computer using the USB cable provided Note that Scarlett 8i6 is a USB 2 0 device and thus the USB connection requires a USB 2 0 compliant port on your computer Your computer will initially tr...

Страница 6: ...rea to get the software for your Scarlett or to follow a step by step setup guide based on your choices Once you have installed the Focusrite Control software to set up and configure your interface th...

Страница 7: ...te that the drive letter may be something other than D depending on what other devices you have connected to your PC Double click on the pop up message to open the dialogue box shown below Double clic...

Страница 8: ...rlett or to follow a step by step setup guide based on your choices Once you have installed the Focusrite Control software to set up and configure your interface the Scarlett will be switched out of M...

Страница 9: ...ate you can do so at https customer focusrite com user register You will need to enter the Serial Number manually this number can be found on the base of the interface itself and can also on the barco...

Страница 10: ...nd 2 respectively The gain controls have concentric tri colour LED rings to confirm signal level green indicates an input level of at least 24 dBFS i e signal present the ring then turns amber at 6 dB...

Страница 11: ...OR main monitor output level control this is an analogue control and adjusts the level at Outputs 1 and 2 on the rear panel 10 connect one or two pairs of stereo headphones at the two 6 25 mm TRS jack...

Страница 12: ...th the cable supplied 14 MIDI IN and MIDI OUT standard 5 pin DIN sockets for connection of external MIDI equipment The Scarlett 8i6 acts as a MIDI interface allowing MIDI data to from your computer to...

Страница 13: ...oftware installation is complete simply connect the Scarlett 8i6 to your computer if your computer has a Type A USB port we recommend you use the Type A to Type C USB cable provided with the unit If y...

Страница 14: ...p focusrite com get started where Getting Started videos are available Operating instructions for Pro Tools First and Ableton Live Lite are beyond the scope of this User Guide but both applications in...

Страница 15: ...s enabled in Ableton Live Lite s Input Config and Output Config pages Typical name Terminology may differ slightly between DAWs Loopback Inputs You will notice that two additional inputs Inputs 9 10 w...

Страница 16: ...k of any tracks already recorded in the DAW can be monitored on headphones Alternatively loudspeakers can be used if the vocal mic is in a separate room The mix itself is set up in Focusrite Control T...

Страница 17: ...ignals This might be the case if you need to increase the size of your DAW s recording buffer which could be necessary when you record overdubs on a particularly large project using many DAW tracks so...

Страница 18: ...to that outlined above Connect Line Outputs 3 and 4 to the compressor s inputs and the compressor s outputs to Line Inputs 3 and 4 as shown below We have omitted the front panel connections in this e...

Страница 19: ...lf Then you can use the Scarlett 8i6 as a simple local mixer as part of your equipment rig to control the overall mix of multiple instruments To FOH Mixer In the example illustrated a guitar stereo an...

Страница 20: ...suit the number of inputs and outputs and other facilities available on the hardware IMPORTANT A separate Focusrite Control User Guide can be downloaded once you have completed the on line registratio...

Страница 21: ...reen image on page 20 CH NO INPUTS OUTPUTS 1 Input 1 Output 1 Headphones 1L 2 Input 2 Output 2 Headphones 1R 3 Input 3 Output 3 Headphones 2L 4 Input 4 Output 4 Headphones 2R 5 Input 5 S PDIF 1 6 Inpu...

Страница 22: ...mic Range 111 dB A weighted Frequency Response 20 Hz to 20 kHz 0 1 dB THD N 0 0012 minimum gain 1 dBFS input with 22 Hz 22 kHz bandpass filter Noise EIN 128 dB A weighted Maximum input level 9 dBu no...

Страница 23: ...equency Response 20 Hz to 20 kHz 0 1 dB THD N 0 002 minimum gain 1 dBFS input with 22 Hz 22 kHz bandpass filter Input Impedance 44 k ohms Maximum input level 18 dBu measured at minimum gain Line Outpu...

Страница 24: ...Analogue Inputs 3 to 6 Connectors 4 x balanced TRS jacks on rear panel Analogue Outputs 1 to 4 Connectors 4 x balanced TRS jacks on rear panel Stereo headphone outputs 2 x TRS jacks on front panel Mai...

Страница 25: ...25 Weight and Dimensions W x D x H 210 mm x 149 5 mm x 47 5 mm 8 27 x 5 89 x 1 87 Weight 0 84 kg 1 85 lbs...

Страница 26: ...CES Your Scarlett 8i6 has a two year warranty valid anywhere in the world against manufacturing defects Full Terms and Conditions can be found at https focusrite com warranty Focusrite is a registered...

Отзывы: