Focusrite Saffire Скачать руководство пользователя страница 16

15

buttons. To the left of the dial is a Mute button (labelled M), above is

a button that sets the Monitor dial on the hardware to control the

level (labelled H) instead of the software, and to the right is a Solo

button (labelled S). Each dial illuminates when active.The Mute button

cuts the output and the Solo button mutes (cuts) all other outputs.

The set of controls for stereo outputs 1/2 has the Hardware Control

button (H) active as default so that the Monitor control on the

hardware sets its level, to deselect it simply press the button allowing

software control. Outputs 1/2 controls also feature an additional

button with a downward arrow; this dims the stereo output by 12dB

(the same as pressing the dim button on the hardware). Note that

9/10 output controls (SPDIF) do not have a level dial or a Hardware

Control button, just Mute and Solo.

Foldback Reverb

The reverb dial in every stereo output section sets the amount of

foldback reverb (not recorded reverb, just for the headphone/monitor

mixes) applied to analogue input(s) 1 and/or 2 as required, with a

smaller button that turns the reverb on or off. If wanting to set reverb

parameters then the plug-in window can be launched in the same way

as the EQ and Compressor windows in the Input stage, by pressing

the plug-in icon located to the right of the Main Application window,

below the Saffire logo.

If recording two separate mono inputs the reverb window will appear

twice so that different types of reverb can be applied to each input. If

recording a stereo source, one reverb window will appear to define

the reverb for both inputs in the stereo pair.

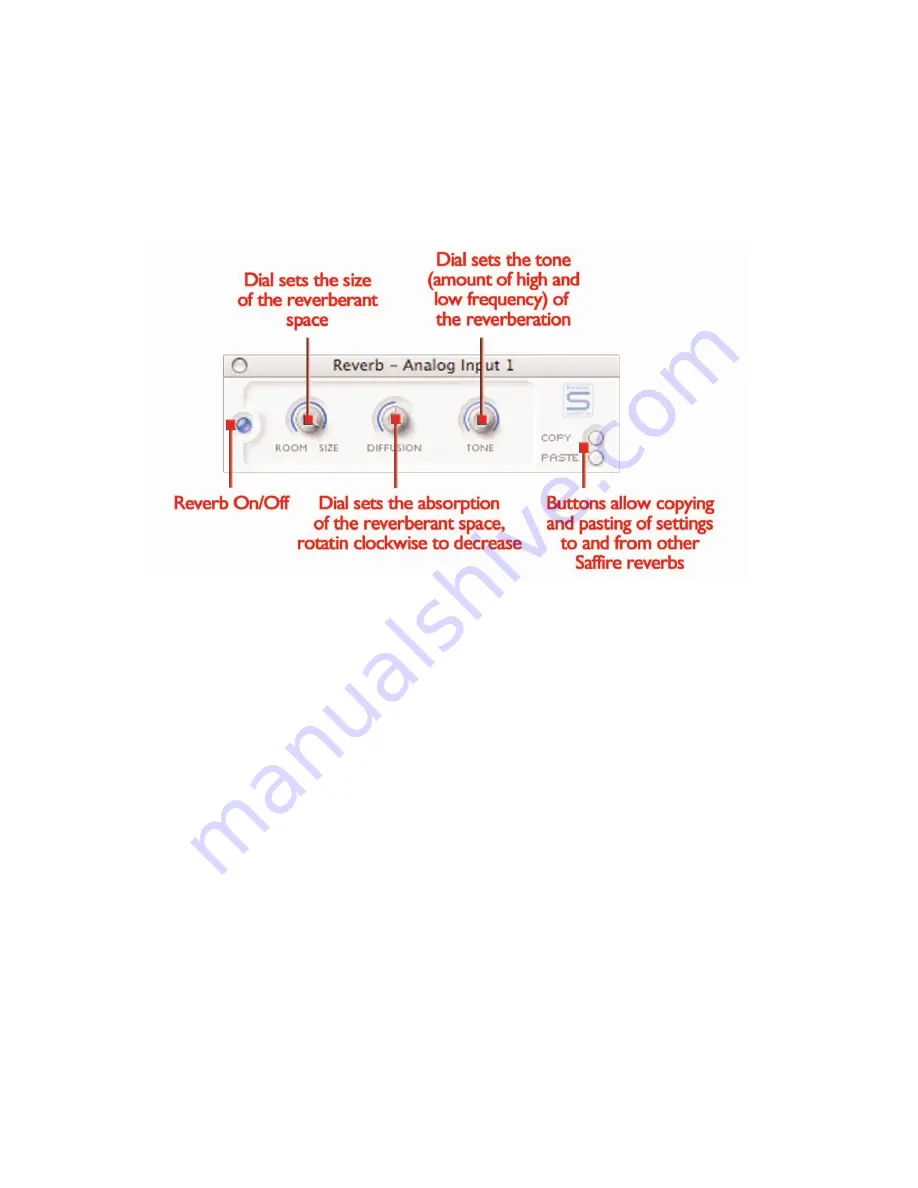
The foldback reverb settings for the analogue inputs (across all

outputs) are defined by three dials.The first dial, labelled SIZE, defines

the size of the reverberant space, rotating clockwise to increase. The

second dial, labelled DIFFUSION, modifies the absorption of the

reverb, rotating clockwise to decrease (increasing the amount of

reflected sound). The third dial, labelled TONE, filters the reverberant

sound to create more low frequency (in the fully anticlockwise

position) and more high frequency (in the fully clockwise position).The

smaller button to the left of the dials has the same function as with

the other plug-ins, to activate/bypass the plug-in (illuminated when

active).

AU/VST Reverb

Although the reverb that functions within SaffireControl is for foldback

only, an AU/VST version of all four plug-ins is available for use

separately within the sequencer/recording software. Using the

AU/VST plug-ins will mean they run off your computer s  processor,

unlike the SaffireControl plug-ins that run off the Saffire hardware s

onboard DSP.The AU/VST reverb has identical controls to the reverb

within SaffireControl (dials for Size, Diffusion and Tone) but instead of

an off/on button within the plug-in window, there is a dial to mix

between 100% dry (fully anticlockwise) and 100% wet (fully

clockwise) signals.

Содержание Saffire

Страница 1: ...UG Rev 1 1 ...

Страница 2: ...SaffireControl and its plug in suite can truly provide everything the modern engineer needs to navigate through a typical recording session Quality Focusrite front end design combines with stylish software offering effects processing of the incoming audio and foldback reverb on any of the separate headphone monitor outputs to ensure that artists are kept happy and audio is tracked to the highest s...

Страница 3: ...his is a fault with the Powerbook itself 2 Run the Installer from the Saffire resources disc 3 Now simply follow the on screen instructions 4 During the installation you will need to authorise your Saffire Plugins We recommend you use SAFARI as your internet browser 5 Once installation is complete you may exit the installer 6 If for some reason you are unable to complete the authorisation process ...

Страница 4: ...dphones signal be independently controlled using the corresponding dial but the balance of each signal can be set using the custom mix facility within the accompanying SaffireControl software 5 Microphone and line inputs Front panel inputs are supplied for both microphone and line level sources Plugging in a source to one of the Line Inputs will deactivate the corresponding Mic Input so ensure tha...

Страница 5: ...ereo SPDIF signal sent from a synthesizer outboard with digital I O or additional DAW 4 Two standard 5 pin MIDI connectors These allow MIDI data to be received from external MIDI equipment and transmitted from the sequencer to the DAW Digital Audio Workstation most likely your computer via the firewire connection Alternatively if the Saffire s MIDI In is connected to a controller keyboard s MIDI O...

Страница 6: ...ire hardware and press the 48V phantom power button if required Phantom power is only necessary if using a condenser microphone almost all dynamic microphones will be unaffected but ribbon microphones may be damaged 3 Now get the artist to play or sing and set the level of the input using the gain adjustment knob on the front panel Rotate the dial clockwise to increase the level making sure that t...

Страница 7: ...e headphones output Soundcard S CARD mode SaffireControl boots up in Soundcard S CARD mode which is the mode to use if wanting to send outputs 1 8 from a sequencer straight out of analogue outputs 1 8 of the Saffire for mixing monitoring purposes Pressing the TRACK tracking recording button on the bottom right of the SaffireControl window changes the software to recording mode where both inputs an...

Страница 8: ...me the previous settings will always reload upon booting 7 SaffireControl Session Management Advanced Settings Software The main application window is where the general session settings are configured complete with multiple faders for all incoming and outgoing audio and vertical strip meters for each stage of the audio chain This is divided into three main sections input processing balancing of au...

Страница 9: ...open its separate window to modify settings or reverse the order of the plug ins as shown in the picture above The default order of the plug ins is compression then EQ Amp Sim with the first plug in in the chain always sitting above the second One mouse click on the relevant plug in button opens up a separate window where the individual settings for that input channel can be defined see relevant p...

Страница 10: ... two bands controlled by each set of three dials on either end of the panel can be independently set to be band pass as default high low shelf middle button or high low pass bottom button by pressing the corresponding small buttons at either end as shown in the diagram When in high low shelf mode only the GAIN and FREQ dials will be active for that band and when in high low pass mode only the FREQ...

Страница 11: ...on will be illuminated to show that the plug in is active click the button to bypass as required A slider is featured to allow different classic amplifier simulations to be selected Simply click on an area of the slider to select an amplifier the slider will jump to whatever area is clicked Five dials are included to allow control over the amp s settings The first is DRIVE which increases the leve...

Страница 12: ...ext as this determines how much the signal is reduced by when it exceeds the threshold For example a ratio of 10 1 means that when the level of the uncompressed signal exceeds the threshold by 10dB the compressed signal will only increase by 1dB The higher the ratio therefore the further the dial is rotated in a clockwise direction the more heavily the signal is compressed The next dials to set ar...

Страница 13: ...educe it For example when SaffireControl is first launched the faders within the Main Application window will all be set to 0dB so that the level of all 10 tracks will be identical to that set within the software sequencer The mix created with these faders will become the default output signal sent to each set of the stereo outputs controlled by the lower section of the Main Application window How...

Страница 14: ...b applied Each stereo output has its own section with the stereo pairs positioned in ascending order from left to right The stereo output sections are all identical except for the last one 9 10 which is the SPDIF output and so contains no level control as the digital output level is fixed This section of the Main Application window will change when the stereo link button in the Input Stage section...

Страница 15: ...et in the custom mix window Press the button to activate the reverb illuminated when active and rotate the dial clockwise to increase the amount of reverb See FOLDBACK REVERB section on page 15 for details on how to modify reverb settings This mix of inputs now becomes the INPUT MIX for that pair of outputs on the horizontal slider crossfader If just wanting to listen to this mix with none of the ...

Страница 16: ...recording two separate mono inputs the reverb window will appear twice so that different types of reverb can be applied to each input If recording a stereo source one reverb window will appear to define the reverb for both inputs in the stereo pair The foldback reverb settings for the analogue inputs across all outputs are defined by three dials The first dial labelled SIZE defines the size of the...

Страница 17: ...gs like appearance and generic Saffire operation The top two buttons are LOAD and SAVE These allow all settings within your session to be saved as regular files at a destination of your choice on your computer and instantly recalled at a later date The next two dials are presets for SaffireControl function The top S CARD button default mode should be pressed if the Saffire hardware is to act like ...

Страница 18: ...ays in view and easily accessible Press the SHRINK button once to reduce to the first smaller format and twice to shrink to the smallest format An EXP button then allows the window to be expanded back to full size The last control is the S RATE button which launches a separate window in which the sample rate of the Saffire hardware s digital converter can be set To set a sample rate simply click o...

Страница 19: ... is designed for use with a sequencer eg Cubase or some other software with MIDI capabilities This mode is necessary when the sequencer is running because it will prevent doubling of notes that occur when the same MIDI information is transmitted by both the input device and the sequencer MIDIThru Mode Input and output MIDI devices without a sequencer When the THRU LED on the front panel is lit all...

Страница 20: ...OP Mix 3 OP Mix 4 Custom Input Mix 1 Playback Mix Custom Input Mix 2 Custom Playback Mix 1 Custom Playback Mix 2 Input Playback Input Playback Custom Input Mix 3 Custom Playback Mix 3 Input Playback Custom Input Mix 4 Custom Playback Mix 4 Input Playback Custom Input Mix 5 Custom Playback Mix 5 Input Playback Monitors L R Aux Out L R Cue Mix 1 L R Cue Mix 2 L R SPDIF Out 48V FLIP Dual Mono Reverb ...

Страница 21: ... well as the compressor on off switch within the main application window for the relevant input channel Are the compressor controls set correctly The threshold must be low enough for the signal to exceed it for the compressor to have any effect See page 11 for more information The EQ is not working Is the plug in active The small switch on the left of the plug in window must be illuminated as well...

Страница 22: ...sured at 60 dB of gain with 150 termination and 20Hz 22kHz bandpass filter LINE Frequency Response 20Hz 20kHz 0 1 dB THD N 0 001 measured with 0 dBFS input and 22Hz 22kHz bandpass filter Noise 88 dBu 22Hz 22kHz bandpass filter INSTRUMENT Frequency Response 20Hz 20kHz 0 1 dB THD N 0 004 measured with 0 dBu input and 20Hz 22kHz bandpass filter Noise 87 dBu 20Hz 22kHz bandpass filter DIGITAL PERFORMA...

Страница 23: ...n Authorised Focusrite Reseller defined as a reseller which has purchased the Product directly from Focusrite Audio Engineering Ltd in the UK or its Authorised Distributors outside the U K and is not transferable This Warranty is in addition to your Statutory Rights in the country of purchase Please note A Manufacturing Defect is defined as a defect in the performance of the product which may be e...

Отзывы: