

09
Before you start, it is necessary to
remove the clear plastic lid. Doing so
enables access for adjustment, and
fixing the unit in place.
Remove it, by pushing gently on the
two shortest sides of the clear plastic
lid. Then pull off.
Never use a screwdriver to prise off
the lid, otherwise damage might
occur and will not be covered by the
warranty.
Once removed, fix in place with the
2 screws supplied. Ensure the length
of screw is suitable for the desired
location. Always ensure the crossover
is installed in a dry, vented and not
damp area.
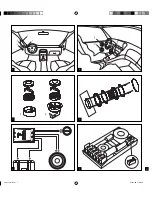
2-Way kits connecting up
Connect the output from the amplifier
into the input of the crossover
“INPUT”.
Connect the woofer to the output of
the crossover “WOOFER”.
Connect the tweeter to the output of
the crossover “TWEETER”
(fig. E)
.
Finally always ensure the tweeter
and woofer are connected in phase
correctly and the polarities are
respected “+” to “+”, and “-” to
“-”. If not done correctly a “hole” or
“peak” may result due to a shift in
phase. This will dramatically impair
the overall performance.
Installation and positioning
The toggle switch found inside the
crossover allows the user to adjust the
tweeter level. This user-friendly option
allows adjustments to be made, to
your own personal listening pleasure,
plus optimising the infinite amount
of the speaker’s locations available.
This allows the system to be “tailor
made” to your vehicle, effectively
ensuring the best acoustics available.
Remember, with too much treble your
system may sound aggressive, suffer a
loss of dynamics, and end up in poor
definition.
Depending on the level of high
frequency
required
for
perfect
integration with the woofer, adjust
from 0 to –3 and -6db. Normally
if the tweeter is positioned close or
on axis with the listening position
slight reductions of –3 and -6dB are
advised.
Information of other K2 Power
products
Focal-JMlab offer a range of sub-
woofers from the 27 KX (270mm/
10.6”) to the impressive 46 KX4
(460mm/18”). Consult your dealer
for further information.
Crossover installation
Level adjustment of tweeter
K2 Power woofer, positioned ideally
high in the doors
(fig. B, 1)
, produce
optimal midrange frequencies, thus
integrating better into the rest of
the system.
The woofers from the K2 Power range
can also be placed low in the “kick-
panels”
(fig. B, 3)
of the vehicle. This
is to further optimize the stereophonic
staging.
Woofer fixing
Either cut the required hole or use
the pre-fitted space. Make sure the
diameter is correct. Where necessary,
carefully push in the four fixing clips to
fit together with the fixing screws.
Carefully place the fixing ring,
ensuring it lines up with the holes or
fixing clip positions
(fig. D)
.
Fix the foam gasket to the back of the
drive unit chassis. Add a small amount
of glue where necessary so it remains
in the correct position (lined up with
the holes).
Lower the drive unit above the fixing
ring, so it remains in the correct
position (lined up with the holes).
Don’t forget to connect the cable to
the connectors.
Now lower the drive unit and screw in
place with the four screws provided.
Add the grille and push in place.
Ensure the logo is straight.
Woofer installation
notice 130 165 kf 9
21/01/05, 17:36:33


