background image

4

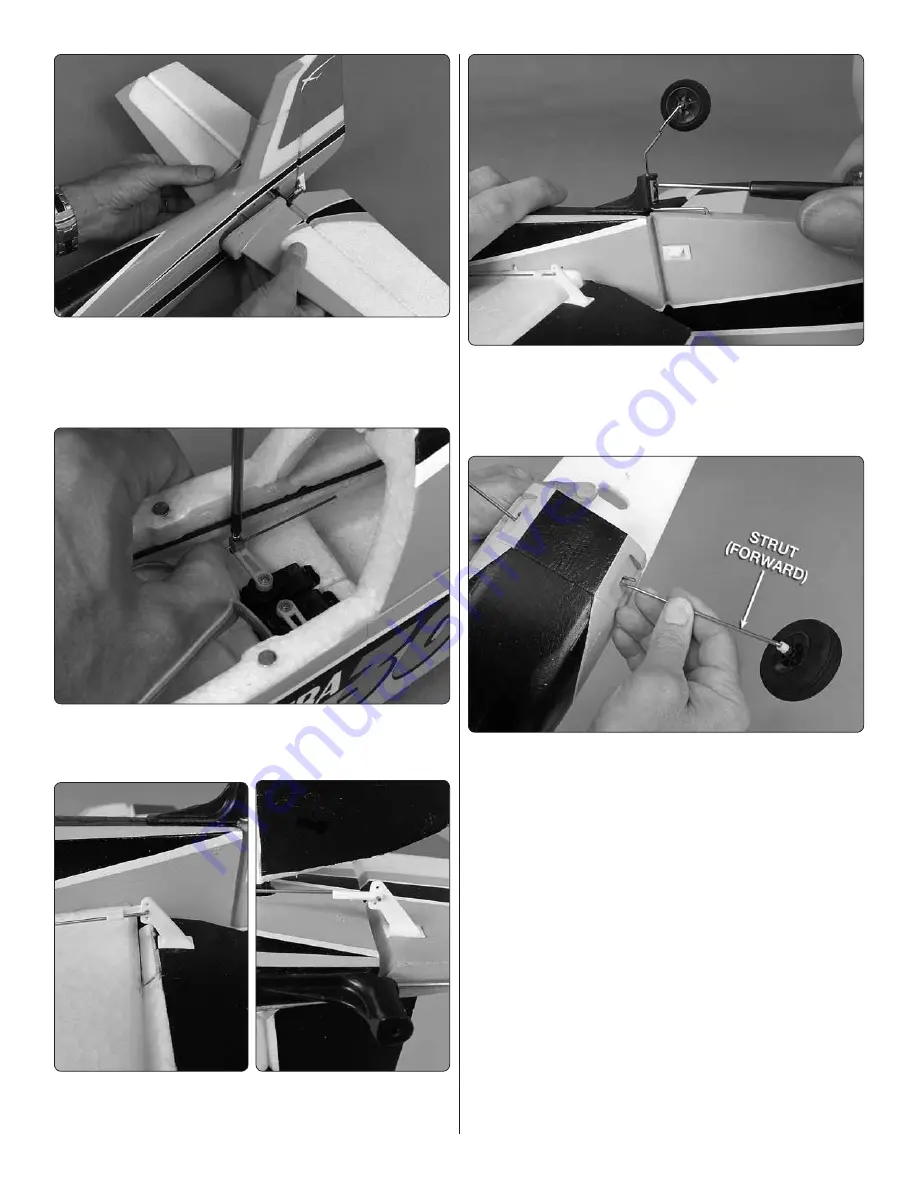
 2. Key in one stab half, then the other simultaneously 

fi tting the other end of the joiner tube into the other 
elevator. Press both halves fi rmly together to make sure 
they are centered in the fuselage and securely keyed all 
the way into each other.

 3. Check that the screws in the screw-lock connectors 

are not tight so the pushrods can temporarily “fl oat” until 
the radio is set up later. 


 4. Fit the elevator and rudder pushrods into the 

middle


hole in their respective control horns and secure with the 

90° pushrod keepers

 5. Fit the 

tail gear wire

 into the tail gear assembly and 

secure with the M3 set screw lightly wetted with thread 
locker—a 1.5mm 

machined

 hex driver is preferred, but 

the included “L” wrench is suffi cient. Be certain the set 
screw locks onto the 

fl at spot

 in the wire. 

 6. Press the 

main landing gear wires

 all the way into 

the receptacles in the fuselage with the longer, “strut” 
portion of the wires toward the front as shown.

Содержание extra 300 sx

Страница 1: ...trol over the final assembly or material used for final assembly no liability shall be assumed nor accepted for any damage resulting from the use by the user of the final user assembled product By the...

Страница 2: ...a 3D capable aircraft with a 3S 1800mAh LiPo A 3S 2200mAh LiPo is also suitable but the additional weight of a heavier battery may detract from its 3D performance slightly In any case if you start exp...

Страница 3: ...5mm hex key wrench M3 set screw M4 x 40 wing bolt Wing Foam wing Aileron servos 2 Servo extensions Y harness Aileron linkage pushrods screw lock connectors 90 pushrod connectors R L horizontal stabil...

Страница 4: ...o is set up later 4 Fit the elevator and rudder pushrods into the middle hole in their respective control horns and secure with the 90 pushrod keepers 5 Fit the tail gear wire into the tail gear assem...

Страница 5: ...ne in the photo approximately 2 1 2 65mm ahead of the wing bolt 10 Connect the servo and ESC wires to the receiver If using a dual diversity receiver with two antennas use tape to hold the antennas pe...

Страница 6: ...Down 3 4 19mm 21 Up 3 4 19mm 21 Down NOTE The control throws are measured at the widest part of each surface at the root ends of the elevators and ailerons and at the bottom of the rudder Set the Fail...

Страница 7: ...down suspended by the wing with your fingertips This procedure will be easiest and most accurate if you can feel the C G range with your fingertips A quick way is to temporarily insert T pins or regul...

Страница 8: ...1440mAh 1440mAh divided by 170mAh minute 8 47 minutes we ll round down to 8 1 2 minutes On your second flight perhaps set your timer to 7 minutes and repeat the procedure to continue to log data for c...

Страница 9: ...tructions but ultimately the quality and flyability of your finished model depends on how you build it therefore we cannot in any way guarantee the performance of your completed model and no represent...

Страница 10: ...16 17 18 19 20 21 22 23 24 25 26 27 28 29 30 B C D E F G FORMULAS Flight Time 10ths Recharge Capacity mAh minute Battery Capacity Target Capacity to Use In Flight Recommended Flight Time Average In F...

Страница 11: ...11...

Страница 12: ......

Отзывы: