background image

H

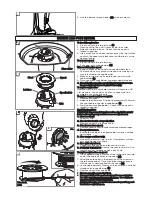
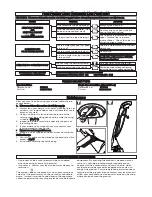
To feed the nylon line
1. Press and hold the two latches (J).
2. Gently pull the line until it reaches the line cutter.
3. Release the two latches.  Check that the spool is

locked in position.

4. If too much line has been fed out, press the two latches

and turn the spool anti-clockwise until the line is at the
desired length.

To remove spool
1. Press and hold the two latches.
2. Pull spool out of spoolholder (K).
When refitting the spool
1. Keep all areas of the spool and spoolholder clean.

Failure to do so may prevent the spool from being se-
curely located in the spoolholder.

2. Make sure the line is placed through the slot in the

spoolholder (L).

3. Place spool into spoolholder and press down into place.
4. Check that the spool is correctly fitted by trying to remove

the spool without depressing the latches (L1).

To replace nylon line
Replacement line is available from most Husqvarna UK
Ltd. stockists.  You can buy it either as spool and line
complete or as nylon line only.
To replace spool and line complete
1. Remove old spool.
2. Release line from cleat.  Unwind approximately 100mm of

line and feed through slot in spoolholder (L).

3. Re-fit spool into spoolholder.  Check that the spool is

locked in position.

Fault Finding Hints
WARNING! Disconnect from the mains electricity supply
before attempting any maintenance or adjustment.
1. Line too short.

Feed out line.

2. Line broken inside of spoolholder.

Remove spool and re-thread line.

3. Line jammed on spool.

Remove spool and rewind line to remove crossed loops.

4. Poor performance.

Ensure the inside of the spoolholder is clean and free
from debris.

5. Line snaps continuously.

Use only tip of nylon line to trim.  If symptoms still per-
sist, change spool and line.

6. Line will not pull out.

Check that line has been released from cleat.

7. IF FAULT PERSISTS Contact Husqvarna UK Ltd. Cus-

tomer Service.  Telephone 0844 844 4558.

To replace nylon line on spool
1. Take approximately 5 metres of line line and insert into

one of the line lock holes in the spool (M).

2. Wind line onto spool in the direction of the arrows on

the top of the spool.  Care should be taken to ensure
that the line is neatly coiled on the spool (M).

3. Leave approximately 100mm of line unwound and feed

through slot in spoolholder (L).

4. Replace spool into spoolholder.

Ensure spool is correctly fitted.

Remember! Your trimmer is designed to use only nylon
line with a maximum diameter of 1.5mm.  Use only gen-
uine Husqvarna UK Ltd. nylon line.
Always return the product to its normal operating posi-
tion before switching on.

Manual Line Feed System

Line cutter

Spool

Spoolholder

Latches

Slot

J

K

L

Cleat

L1

M

Line lock
hole

2. Use the trimmer around trees (H) and near plants.

Содержание Minitrim Auto ST MAST23

Страница 1: ... Original Instructions IMPORTANT INFORMATION Read before use retain for future reference Minitrim ST Minitrim Auto ST Minitrim Auto XT ...

Страница 2: ...British Standards Institute recommend the use of a Residual Current Device R C D with a tripping cur rent of not more than 30mA Even with a R C D in stalled 100 safety cannot be guaranteed and safe working practice must be followed at all times Check your R C D every time you use it 2 Before use examine the cable for signs of damage or Mini Trim Auto XT WARNING When using the product the safety ru...

Страница 3: ...arts for safety 3 Only use the replacement cutting line specified for this product 4 Only use replacement parts and accessories recom mended by Husqvarna UK Ltd 5 After any maintenance in dealing with the cutting line always return the product to its normal operating posi tion before switching on 6 Clean unit with a dry cloth Never use metal objects to clean the unit 7 Inspect and maintain the tri...

Страница 4: ...d continues to rotate after the trimmer has been switched off To start your trimmer 1 Squeeze the safety lock off lever switch lever D To stop your trimmer 1 Release the switch lever 2 1 How to Trim WARNING The use of eye protection is recommended Do not lean over the trimmer whilst trimming or edging objects may be thrown by the cutting line Do not allow cutting head to rest on the ground Do not ...

Страница 5: ...sconnect from the mains electricity supply before attempting any maintenance or adjustment 1 Line too short Feed out line 2 Line broken inside of spoolholder Remove spool and re thread line 3 Line jammed on spool Remove spool and rewind line to remove crossed loops 4 Poor performance Ensure the inside of the spoolholder is clean and free from debris 5 Line snaps continuously Use only tip of nylon ...

Страница 6: ...r clean Fail ure to do so may prevent the cap being securely lo cated in the spoolholder 2 Replace the cap pressing firmly DOWN towards the spoolholder to ensure cap is fully located 3 Check that the cap is correctly fitted by trying to re move it without depressing the two latches To replace nylon line For your convenience it is recommended you buy spool and line complete Nylon line only is also ...

Страница 7: ... Service Is the line cutter missing from the safety guard Contact Husqvarna UK Ltd Customer Service Telephone 0844 844 4558 UK 1800 882 350 ROI No No No Yes Yes LINE NOT FEEDING OR LINE TOO SHORT OR TRIMMER VIBRATES CONTINUOUS CLATTERING NOISE LINE SNAPS CONTINUOUSLY IF NONE OF THE ABOVE OR IF FAULT PERSISTS Has the motor reached full speed before use No Allow the motor to reach full speed before ...

Страница 8: ...y way Guarantee Guarantee Policy Service Recommendations Your product is uniquely identified by a silver and black product rating label We strongly recommend that your product is serviced at least every twelve months more often in a professional application EC Declaration of Conformity Husqvarna AB S 561 82 Huskvarna Sweden Declare under our sole responsibility that the product s Designation Lawn ...

Отзывы: