background image

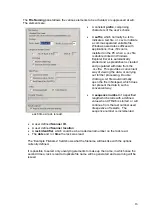
 The 

name

 of the currently selected scanner is displayed in the first field. 


Select Scanner

 - will display a list of all the usb imaging drivers installed on your 

PC. Put a rack of tubes on the scanner you want to use and select it from the list.  A 
new scan will be done and the left hand side of the display will be updated.  

Please 

note

 that scanning racks of tubes is a specialist activity and not all scanners are 

suitable (there may be focusing, brightness, contrast or resolution problems).  Adjust 
the size of the ROI, in the left hand, to match the position of the rack.


Save ROI

 - will save the current position of the ROI (amazing).  It will also be saved 

when the dialog is closed using the “OK” button.


Scan

 - if you think the ROI needs to be adjusted its position should be refreshed by 

pressing “Scan”


Reset ROI

 - Sets the position of the ROI to the manufacturer’s default values.


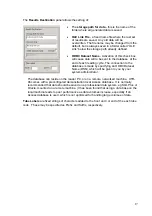
Decode settings: 


Upper Pixel Size 

- this value should not normally be changed. 


Lower Pixel Size 

- this value should not normally be changed. 


Decode Methods 

- you should not necessarily believe that the fastest algorithm will 

produce the fastest overall decode cycle as some codes are better suited to different 
decode algorithms. Using the wrong algorithm may fail first time necessitating a 
second or third retry. 


Cascade Methods

 - when checked, will cause decoding of each tube to start using 

the “Decode Method “ selected above and then to retry with successively slower 
methods until a successful decode has been achieved. 


Decode Timeout

 - if an attempt to decode a tube has not been successful within the 

time specified, the attempt will be aborted and a “No read” result will be returned.  
This setting can be used to stop part full racks taking too long to decode.  If you find 
that some tubes are not decoding, this is the first parameter to change.  So long as 
there are tubes to be read it doesn’t matter if this value is much too large, but it could 
slow the system down if you regularly use part full racks. 


Tube manufacturer - 

changing this setting will set the parameters needed to decode matrix 

codes of the different sizes used by different manufacturers. 

 
Grid Size - 

this is not a configurable option. 


20

Содержание XTR-96

Страница 1: ...XTR 96 96 Tube Rack Scanner Manual Version 2 205...

Страница 2: ...August 2006 1...

Страница 3: ...2 Welcome 3 Introduction 4 Installation 5 Getting started 7 Running XTR 96 11 Results configuration 15 System settings 19 Using the Winsock interface 21 Setting up a HyperTerminal session 23 Trouble s...

Страница 4: ...manufacturers provided that they adhere to the ISO 16022 Data Matrix Two Dimensional Bar Code format The software has been designed to run with the minimum of user input and set up Designed and Manufa...

Страница 5: ...C that is running the software XTR 96 Features Flexible software integration The system has a standard Windows interface with an automation override facility Several methods are available for the cont...

Страница 6: ...ver into the slot at the read and moving the slider switch to the right towards the USB and Power connectors see below Un lock Illustration showing rear of unit Do not connect USB Cable or USB Dingle...

Страница 7: ...3 Select Fujitsu fi 60F as the scanner type 4 Restart the computer to complete the installation process 5 Connect the USB dongle and USB Scanner Cable 6...

Страница 8: ...you desktop To execute from the start menu single click the left mouse button on the start button and select Programs then move to the entry that says XTR 96 finally move to the entry that says XTR 96...

Страница 9: ...t is not on the corner of the rack left click the mouse and drag the yellow box until it is over the corner of the rack that it was nearest to Repeat this operation until all four yellow boxes are on...

Страница 10: ...reen grid by left mouse clicking and dragging it by its corners Once each tube is located centrally in its own box you can then left mouse click the Save ROI button ROI is an acronym for Region of Int...

Страница 11: ...this screen which will come back to later Now move the mouse to white text entry box called Rack ID left mouse click inside the white box area and type in the Rack ID that is on the rack barcode if it...

Страница 12: ...etting started section of this manual you will see the following screen To scan a rack of tubes place the rack in the scanner housing and left click the mouse on the Scan and Decode button the softwar...

Страница 13: ...u move the mouse pointer over the tubes a small text box indicates the cell ID and the tube number you will also see that the row and column numbers highlighted If you left mouse click the Zoom In but...

Страница 14: ...ut buttons progressively reduce or enlarge the image between minimum and maximum zoom positions Now move the mouse to white text entry box called Rack ID left mouse click inside the white box area and...

Страница 15: ...to take a look at some of the other features of the software Move the mouse pointer to the file menu and left click the mouse you will see a list of commands some of which are grey in colour and some...

Страница 16: ...n of the results files the structure of the data in the results files and provides connectivity to an external database using the industry ODBC standard By default XTR 96 saves two copies of decoded d...

Страница 17: ...e clicking a txt file would normally open the file in Notepad which does not present the data in such a convenient way A sequence number of a specified length which starts with a defined value when XT...

Страница 18: ...ade by specifying an ODBC Dataset Name DSN which will be given to you by your system administrator The database can reside on the reader PC or on a remote networked machine XTR 96 comes with a preconf...

Страница 19: ...e file will be added to the lines of header information Rack ID Use the RackID which was input at reading time Free Text Two lines of information of the user s choice Results Format allows the present...

Страница 20: ...essentially cosmetic When viewing a HyperTerminal session see later data tends to be shown in a continuous stream of values across the screen and is not easy to interpret this causes no problem to an...

Страница 21: ...not normally be changed Decode Methods you should not necessarily believe that the fastest algorithm will produce the fastest overall decode cycle as some codes are better suited to different decode a...

Страница 22: ...Enable Winsock from the System Dialog and make a note of the Hostname and Port Number Connect the HyperTerminal Session and the message shown in the above display will automatically be displayed This...

Страница 23: ...OK and treat all future tubes as ABgene This is not a persistent setting so next time XTR 96 is started this instruction would have to be sent again Similarly matrix micronic White on Black and nun ca...

Страница 24: ...grams Accessories Communications HyperTerminal and Bill Gates will bombard you with questions you don t want to answer Press Cancel at the Location Information screen Bill will shout at you as follows...

Страница 25: ...rminal responds with the Connect To dialog In the Connect using combo box select TCPIP IP Winsock Enter the Host address that was displayed in XTR 96 s System dialog and change the Port number to 201...

Страница 26: ...at a time waiting for the installation of each one to complete To install new USB devices o Ensure the USB Device is not plugged in o Insert the manufacturer s installation CD and follow the instructi...

Отзывы: