


Installation and Maintenance Manual
Series 19 - Segmented Ball Valves
Date: Feb 2013 / Page 16 of 19
Installation and Maintenance Manual
Series 19 - Segmented Ball Valves
Date: Feb 2013 / Page 17 of 19
®
®
A Subsidiary of BRAY INTERNATIONAL, Inc.
A Subsidiary of BRAY INTERNATIONAL, Inc.
FLOW-TEK, Inc.
Tel: 832.912.2300
© 2012 Flow-Tek, Inc.
8323 N. Eldridge Pkwy #100
Fax: 832.912.2301
Houston, Texas 77041
www.flow-tek.com
FLOW-TEK, Inc.
Tel: 832.912.2300
© 2012 Flow-Tek, Inc.
8323 N. Eldridge Pkwy #100
Fax: 832.912.2301
Houston, Texas 77041
www.flow-tek.com
12. Push packing (13) and bearings (6, 7) out of the body
using a soft metal (bronze) dowel with the appropriate
diameter. Push packing out of the body from the center
of the valve.
11.3 - Reassembling the Valve
To reassemble the body subassembly, refer to the Parts Diagram.
1. Clean all parts and replace all O-rings and soft seals.
2. Check the segment (5) sealing surface to make sure it is
smooth and free of scoring and scratches.
CAUTION:
Damaged or dirty seal surfaces can cause
excessive seat wear and high torque requirements.
Damaged segment should be replaced.
3. Inspect the stem (8) and end post (9) for scratches or
galled surfaces. If damage exists, replace the stem or
contact the factory representative.
NOTE:
Segment and stem are interchangeable. Replacing
the segment does not require replacing the stem.
4. Using a press to install new bearings in the body is
recommended. (Optional post/bearing tool is available
from the factory -
See Table 4 on page 17
) when
correctly installed, the ends of the body bearings (6, 7)
should be flush with the inside of the body.
5. Position the segment (5) in the body by lowering it,
splined hole first, into the back of the body. Rotate the
segment surface toward the front of the body so that the
splined hole is toward the packing box.
CAUTION:
Be extremely careful not to gall or scratch
the sealing surface of the segment when replacing it in
the body. Scratches may later cause excessive leakage
and seal wear.
6. Insert the stem (8) through the post end of body and through
the splined hole of the segment into the packing box.
7. Position the stem so that the pin hole in the stem (8) and
Segment (5) are in alignment. (Stem (8) across flat on
the top and pin holes are perpendicular to each other).
Install the stem pin (10) and drive it firmly into place so
that half is in the Segment (5) and half in the stem (8).
8. Insert the end post (9) into the body. Posts have a half
circle mark on the end. Align this mark with the Segment.
Install the end post pin (11) and drive it firmly into place
so that half is in the Segment and half is in the post.
9. Install the post cover (20) with gasket (19), tighten the
nuts (23) to the required torque per Table-3.
10. Slide thrust washer (12), packing spacer (13A), packing
(13), and gland ring (14) over the double D end of the
stem and into packing box bore.
NOTE:
Always use new packing whenever rebuilding
the packing box.
CAUTION:
Since the sealing on V-ring packing takes
place at the feather edge, it is imperative to avoid
damage to that edge.
11. Reinstall the gland retainer (15) and packing nuts (18)
and leave loose.
CAUTION:
Do not over tighten packing. This can cause
excessive packing wear and stem friction, which may
impede stem rotation.
12. Place the valve on a flat surface with the threaded
(retainer) port facing up and pull the stem (8) toward
the actuator until it is fully against the thrust washer (12).
13. Make certain the segment surface facing up and
position the segment as close as possible in the center
of the body‘s inside diameter. (The pinned connection
between the segment and stem is not a tight connection.
The design includes a considerable amount of axial play
between the segment and stem.)
14. Lubricate the seat O-ring (4) and install into the seat (2).
15. Lubricate the seat retainer O-ring (4A) and install into the
Seat Retainer (2A).
16. Lubricate the mating surfaces between the seat (2) and
seat retainer (2A).
17. Place Wave springs (3) & shim (3A) set in the seat
retainer.
18. Place the seat (2) into seat retainer (2A), so the seat is
resting on the shims and wave springs.
19. For metal seat, lubricate the contact surfaces between
the seat and segment.
20. Replace the O-rings (4B) in the seat retainer (2A) (except
on high temperature valves, which do not use O-rings).
Refer to Figure 13. Lubricate the seat retainer threads
and O-rings and reinstall the retainer in the body. Torque
the seat retainer according to
Table 2
.
21. After the seat retainer is tightened, tighten the packing
nuts (18) just over finger-tight. Packing nuts (18) should
be tightened as necessary to prevent stem leakage.
CAUTION:
Do not over tighten packing. This can cause
excessive packing wear and high stem friction, which
may retard stem rotation.
11.4 Remounting the Actuator
1. Before mounting an actuator on the valve body, verify
that the Segment rotation matches the actuator rotation
and complies with the air/signal failure requirements.
Procedure for mounting the actuator is as follows.
2. Bolt the Bracket on to the body, if it is removed.
3. Slide the entire actuator assembly onto the stem by
ensuring the desired actuator orientation. (Please refer
to the actuator IOM for necessary adjustments on the
assembling with valve).
4. Tighten the actuator mounting bolts.
5. Install valve in pipe line as outlined in Section 4.
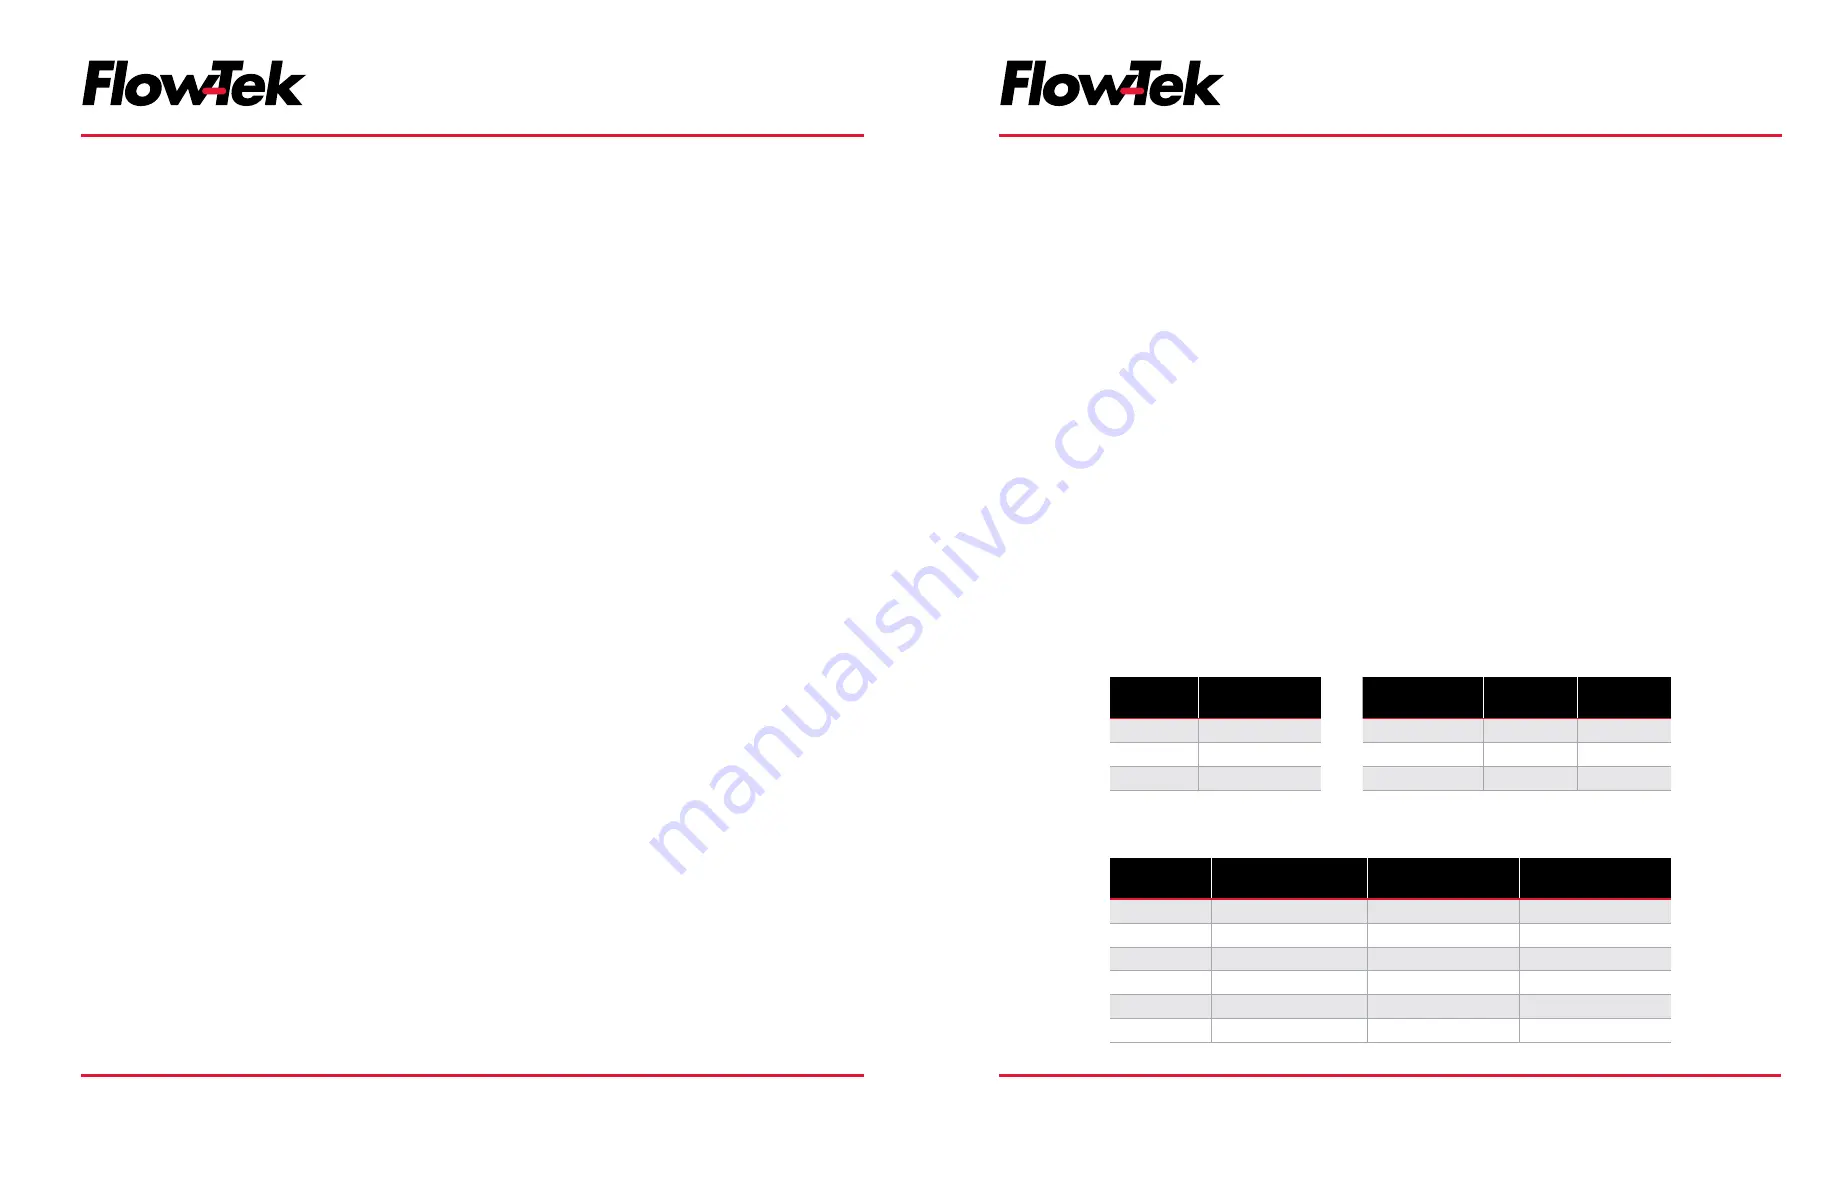
Table 2:
Retainer Torques
Valve Size
(inches)
Torque Value
(N-m)
1, 1.5, 2
200-240
3
340-410
4, 6
750-820
Table 4:
Assembly Tools (Optional upon request)
Valve Size
Retainer Tool Part No.
Stem Bearing Press
Tool Part No.
Post Bearing Press
Tool Part No.
1” (DN 25)
9N-0000-00466
9N-0000-00471
9N-0000-00476
1.5” (DN 40) 9N-0000-00467
9N-0000-00472
9N-0000-00477
2” (DN 50)
9N-0000-00468
9N-0000-00473
9N-0000-00478
3” (DN 80)
9N-0000-00445
9N-0000-00448
9N-0000-00449
4” (DN 100)
9N-0000-00469
9N-0000-00474
9N-0000-00479
6” (DN 150)
9N-0000-00470
9N-0000-00475
9N-0000-00480
Table 3:
Lubricated Screw Tightening Torques
Stud Size
A193-B7
& B7M
A193-B8
1/4”-20 UNC
5 Nm
2 Nm
5/16”-18 UNC
10 Nm
4.5 Nm
3/8”-16 UNC
18 Nm
8 Nm


