


Fig.5
H
G
I
Fig. 4
Fig.6
I
G
E
E
D
F
<IT>
<EN>
<DE>
<FR>
<ES>
<PT>
<RUS
>
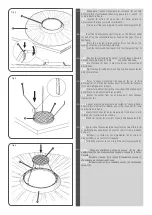
Fig.4
Appoggiare l’anello trasparente di sostegno (E) sul telo
diffusore (D) e, sfruttandone i dentini, agganciare gli anelli (F)
come indicato in figura.
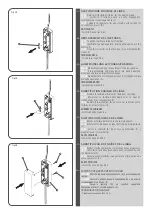
Fig.5
Inserire le astine (G) nelle sedi (H) della ghiera (I),
assicurandosi del loro completo inserimento.
Fig.6
Inserire le astine (G) e la ghiera (I) nell’anello trasparente (E).
Fig.4
Rest the transparent support ring (E) on the diffusor sheet
(D) and, using the appropriate hooks, hook on the rings (F) as in
the figure.
Fig.5
Insert the rods (G) in the housings (H) of the ring nut (I),
making sure they are inserted completely.
Fig.6
Insert the rods (G) and the ring nut (I) in the transparent ring (E).
Abb.4
Den transparenten Ring (E) auf das Tuch (D) legen, und wie in
der Abbildung die Ringe (F) in die
Zähnchen einhaken.
Abb.5
Die Stäbchen (G) ganz in die Sitze (H) am Schraubring (I)
einschieben.
Abb.6
Die Stäbchen (G) und den Schraubring (I) in den transparenten
Ring (E) einsetzen.
Fig.4
Poser l’anneau transparent de support (E) sur la toile
diffuseur (D) et, à l’aide des petites dents, accrocher les anneaux
(F) comme indiqué dans la figure.
Fig.5
Insérer les petites tiges (G) dans les sièges (H) de la bague (I),
en veillant à ce qu’elles soient bien en place.
Fig.6
Insérer les petites tiges (G) et la bague (I) dans l’anneau
transparent (E).
Fig.4
Apoyar el anillo transparente de sostén (E) sobre la banda
difusora (D) y, mediante los dientes, enganchar los anillos (F) como
se muestra en la figura.
Fig.5
Montar las varillas (G) en los alojamientos (H) de la virola (I),
cuidando de insertarlas bien a fondo.
Fig.6
Montar las varillas (G) y la virola (I) en el anillo transparente (E).
Fig.4
Apoiar o anel transparente de suporte (E) na tela difusora (D)
e, desfrutando dos dentinhos, engatar os anéis (F) como indicado
na figura.
Fig.5
Introduzir as hastes (G) nos alojamentos (H) da virola (I),
assegurando-se da sua total introdução.
Fig.6
Introduzir as hastes (G) e a virola (I) no anel transparente (E).
Рис.4
Положить прозрачное опорное кольцо (E) на ткань
диффузора (D) и при помощи зубцов зацепить кольца (F) согласно
рисунка.
Рис.5
Вставить стержни (G) в гнезда (H) зажимного кольца (I),
убедившись в их полном сцеплении.
Рис.6
Вставить стержни (G) и зажимное кольцо (I) в прозрачное
кольцо (E).
Содержание ROSY ANGELIS
Страница 7: ......
Страница 8: ...www flos com Cod 08083 04 06 2013...