background image

3

FKGW 56 A1

DE

AT

CH

Lieferumfang

 Handgriff 

2

  Haube mit Thermometer

3

 Lüftungsscheibe

4

 Obere Gelenkstücke 

5

 Untere Gelenkstücke

6

 Warmhalterost

7

 Kohleschüssel

8

 Verbindungsstück Ascheauff angbehälter

9

 Rechter Seitentisch

10

  2 x Seitentischestrebe

11

 Ascheauff angbehälter

12

 Hitzeschutzblech

13

 Handgriff 

14

 Hakenleiste

15

  2 x Standfußstrebe

16

 Bodenblech

17

 Achse

18

  2 x Rad

19

  2 x Radstrebe

20

  2 x Verbindungsstrebe (kurz)

21

 Querstrebe

22

 Linker Seitentisch

23

 Lochplatte

24

 Kohlerost

25

 Kohleteiler

26

  2 x Handgriff 

27

 Grillrost

Verbindungselemente

 A

 B

 C

 D

 E

 F

 G

 H

 I

 J

 K

 L

M6x45

22x

M6x16

14x

M5x10

2x

Ø6x18

20x

Ø6x12

2x

Ø6x18

10x

M5

2x

M6

20x

M10

2x

M6

2x

Ø6x30

2x

Ø5

2x

 HINWEIS


Prüfen Sie die Lieferung auf Vollständigkeit und auf sichtbare Schäden.


Bei einer unvollständigen Lieferung oder Schäden infolge mangelhafter Verpackung oder durch Transport 
wenden Sie sich an die Service-Hotline (siehe Kapitel 

Service

).

IB_85798_FKGW56A1_LB1.indb   3

02.01.13   09:57

Содержание FKGW 56 A1

Страница 1: ...KUGELGRILLWAGEN FKGW 56 A1 KUGELGRILLWAGEN Bedienungsanleitung IAN 85798 ROUND BARBECUE Operating instructions...

Страница 2: ...Page 13 Klappen Sie vor dem Lesen die Seite mit den Abbildungen aus und machen Sie sich anschlie end mit allen Funktionen des Ger tes vertraut Before reading unfold the page containing the illustrati...

Страница 3: ......

Страница 4: ...em e Verwendung 2 Sicherheit 2 Grundlegende Sicherheitshinweise 2 Lieferumfang 3 Verbindungselemente 3 Montage 4 Montage vorbereiten 4 Ben tigtes Montagematerial 4 Inbetriebnahme 10 Direktes Grillen 1...

Страница 5: ...che jeglicher Art wegen Sch den aus nicht bestimmungsgem er Verwendung unsachgem en Reparaturen unerlaubt vorgenommenen Ver nderungen oder Verwendung nicht zugelassener Ersatzteile sind ausgeschlossen...

Страница 6: ...17 Achse 18 2 x Rad 19 2 x Radstrebe 20 2 x Verbindungsstrebe kurz 21 Querstrebe 22 Linker Seitentisch 23 Lochplatte 24 Kohlerost 25 Kohleteiler 26 2 x Handgri 27 Grillrost Verbindungselemente A B C D...

Страница 7: ...n zu Ihrer Sicherheit immer nach au en zeigen um Verletzungen zu vermeiden Ziehen Sie erst nach Beendigung der Montage alle Schraubverbindungen fest an sonst kommt es zu unerw nschten Materialspannung...

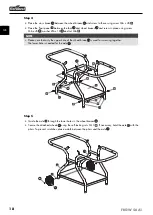
Страница 8: ...ittels hitzebest ndiger Unterleg scheibe 6 x 18 F Unterlegscheibe 6 x 18 D und Schraube M6 x 16 B an die Kohlesch ssel 7 Schritt 3 Stecken Sie die zwei Standfu streben 15 in eine der Seitentischstrebe...

Страница 9: ...8 D und Mutter M6 H fest HINWEIS Beachten Sie dass das obere Loch der Radstrebe 19 zum Verschrauben benutzt wird Das untere Loch wird f r die Achse 17 ben tigt Schritt 5 F hren Sie die Achse 17 durch...

Страница 10: ...Seiten tischstrebe 10 mittels Schraube M6 x 45 A und Mutter M6 H fest Schritt 7 Legen Sie die Kohlesch ssel 7 mittig auf die vier Haltepunkte des Rahmengestells und verschrauben Sie sie mittels Schra...

Страница 11: ...A1 DE AT CH Schritt 8 Setzen Sie die Haube 2 auf die Kohlesch ssel 7 und befestigen Sie sie mittels Bolzen 6 x 30 und Sicherungssplint K Ziehen Sie zum Abschluss der Montage alle Schraubverbindungen f...

Страница 12: ...edarf setzen Sie die Kohleteiler 25 auf den Kohlerost 24 Haken Sie die beiden Handgri e 26 am Grillrost 27 ein und setzen Sie es in die Kohlesch ssel 7 ein Sie k nnen nun die Handgri e 26 wieder vom G...

Страница 13: ...le Glutzustand ist nun erreicht Verteilen Sie die Holzkohle mit einem geeigneten Metallwerkzeug gleichm ig in der Kohlesch ssel 7 Setzen Sie den Grillrost 27 ein und beginnen Sie mit dem Grillen Direk...

Страница 14: ...zum anderen kann der Bratensaft f r eine So e verwendet werden Geben Sie etwas Wasser in die Tropf schale um ein Anbrennen zu verhindern Bef llen Sie die Zonen 1 und 3 mit Kohle und entz nden Sie sie...

Страница 15: ...ieleistung gilt nur f r Material oder Fabrikationsfehler nicht aber f r Transportsch den Verschlei teile oder f r Besch digungen an zerbrechlichen Teilen z B Schalter Das Produkt ist lediglich f r den...

Страница 16: ...nded use 14 Safety 14 Basic safety instructions 14 Scope of delivery 15 Connection elements 15 Assembly 16 Preparing for assembly 16 Required assembly material 16 Using the device 22 Direct grilling 2...

Страница 17: ...proper usage the application of force or unauthorised modi cations Claims of any kind for damage resulting from unintended use incompetent repairs unauthorised modi cation or the use of unauthorised s...

Страница 18: ...19 2 x Wheel braces 20 2 x Connecting braces short 21 Cross brace 22 Left side table 23 Perforated plate 24 Charcoal grid 25 Charcoal divider 26 2 x Handles 27 Cooking grill Connection elements A B C...

Страница 19: ...ded spanners WAF 8 mm WAF 10 mm WAF 17 mm WARNING To avoid possible injury the screw heads should always face outwards First tighten all screw connec tions down when the assembly is complete this will...

Страница 20: ...o the rebowl 7 with a heat resistant washer 6 x 18 F washer 6 x 18 D and screw M6 x 16 B Step 3 Insert the two foot braces 15 into one of the side table braces 10 and screw in place using screw M6 x 4...

Страница 21: ...ut M6 H NOTE Please note that only the upper hole of the wheel brace 19 is used for screwing together The lower hole is needed for the axle 17 Step 5 Guide the axle 17 through the lower holes in the w...

Страница 22: ...front of the side table brace 10 using screw M6 x 45 A and nut M6 H Step 7 Place the rebowl 7 onto the four holding points of the rack in a central position and screw in place using screw M6 x 16 B w...

Страница 23: ...20 FKGW 56 A1 GB Step 8 Place the hood 2 onto the rebowl 7 and secure it using bolts 6 x 30 and cotter pin K To nish the assembly tighten all screw connections rmly 2 7 K...

Страница 24: ...wl 7 If needed place the charcoal divider 25 on the charcoal grill 24 Hook both handles 26 onto the cooking grill 27 and place it into the rebowl 7 You can now remove the handles 26 from the cooking g...

Страница 25: ...been reached Use a suitable metal tool to distribute the charcoal evenly in the rebowl 7 Insert the cooking grill 27 and start grilling Direct grilling Direct grilling is similar to frying The food is...

Страница 26: ...eaning of the grill on the other the meat juices can be used for a sauce gravy Put some water into the drip tray so the juices do not burn Fill zones 1 and 3 with charcoal and ignite it For slow and g...

Страница 27: ...ranty claim please contact Customer Service by telephone This is the only way to guarantee free dispatch of your goods NOTE This warranty is valid only for material or manufacturing faults not for tra...

Страница 28: ...1 IAN 85798 KOMPERNASS GMBH BURGSTRASSE 21 44867 BOCHUM GERMANY www kompernass com Stand der Informationen Last Information Update 12 2012 Ident No FKGW56A1102012 2...

Отзывы: