WST 1000 FV
20
Instructions for use
Before switching on the power tool
Unpack power tool and accessories
and check that no parts are missing
or damaged.
Attaching/changing the
sanding head
`^rqflk>
_ÉÑçêÉ=éÉêÑçêãáåÖ=~åó=ïçêâ=çå=íÜÉ=ÉäÉÅíêáÅ=
éçïÉê=íççäI=éìää=çìí=íÜÉ=ã~áåë=éäìÖK
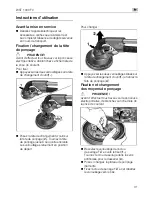
To attach:
Press the two locks on the tool change
head (
1.
).
Put the tool change head on the sanding
head (
2.
). Rotate sanding head until it
engages. The locks move back to their
original position.
To change:
Press the two locks on the tool change
head (
1.
) and remove sanding head (
2.
).
Attaching and changing
the sanding tools
`^rqflk>
_ÉÑçêÉ=éÉêÑçêãáåÖ=~åó=ïçêâ=çå=íÜÉ=ÉäÉÅíêáÅ=
éçïÉê=íççäI=éìää=çìí=íÜÉ=ã~áåë=éäìÖK
Lift up the lock on the FixTec clamping
nut (
1.
). Loosen clamping nut by turning
it anti-clockwise (
2.
).
Attach/change diamond sanding pad.
Tighten FixTec clamping nut and fold
down lock.
Содержание WST 1000 FV
Страница 1: ...WST 1000 FV ...
Страница 227: ......
Страница 228: ...352 284 06 2015 Für Druckfehler keine Gewähr Technische Änderungen vorbehalten ...


