background image

- 6 -

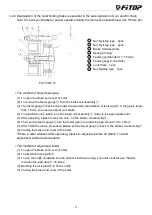
3.2.2 Examination of the hoist holding brake is essential to the safe operation of your electric chain

hoist.To check your brake for proper operation follow the instructions listed below (ref. Picture 22).

1

Nut, Nyistop type

4pcs

2

Nut, Nyistop type

4pcs

3

Brake Coil Assembly

4

Spring Closing

5

Feeler gap(Standard: 1~1.5mm)

6

Feeler gauge(1mm thick)

7

Lock Plate

1pcs

8

Nut Nyistop type

1pcs

• The method of adjust feeler gap:

(1) To open the brake end cover of hoist.

(2) To remove the feeler gauge

from the brake coil assembly

.

(3) The feeler gauge

has been provided to measure the distance of feeler gap

. If the gap is larger

than 1.5mm, you need to adjust your brake.

(4) To adjust the nut

which is on the brake coil assembly

down to the appropriate seat .

(5) After adjusting, please to lock the nut

on the brake coil assembly

.

(6) Then put the feeler gauge

into the feeler gap

to adjust the gap around 1mm-1.5mm.

(7) After finish the above procedure, please put the feeler gauge

back to the brake coil assembly

.

(8) Closing the brake end cover of the hoist.

If there is slide situation after operating, please to adjust as picture 22 (Mark: To avoid
adjustment without authorization)

• The method of adjust load limiter:

(1) To open the brake end cover of hoist.

(2) To stretch the lock plate

.

(3) To turn the nut

clockwise into the anchor stud then turning it counter clockwise so that will

increase the load about 1.25 times.

(4) Bending the lock plate

to fix the nut

.

(5) Closing the brake end cover of the hoist.

PICTURE 22

Содержание CTS Series

Страница 1: ......

Страница 2: ... trolley This manual has been provided to assist you in the proper installation and operate of your new host or trolley and will provide you with important safety and operation tips The safe operation of your new hoist is your most important concern Proper operation of your hoist will increase its longevity and minimize your maintenance requirements Please study this manual thoroughly before insta...

Страница 3: ... not please oil it 1 2 3 See Picture 1 for proper chain bag installation 1 3 1 3 1 3 1 3 Electrical Electrical Electrical Electrical Hookup Hookup Hookup Hookup 1 3 1 The plug in power input cable is a four wire R S T E SO type cable equipped with a four conductor plug for your convenience Connect the wires marked R S and T the incoming power source If one of the three phases of the power source i...

Страница 4: ...proper manner Improper or negligent use of this equipment could result in bodily injury or death to the operator or surrounding personnel ref Picture 4 2 2 4 Do not remove the safety latch from the top or bottom hooks The safety latch is designed to secure the hook to the lifted load It can prevent the load from slipping off the hook ref Picture 5 Furthermore local and national safety laws require...

Страница 5: ...3 Do not pull the hoist by the push button cable ref Picture 11 instead push the lifted load 2 2 14 Do not run the hoist into the end stops this could result in damage to the hoist and possible loss of the load ref Picture 12 2 2 15 While operating the push button please push the buttons firmly excessive jogging tapping of the push button causes high inrush currents and can result in motor overhea...

Страница 6: ...fe life life life of of of of the the the the hoist hoist hoist hoist please please please please perform perform perform perform the the the the following following following following safety safety safety safety checks checks checks checks listed listed listed listed below below below below 2 3 1 Check if the push button operates properly Up is Up Down is down etc ref Picture 17 2 3 2 Check for ...

Страница 7: ...ad chain twisted or damaged 3 1 6 Is the load chain clean free of corrosion and well lubricated 3 2 3 2 3 2 3 2 Monthly Monthly Monthly Monthly examination examination examination examination 3 2 1 Examination of load chain Your FITOP electric chain hoist has been furnished with special calibrated grade 80 load chains that are available through FITOP authorized dealers only The load chain must be ...

Страница 8: ...adjust your brake 4 To adjust the nut which is on the brake coil assembly down to the appropriate seat 5 After adjusting please to lock the nut on the brake coil assembly 6 Then put the feeler gauge into the feeler gap to adjust the gap around 1mm 1 5mm 7 After finish the above procedure please put the feeler gauge back to the brake coil assembly 8 Closing the brake end cover of the hoist If there...

Страница 9: ...aced If the shape of the width of edge changes L please change the hook immediately for safety reason 3 2 6 Examination of the chain container Does the hoist hook or load chain catch on the container Is the bag ripped or the frame bent or damaged Any other object in the container except the chain 3 2 7 Examination of the power cord and other electrical cables Are any of the electrical cables pulle...

Страница 10: ... will cause the motor to overheat 4 Damaged motor 4 Check the motor windings are they grounded Hoist operates in Only one direction 1 Hoist Up motion only The 1 Check the motor brake is it releasing Measure motor O L has tripped opened the motor current draw is it correct Note due to excessive overheating Overloading or excessive jogging will cause high current draw which in tum will overheat the ...

Страница 11: ... 9 ...

Страница 12: ... 10 ...

Страница 13: ... 11 ...

Отзывы: