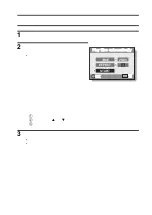
background image

87

English

POST-VIEW SETTING

Specify the duration that the captured image appears on the monitor (post-
view) after the shutter button is pressed.
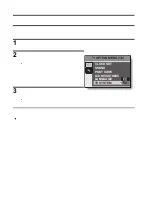
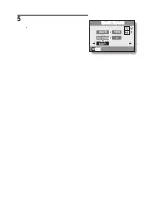
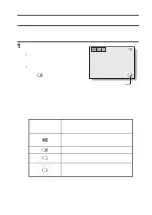
Display the Option Menu (page 82).

Select “POST VIEW” and press the 
SET button.

h

The Post View Menu appears.
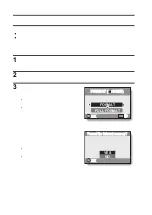
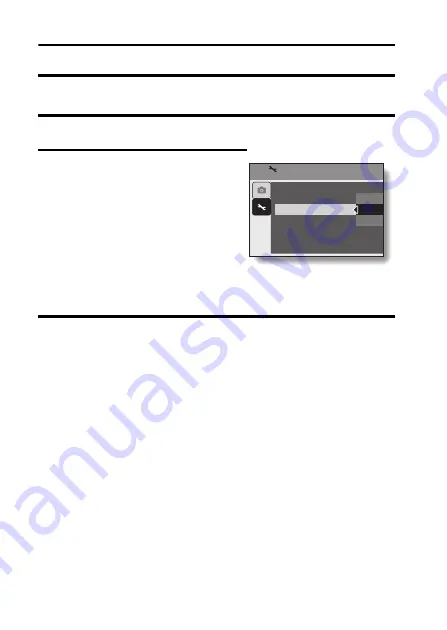
1SEC:

The post-view image is displayed 
for 1 second.

2SEC:

The post-view image is displayed 
for 2 seconds.

OFF:

The post-view image is not 
displayed.

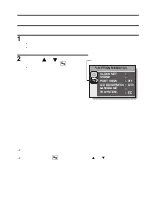
Select the desired setting, and press the SET button.

h

This completes the post-view setting.
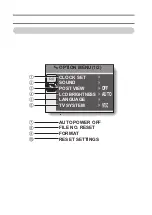
CLOCK SET
SOUND

POST VIEW

LCD BRIGHTNESS
LANGUAGE
TV SYSTEM

OPTION MENU (1/2)

1SEC
2SEC

OFF

Содержание VPC-S60

Страница 1: ...using the camera Make sure to read and understand the separate booklet SAFETY MANUAL Keep this manual in a safe place for later reference Important note This manual explains how to safely operate the...

Страница 2: ...tion If this equipment does cause harmful interference to radio or television reception which can be determined by turning the equipment off and on the user is encouraged to try to correct the interfe...

Страница 3: ...separately from your household waste Please dispose of this equipment at your local community waste collection recycling centre In the European Union there are separate collection systems for used ele...

Страница 4: ...ll the battery 1 Open the battery card cover and insert the batteries h The battery card cover is located on the bottom of the camera 2 Press the ON OFF button to turn the camera on h The Shooting Scr...

Страница 5: ...e upper left area of the monitor indicates the active shooting mode setting c Single shot mode P Sequential shots mode X Video clip recording mode 3 Press the shutter button h The image is captured kV...

Страница 6: ...to the Playback Screen h Press the l or m button to display the video clip you wish to play back h Video clips are indicated by a video clip pattern along the top and bottom of the screen 2 Press the...

Страница 7: ...o clip on page 40 Shooting single shots on page 31 SHOOTING SEQUENTIAL SHOTS on page 39 Log the date and time of your photos DATE AND TIME SETTING on page 19 Zoom in on the subject USING THE ZOOM on p...

Страница 8: ...ight view mode on page 44 FLASH SETTING red eye reduction on page 48 Photographing landscapes USING THE SCENE FUNCTION landscape mode on page 44 Take a self photo SELF TIMER on page 50 Make images lig...

Страница 9: ...just the monitor brightness Adjust the monitor brightness on page 29 Data managing processing Search for image data 9 image display playback on page 34 Delete files Erasing files on page 37 Protect im...

Страница 10: ...ATION 1 CONTENTS 4 CHECKING THE INCLUDED ACCESSORIES 7 GETTING THE MOST OUT OF YOUR CAMERA 9 SYSTEM MAP 11 SETUP PARTS NAMES 12 INSTALLING THE BATTERIES AND CARD 14 TURNING THE CAMERA ON AND OFF 17 DA...

Страница 11: ...IMAGE PROPERTIES INFORMATION SCREEN 81 OPTION DISPLAYING THE OPTION MENU 82 SOUNDS 85 POST VIEW SETTING 87 SCREEN LANGUAGE 88 TV SYSTEM SETTING 89 AUTO POWER OFF FUNCTION 90 FILE No RESET FUNCTION 92...

Страница 12: ...English 6 OTHER DEVICES AND CONNECTIONS CONNECTING TO A TV 102 DIRECT PRINTING 103 APPENDICES COMMONLY ASKED QUESTIONS 111 TROUBLESHOOTING 117 SPECIFICATIONS 123 HINTS FOR TAKING PICTURES 130...

Страница 13: ...OM 1 i AA alkaline batteries 2 batteries made exclusively to be used as included accessories i Dedicated AV interface cable 1 i Dedicated USB interface cable 1 i SAFETY MANUAL safety precautions bookl...

Страница 14: ...mory Card i Multi Media Card What card means in this manual i In this manual SD Memory Cards and Multi Media Cards that can be used in this digital camera are referred to as card i The cards in the il...

Страница 15: ...ra including a super quick focus an easy to understand guidance display on a large screen a more extensive scene function and more You ll never miss a photo opportunity thanks to the quick focus Touch...

Страница 16: ...of preset settings aperture shutter speed etc for specific shooting conditions k Speedy mode switching Switch the shooting mode from still images to video clips to sequential shots with a single butto...

Страница 17: ...s hard disk You can connect it to a printer for direct printing of your photos Or take the card to a photo shop to have your photos printed there Dedicated USBinterface cable Dedicated AV interface ca...

Страница 18: ...12 SETUP PARTS NAMES Front Lens Flash PC AV terminal cover ON OFF button Shutter button Self timer indicator Mirror Check the camera angle when taking a picture of yourself Touch sensor indicator Mic...

Страница 19: ...Monitor SET button Speaker Tripod stand hole Playback button Battery card cover n button o button l button m button Strap holder Illumination sensor Detects the ambient brightness and automatically a...

Страница 20: ...d By using a card however you will be able to take many more photos The card can be used after it has been formatted with the camera page 95 1 Open the battery card cover h While gently pressing the b...

Страница 21: ...oving the card h To remove the card press it down and then release The card will protrude slightly and you can then pull it out Keep your finger on the card until it is completely inserted or released...

Страница 22: ...warning HINT Shooting without a card installed i When a card is installed images are recorded to and played back from the card When no card is installed images are recorded to and played back from th...

Страница 23: ...was last turned off In the playback mode 1 Press the playback button for at least one second h The Playback Screen appears on the monitor pages 33 and 41 Turning off the camera 1 Press the ON OFF but...

Страница 24: ...OFF button to turn it back on i You can change the setting for the time elapsed before the camera automatically turns off page 90 i When the camera is connected to a computer or printer using the dedi...

Страница 25: ...ect the 3 tab h The Option Menu appears 3 Press the m button to select CLOCK SET and press the SET button or the m button h The Clock Set Screen appears h The current date and time settings are shown...

Страница 26: ...r the m button to select the time indication 4 Press the n or o button to change the time setting 5 Press the m button to select the Y M D indication 6 Press the n or o button to change the displayed...

Страница 27: ...internal battery will maintain the date and time settings However there is a small chance the settings may be lost The backup will last for about 7 days It is recommended to check that the date and t...

Страница 28: ...sure that the lens and flash are not blocked by your fingers or the handstrap HINT i Images captured in the still image shooting mode can be rotated when they are played back page 70 i When the optic...

Страница 29: ...in focus just gently press the shutter button to take the picture for a perfectly focused image At the same time the touch sensor is temporarily deactivated whenever the Recording Menu page 54 is disp...

Страница 30: ...ct focus The following examples are some of the situations where the autofocus function may not work i Subjects with low contrast very bright subjects at the center of the image or dark subjects or lo...

Страница 31: ...and far objects are present Use the focus lock function to lock the focus on an object at the same distance as the desired subject then reposition the camera to compose the picture i Fast moving subj...

Страница 32: ...ra on 2 Press the playback button h Each time the playback button is pressed the camera switches between the shooting mode and the playback mode HINT To turn the camera on in the playback mode i Press...

Страница 33: ...ress the ON OFF button to turn the camera on 2 Press the m button h The screen to set the shooting mode and the self timer appears 3 Press the m button to select the shooting mode 4 Press the SET butt...

Страница 34: ...ou shoot or the normal display mode in which the setting indications are turned off providing a full view of the subject 1 Press the ON OFF button to turn the camera on 2 Press the SET button h Each t...

Страница 35: ...MENU button for at least 1 second h The Monitor Brightness Screen appears 3 Press the n and o buttons to adjust the brightness h When set to AUTO the illumination sensor page 13 detects the ambient b...

Страница 36: ...a the data is recorded on the card If no card is installed the data is recorded in the camera s internal memory Taking pictures in backlight conditions i When taking pictures with the light coming fro...

Страница 37: ...utton is pressed In the sequential shots mode when you press the shutter button several successive images are captured For more information about taking sequential shots please see page 39 Shooting si...

Страница 38: ...er of the screen About the focus indicator i A green focus indicator appears when the subject is successfully focused or a red focus indicator when the camera was not able to focus the subject The shu...

Страница 39: ...6 View other images h Press the l or m button to display the previous or next image To display the previous image Press l To display the next image Press m h To return to Shooting Screen press the pla...

Страница 40: ...back h Press the arrow buttons to move the orange frame to the desired image and press the SET button Instead of pressing the SET button you can press T on the zoom switch to show the image full scre...

Страница 41: ...w buttons to view different parts of the magnified image To magnify Magnification increases with each press of T on the zoom switch To return to normal size Magnification decreases with each press of...

Страница 42: ......

Страница 43: ...Set the camera to the playback mode and press the n button h The Delete Screen appears DELETE ALL Erases all the data DELETE SINGLE Erases one file at a time EXIT Returns to the Playback Menu 3 Delet...

Страница 44: ...TE SINGLE 3 Press the SET button h The currently displayed file is deleted h To delete other files repeat steps 1 to 3 CAUTION About protected images i Files that are protected from accidental erase c...

Страница 45: ...timated maximum number of sequential shots The maximum number of sequential shots will differ depending on the subject h Note that if the shutter button is released during shooting shooting stops imme...

Страница 46: ...tter button h Video clip recording begins During recording the recording time is shown on the monitor h It is not necessary to continue pressing the shutter button while shooting 3 End the recording h...

Страница 47: ...playback button for at least 1 second h The video clip just recorded appears on the monitor h Video clips are indicated by a video clip pattern along the top and bottom of the screen 5 Press the SET...

Страница 48: ...uring reverse playback While playback is paused press the l button Slow playback During forward playback While playback is paused press and hold the m button During reverse playback While playback is...

Страница 49: ...r may not be able to play back the video fast enough making it appear jerky The video will always be displayed properly on the monitor If video clip recording stops even when there is card memory rema...

Страница 50: ......

Страница 51: ...pturing fireworks at night m n m _ Lamp Photograph in low light conditions m n m a Still image with sound Shoot a still image and add a voice memo m n n 7 Cosmetic Skin tones are enhanced in close up...

Страница 52: ...memo 1 On the screen to select the scene function settings page 44 select a and press the SET button 2 Press the shutter button to take the picture then speak into the microphone h During recording be...

Страница 53: ...ssed the zoom bar appears on the monitor h When the optical zoom factor is at maximum zooming stops temporarily When T on the zoom switch is pressed again the mode changes to the digital zoom mode and...

Страница 54: ...indication The camera will detect the subject brightness and use the flash only when required In a backlight situation if only the center of the image is very dark the flash will operate to compensate...

Страница 55: ...ress the SET button 3 Press the shutter button h The picture is snapped and the flash operates according to the selected mode HINT In the automatic flash mode i In the automatic flash mode when the su...

Страница 56: ...ooting mode page 26 and press the m button 2 Use the n and o buttons to select the self timer setting 3 Press the SET button h This completes the self timer setting y The image is captured about 2 sec...

Страница 57: ...to restart the self timer i To cancel self timer photography set the self timer setting to off c i After the self timer picture is snapped the self timer is automatically reset to off When x is select...

Страница 58: ...o the Shooting Screen HINT i When the focus range is set to macro the zoom is set to the wide end The camera automatically focuses on the subject within a range of 10 cm 3 94 in Wide end or 40 cm 15 7...

Страница 59: ...stance between the lens surface and the subject i In some cases there may be a slight variance between the distance numerical figure you set in the manual focus mode and the actual distance Use the mo...

Страница 60: ...Menu 1 Set the camera to a shooting mode page 27 2 Press the MENU button h The Recording Menu corresponding to the shooting mode set in step 1 appears h The Recording Menu can be canceled by pressing...

Страница 61: ...55 English ACCESSING THE RECORDING MENU Overview of the Recording Menu RECORDING MENU TOUCH SENSOR RESOLUTION FOCUS METHOD ISO WHITE BALANCE EXPOSURE...

Страница 62: ...al shots shooting mode k Shoot at 3 680 2 760 pixels single shot shooting mode only D Shoot at 2 816 2 112 pixels z Shoot at 2 288 1 712 pixels t Shoot at 1 600 1 200 pixels Shoot at 640 480 pixels Vi...

Страница 63: ...hen gently press the shutter button to snap the picture 1 Display the Recording Menu page 54 2 Select TOUCH SENSOR and press the SET button h The sensor menu appears 3 Select the desired icon and pres...

Страница 64: ...the SET button h The resolution menu or video clip mode menu appears Single shot sequential shots shooting mode Video clip recording mode 3 Select the desired icon and press the SET button h The selec...

Страница 65: ...mode page 54 2 Select the audio recording icon from the video clip mode menu and press the SET button 3 Press the MENU button h The recording mode is enabled 4 Press the shutter button h Audio recordi...

Страница 66: ...the n button Fast forward During forward playback press the m button The speed changes each time the m button is pressed as follows Normal playback 2x 5x 10x 15x Press the l button to resume normal s...

Страница 67: ......

Страница 68: ...itivity you can set higher shutter speeds and capture images in darker locations but noise in the captured images may increase t Sets the ISO sensitivity automatically equivalent to ISO50 to 200 video...

Страница 69: ...ance adjustment automatically based on the natural and artificial light conditions This is the setting used in the auto mode r For shooting outside on a sunny day o For shooting outside on a cloudy da...

Страница 70: ...ng is programmed for the icon it is retained even if another white balance setting r o p or q is selected If you changed to another setting whenever you select the icon and press the SET button the pr...

Страница 71: ...to select EXPOSURE and press the SET button h The screen to adjust the exposure appears 3 Press the n or o button to select the exposure numerical value and press the SET button h The specified expos...

Страница 72: ...amera s playback settings 1 Press the playback button h The display changes to the Playback Screen 2 Press the MENU button h The Playback Menu appears h The Playback Menu is canceled when the MENU but...

Страница 73: ...rotect data from accidental erasure write protect 2 Rotate image page 70 h Rotate still images 3 Resize page 71 h Reduce the resolution of a still image 4 Copy file page 72 5 Print setting page 74 h S...

Страница 74: ...k Menu page 66 2 Select PROTECT and press the SET button h The screen to set the protect setting appears 3 Select YES and press the SET button h The protect mode is set for the data h The protect mark...

Страница 75: ...ode is set for certain data files they will be erased if the card is reformatted page 95 HINT To select a different image in steps 2 and 3 i Press the l or m button To cancel the protect mode for an i...

Страница 76: ...and press the SET button h The screen to rotate the image appears 3 Select YES and press the SET button h Each time the SET button is pressed the image is rotated another 90 degrees HINT i On the 9 im...

Страница 77: ...page 66 2 Select RESIZE and press the SET button h The screen to change the still image resolution appears 3 Select the new image size 4 Press the SET button h Resizing begins HINT Why can t the image...

Страница 78: ...2 Display the Playback Menu page 66 3 Select FILE COPY and press the SET button h The screen to copy files appears 4 Select the copy direction INT MEM H CARD Copy image data from the internal memory...

Страница 79: ...all the data from the copy source to the copy destination 6 Select the desired type of copy When selecting COPY SINGLE 1 Press the l or m button to display the image you wish to copy 2 Press the n or...

Страница 80: ...isplayed on the print and also to specify an index print Display the screen to set the print settings 1 Display the Playback Menu page 66 2 Select PRINT SETTING and press the SET button h The screen t...

Страница 81: ...print settings page 108 for the desired images and then have the reserved images printed automatically About the finished prints i Images that have been rotated will be printed in their original orie...

Страница 82: ...AGE The set print settings are applied only to the image currently displayed ALL IMAGES The set print settings are applied to all the still images on the card 3 Press the SET button h The Date Copies...

Страница 83: ...the n or o button to specify the number of prints h Press the n or o button until the desired number of prints is displayed 4 Press the SET button h You are returned to the Date Copies Print Screen S...

Страница 84: ...English 78 5 Select EXIT and press the SET button h You are returned to the display in step 2 DATE COPIES 1 EACH IMAGE EACH IMAGE EXIT YES OK OK...

Страница 85: ...Confirm All Clear Screen appears YES Clear the print settings for all images NO Cancel the clear procedure and return to the screen to set the print settings 4 Select YES and press the SET button h A...

Страница 86: ...ton to change the setting 3 Press the SET button 3 Select START and press the SET button h Slideshow playback starts h To stop slideshow playback press the SET button or MENU button TIME Adjust the tr...

Страница 87: ...ast 1 second h The Information Screen appears h If the MENU button is pressed again the Information Screen is canceled 1 Resolution setting 2 Resolution 3 Scene function setting 4 Image number 5 Prote...

Страница 88: ...see page 66 2 Press the n or o button to select the option tab 3 h The Option Menu appears To exit the Option Menu To return to the Shooting Screen or Playback Screen Press the MENU button To return...

Страница 89: ...3 English DISPLAYING THE OPTION MENU Overview of the Option Menu AUTO OFF AUTO POWER OFF FILE NO RESET FORMAT RESET SETTINGS CLOCK SET SOUND POST VIEW LCD BRIGHTNESS LANGUAGE TV SYSTEM OPTION MENU 1 2...

Страница 90: ...sages are displayed 6 TV system setting page 89 h Select the type of TV signal that is output from the camera s PC AV terminal 7 Auto power off page 90 h Specify the time elapsed before the auto power...

Страница 91: ...und that is produced when the camera is turned on or off SHUTTER Select the sound that is produced when the shutter button is pressed KEY SW Select the sound that is produced when a camera button SET...

Страница 92: ...respective screen to select the sound appears h Select from 5 different sounds A to E and OFF h After selecting a sound press the m button to preview it h If OFF is selected no sound is produced If OP...

Страница 93: ...ST VIEW and press the SET button h The Post View Menu appears 1SEC The post view image is displayed for 1 second 2SEC The post view image is displayed for 2 seconds OFF The post view image is not disp...

Страница 94: ...t LANGUAGE and press the SET button h The screen to select the display language appears DEUTSCH German ENGLISH English ESPA OL Spanish FRANCAIS French ITALIANO Italian NEDERLANDS Dutch Russian Japanes...

Страница 95: ...h The TV System Menu appears NTSC Outputs NTSC video signals PAL Outputs PAL video signals 3 Select the desired setting and press the SET button h The selected TV system is set HINT If no image appear...

Страница 96: ...atteries from dying if the camera has accidentally been left on You can specify the elapsed time standby time before the auto power off function operates to turn the camera off 1 Display the Option Me...

Страница 97: ...ct the desired option and press the SET button h The Standby Time Menu appears 4 Press the n or o button to select the standby time 5 Press the SET button h The auto power off function is set h To ret...

Страница 98: ...nsequently it results in more than one card containing images with the same numbers By setting the file number reset function to OFF even if the card is reformatted or the card is replaced with anothe...

Страница 99: ...n Card A When the highest image number on Card B before replacing is higher than the highest image number on Card A the file name of the next recorded image continues from last file name recorded on C...

Страница 100: ...r reset function is OFF 3 Select OFF and press the SET button h The file number reset function was set to OFF HINT i Until the file number reset function is turned ON consecutive file names are assign...

Страница 101: ...amera s internal memory remove the card from the camera 2 Display the Option Menu page 82 3 Select FORMAT and press the SET button Card format h The screen to select the type of format appears h Follo...

Страница 102: ...ring data from a reformatted card i If a card is reformatted or the data is erased from the card using the camera or a computer the card s control data may be merely modified and the data itself may n...

Страница 103: ...appears YES Reset to the factory preset settings NO Do not change the settings and return to the Option Menu 3 Select YES and press the SET button h The camera settings are reset to the factory prese...

Страница 104: ...ime on page 128 1 Press the ON OFF button to turn the camera on To check the remaining number of still images Set the shooting mode to the single shot or sequential shots shooting mode page 27 To chec...

Страница 105: ...er install a new card or save the images to a computer and then erase them page 37 from the card i When the remaining number of images or the remaining video recording time is 0 it may be possible to...

Страница 106: ...ient temperature is low may appear early for an incorrect indication of the remaining charge Also depending on the conditions of use of the camera or the ambient conditions temperature etc the indicat...

Страница 107: ...etc or the ambient temperature temperatures below 10 C 50 F the number of images that can be saved on fully charged batteries will vary greatly i It is recommended that you prepare extra batteries wh...

Страница 108: ...used to play back voice memos and audio recordings as well Voice memo playback see page 33 Audio playback see page 60 CAUTION Insert and pull out the cable carefully i When connecting the cables make...

Страница 109: ...ges and initiate printing PictBridge printing Print preparations 1 Insert the card containing the images you wish to print in the camera 2 Turn the printer on use the supplied USB interface cable to c...

Страница 110: ...on operation response is slower i If the camera is powered by batteries for printing make sure that the remaining battery charge is sufficient Insert and pull out the cable carefully i When connecting...

Страница 111: ...e image and print it displayed image Procedure to select one still image and print it 1 Complete the printing setup page 103 2 Press the l or m button h Specify the image to print PRINT PRINT PRINT Pr...

Страница 112: ...3 Press the SET button 4 Select PRINT and press the SET button h Printing begins HINT To cancel printing 1 During printing press the o button h The Confirm Cancel Printing Screen appears 2 Select YES...

Страница 113: ...3 Select PRINT ALL IMAGES and press the SET button h The Print All Images Screen appears 4 Select PRINT and press the SET button h Printing begins CAUTION Printing is not possible if there are more th...

Страница 114: ...cheduled Images Screen appears 4 Select PRINT and press the SET button h Printing begins h Printing begins about 1 minute after the SET button is pressed HINT i In step 2 if you press the l or m butto...

Страница 115: ...v and press the SET button h The Printer Settings Menu appears DATE STAMP Print the date the photo was taken MEDIA TYPE Specify the type of paper used for printing PAPER SIZE Specify the size of paper...

Страница 116: ...can be made for each parameter will differ depending on the printer When PRINTER VALUE is selected h The images will be printed according to the settings specified on the printer side 4 Select EXIT an...

Страница 117: ...t temperature is very low Keep the batteries in an environment of 10 to 40 C 50 to 104 F The battery life has expired Replace with new batteries Why does the icon appear The remaining battery power is...

Страница 118: ...larger and for printing a close up of part of a photo trimming t For printing standard photo photo service sizes For photos displayed on a web page or sent as e mail attachments What is the differenc...

Страница 119: ...focus and set the distance to Monitor When used in cold weather why does the image seem to leave traces as it moves Condition due to the liquid crystals Not a malfunction Spots that appear in the mon...

Страница 120: ...he image Why doesn t the zoom jump playback work Zoom jump playback does not work for an image that was created from a magnified portion of a zoom jump image or for video clips Not a malfunction Why i...

Страница 121: ...the accurate playback of data that has been edited using a computer Printing Why does a message appear during PictBridge printing There is a problem with the printer Please refer to the instruction m...

Страница 122: ...about using the AC adaptor and power cord abroad please consult with a dealer near you for advice Why does the SYSTEM ERROR message appear A problem has occurred within the camera or card Check the fo...

Страница 123: ...Reinsert the batteries making sure to orient them correctly The battery card cover is not completely closed Close the battery card cover completely The camera turns off by itself The power save funct...

Страница 124: ...ching the shutter button and the focus lock is active Remove your finger from the shutter button and then use the operation buttons The flash does not operate The flash off mode is selected Set the fl...

Страница 125: ...62 Monitor No playback image appears The playback mode is not active Press the playbackbutton 26 Viewing images The image is too dark The flash was blocked by a finger or other object Hold the camera...

Страница 126: ...t the correct focus setting for your needs 31 52 The focus setting is not correct The camera moved when the shutter button was pressed Hold the camera correctly and press the shutter button correctly...

Страница 127: ...de is set Cancel the protect mode 68 Misc The PROTECTED message appears and the data cannot be erased You have attempted to erase data that is protected from accidental erasure Set the protect setting...

Страница 128: ...focus range to it changes to when the scene function is set to a Y The macro focus range setting is not available Z _ The resolution is fixed at The flash is disabled even when shooting single shots T...

Страница 129: ...rd for digital still camera image files to provide interoperability between digital photography devices for the images stored on removable memory cards However it is not guaranteed that all devices wi...

Страница 130: ...ly d 640 480 pixels 30 frames second video clip recording only 5 320 240 pixels 15 frames second video clip recording only White balance Full auto TTL manual setting possible Lens 3 0 optical zoom len...

Страница 131: ...function is set to fireworks etc During flash 1 30 to 1 1 500 sec Sequential shots shooting mode 1 2 to 1 1 500 sec Video clip recording mode 1 30 to 1 10 000 sec Sensitivity Single shot mode sequenti...

Страница 132: ...ating no condensation 10 to 90 storage no condensation Power supply Batteries AA size alkaline batteries 2 The following batteries can also be used AA size Ni Cd batteries SANYO N 3UV 2 AA size nickel...

Страница 133: ...teries and the conditions of use Especially when used at temperatures below 10 C 50 F the battery operation time is drastically reduced PC AV communication sound and image output terminal Dedicated re...

Страница 134: ...e continuous shooting time will differ depending for example on the card type capacity performance etc 1 Available only for single shot still image shooting Shooting mode setting Resolution setting In...

Страница 135: ...manual i Sanyo Electric shall not be held responsible for any problems resulting from the use of this camera i Sanyo Electric declines all responsibility for damages due to improper use of the camera...

Страница 136: ...way to snap the picture This two step method is the way to ensure that your photos are perfectly focused k Reasons for unfocused images 1 The shutter button was pressed before the image was focused 2...

Страница 137: ...use the manual focus page 52 In addition to the autofocus a manual focus mode is also incorporated in your camera In the autofocus mode the distance between the camera and the subject is automaticall...

Страница 138: ...dark You can get a better picture by using the flash for example or changing the exposure setting Photographing moving subjects sports mode Y Points i Match the camera s movement with that of the sub...

Страница 139: ...l be blurry Use a tripod whenever possible or if a tripod is not available you can lean against a wall or pillar to help stabilize the camera i You can photograph your subject with the night scene in...

Страница 140: ...SANYO Electric Co Ltd...

Отзывы: