background image

6

Assembly
Montaje

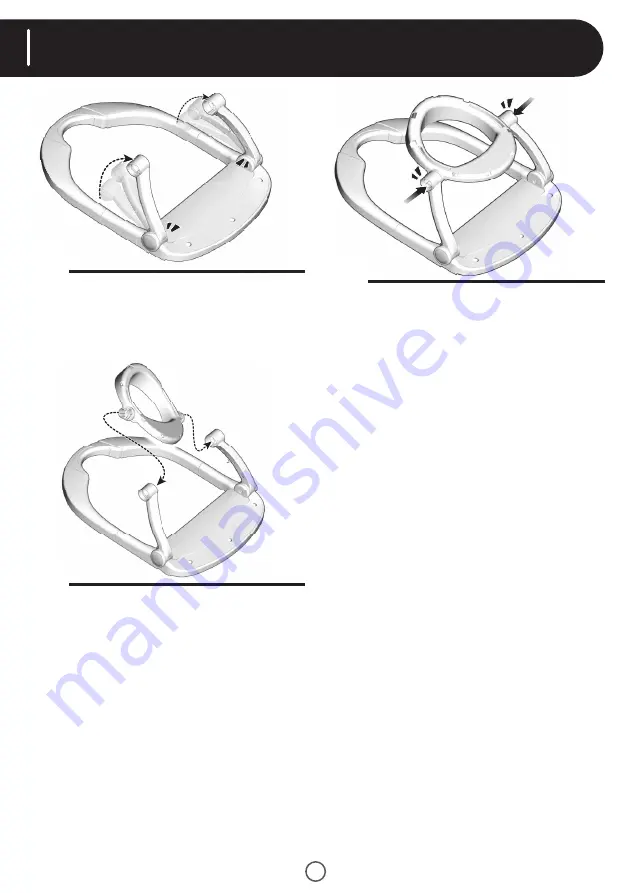
• Lift the frames until each “

snaps

” into place.

• Subir los armazones hasta que cada uno se 

ajuste

 en su lugar.

5.

• Position the seat ring so that the wider, 

flat side is toward the front base.

• At an angle, fit the peg on one side of the 

seat ring into the hole in the frame.

• Then, fit the remaining peg on the seat ring 

into the hole in the other frame.

• Colocar el aro del asiento de modo que el lado 

ancho, plano quede hacia la base delantera.

• En ángulo, ajustar la clavija de un lado del aro 

del asiento en el orificio del armazón.

• Luego, insertar la clavija restante del aro del 

asiento en el orificio del otro armazón.

6.

PUSH
EMPUJAR

PUSH

PUSH
EMPUJAR

EMPUJAR

• Push the frame near a seat ring peg to 

snap

” the seat ring into place.

Hint: 

If you cannot “snap” the parts into place, 

you may have assembled the seat ring backwards. 
Remove the seat ring from the frames and turn 
it around so that the wider, flat side is toward the 
front base. Then, repeat this assembly step.

• Empujar el armazón cerca de la clavija del aro 

del asiento para 

ajustar

 el aro del asiento en 

su lugar.

Atención: 

Si las piezas no se ajustan en su 

lugar, quizá el aro del asiento esté al revés. 
Quitar el aro del asiento de los armazones 
y voltearlo de modo que el lado ancho, plano 
quede hacia la base delantera. Luego, repetir 
este paso de montaje.

7.

Содержание DRF51

Страница 1: ...to or out of the seat Sentar y sacar al beb Poner el producto ensamblado sobre el piso Arrodillarse o pararse detr s de la silla y meter o sacar las piernas del beb en de los orificios de pierna del c...

Страница 2: ...io clientes mattel com SOUTH AFRICA Mattel South Africa PTY LTD Office 102 I3 30 Melrose Boulevard Johannesburg 2196 To clean the frame and toys wipe clean using a mild cleaning solution and damp clot...

Страница 3: ...rla nicamente sobre el piso Peligro de asfixia No usarla en superficies suaves cama sof coj n ya que el producto puede voltearse y causar asfixia en superficies suaves Nunca dejar al ni o sin supervis...

Страница 4: ...edges Do not use the product if any parts are missing damaged or broken Do not use accessories or replacement parts other than those approved by the manufacturer IMPORTANTE Antes del montaje y de cad...

Страница 5: ...de la base delantera Presionar para ajustar cada uno en su lugar Atenci n Los armazones y base delantera est n dise ados para ajustarse de una sola manera Si estas piezas no se conectan ajustar cada a...

Страница 6: ...lavija restante del aro del asiento en el orificio del otro armaz n 6 PUSH EMPUJAR PUSH PUSH EMPUJAR EMPUJAR Push the frame near a seat ring peg to snap the seat ring into place Hint If you cannot sna...

Страница 7: ...n Presionar para ajustarlos en su lugar Assembly Montaje 8 TOP VIEW VISTA DE ARRIBA Pad Pegs Clavijas del colch n Pull the edge of the seat pad around the seat ring Fit the eight buttons holes on the...

Страница 8: ...ede pegar sobre las etiquetas de f brica en caso de que el ingl s no sea su idioma primario Seleccione la etiqueta de advertencia en el idioma de su elecci n Assembly Montaje 11 Lift the frames until...

Отзывы: