background image

28

Caring for your washer

When you have finished using your washer

  Turn off the taps to prevent the chance of flooding 

should a hose burst.

  Turn off the power at the wall.

Cold water washing

If you always wash with cold water, we recommend 
that a WARM or HOT wash be used at regular 
intervals, eg every 5th wash should be at least a warm one.

Cleaning your washer


Note: ensure the power is turned off at the wall before cleaning your washer.

  Clean the surfaces of your washer with a soft damp cloth only and wipe dry. Do not use scouring 

or spray cleaners as they can damage the paint, plastic and panel surfaces.

  Clean the fabric softener dispenser after each cycle using warm soapy water.

  To remove the agitator for cleaning, unscrew the nut down the centre of the agitator by turning 

anti-clockwise.

Important!


The agitator must be fully pushed onto the shaft when refitting. Tighten the nut firmly by hand. 

Ensure the agitator is not loose.

Cleaning the inside of your washer


If you use fabric softener or do regular cold water washing, it is important that you occasionally 
clean the inside of your machine. We recommend completing the following cycle 5 – 6 times  
a year:

  Add about two cups of a good quality powdered detergent to the machine (down the dispenser).

  Press POWER and select ALLERGY cycle, HIGH water level, MEDIUM spin and the SOAK option.

  Press START / PAUSE.


We do not recommend that you wash clothes during this procedure.

Содержание WashSmart

Страница 1: ...NZ AU Installation instructions and User guide WashSmart Clothes washer ...

Страница 2: ......

Страница 3: ...r supply 4 Levelling 5 Accessories and spare parts 6 Before you do your first wash 7 Getting started quickly 8 WashSmart controls 10 WashSmart safety features 11 Eco Active wash 12 Sorting and loading 13 Detergent 14 Fabric softener 15 Wash cycles 16 Wash options 17 Water level 17 Wash temp Spin speed Wash advance 18 Options 19 Customising wash cycles 21 Changing pre set options 22 Machine informa...

Страница 4: ...performance Your WashSmart washer has an extra large capacity and numerous wash cycles and options so you can perform every wash task with ease and spend less time in the laundry With the ability to select the most efficient water level for each load your WashSmart makes it kinder on your wallet and the environment Please take the time to read these instructions carefully before you begin using yo...

Страница 5: ...ot on any textured floor coverings eg carpet rugs to ensure that the opening at the bottom of the machine is not obstructed In your clothes washer you will find 1 hose guide 2 inlet hoses 4 rubber foot inserts Drain hose 1 Carefully pull the drain hose out from the back of the machine by pulling the exposed part of the hose downward and outward 2 To guide the drain hose over the tub or standpipe t...

Страница 6: ...to the corresponding machine inlet valves Inlet valves are marked on the back of the machine Ensure the Hot valve is connected to the hot tap and the Cold valve is connected to the cold tap H Hot C Cold Cold supply only If you only have a cold water supply an inlet valve cap blanking cap MUST be connected to the Hot inlet valve The cap prevents water leaking out of the hot valve The cap is availab...

Страница 7: ... the lid near the control panel Pull the machine out and adjust the rear feet wind down until the machine is level side to side when in position 4 Open the lid Place spirit level on the flat surface on the left side inline with the centre of the bowl Adjust the front left foot wind down until the machine is level 5 Move the spirit level to the right side in line with the centre of the bowl Adjust ...

Страница 8: ...cally turn off at the end of the installation test cycle Clothes washer safety This clothes washer is not intended for use by children and persons with reduced physical sensory or mental capabilities or lack of experience and knowledge unless they have been given supervision or instruction concerning use of the appliance by a person responsible for their safety Supervise children at all times to e...

Страница 9: ... drain hose threaded through the U bend with no more than 20 mm extended and hooked into your standpipe Refer to page 3 3 Is the hot hose connected to the Hot valve marked H Is the cold hose connected to the Cold valve marked C Refer to page 4 4 Is the machine correctly levelled feet are extended and cabinet corners are clear of the floor Refer to page 5 5 Have you performed the installation test ...

Страница 10: ...tor refer to Sorting and Loading page 13 Remove fabric softener dispenser cup Detergent Follow the manufacturer s instructions on the detergent package Use the mark on the agitator nearest to the top of the clothes as a guide to the correct amount of detergent to use refer to Detergent page 14 Pour the detergent down the centre of the agitator stem Replace the fabric softener dispenser cup this st...

Страница 11: ... 2 Select your desired wash cycle by touching the corresponding button refer to page 16 3 Choose your wash options eg you may want a WARM wash temperature and a SLOW spin speed refer to pages 17 19 4 Touch START PAUSE to start the cycle The washer will start to fill with water and select the correct wash action for your load For best fabric and colour care remove your clothes as soon as the cycle ...

Страница 12: ...e aware that actual cycle times may vary as they are influenced by a number of factors eg the flow rate of your water supply the load size and cycle selection Keylock mode Keylock can be used to lock the buttons on your WashSmart when not in use This will avoid accidental button pushes from items left on the lid of the washer and also from any little fingers To turn Keylock mode ON or OFF Touch an...

Страница 13: ...ot put anything down the lid lock slot in the top deck of your machine Do not try to disable the lid lock Ensure that children or infirmed persons are well supervised when around your WashSmart washer Auto drain Unsupervised clothes washers filled with water can present a drowning hazard to small children In order to minimise any risk of this type of accident your WashSmart has been pre programmed...

Страница 14: ...sh action thoroughly dissolves and activates the detergent The concentrated solution of detergent and water rapidly targets stains and soils at the fibre level of fabrics boosting soil removal and accelerating the wash process Wash 2 Agitation wash top loader type wash After recirculating the sudsy water through your clothes for 4 minutes your WashSmart washer will fill with just enough cold water...

Страница 15: ...age may occur to these surfaces Make sure the water level suits the load size If manually selecting the water level select the correct water level by using the mark on the agitator nearest to the top of the load Ensure the load does not extend above the bottom of the fabric softener dispenser cup as splashing may occur For a balanced load Place unfolded clothes firmly and evenly around the agitato...

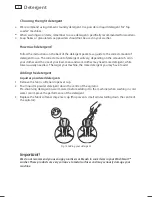
Страница 16: ...rk clothes may need more detergent while towels usually need less The larger your machine the more detergent you may have to add Adding the detergent Liquid or powdered detergents 1 Remove the fabric softener dispenser cup 2 Pour liquid or powder detergent down the centre of the agitator Pre dissolving detergent in warm water before adding it to the machine when washing in cold water can improve t...

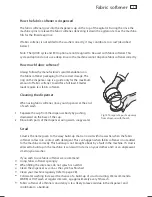
Страница 17: ... of each wash 1 Separate the cup from the dispenser body by pushing downward on the base of the cup 2 Rinse both parts of the dispenser using warm soapy water Scrud Scrud is the name given to the waxy build up that can occur within a washer when the fabric softener comes into contact with detergent This can happen when fabric softener is not added to the machine correctly This build up is not brou...

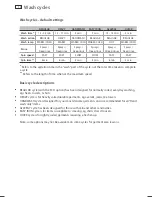
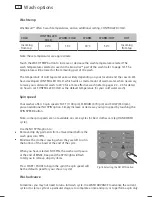
Страница 18: ...le not the total time taken to complete a cycle Refers to the length of time when at the maximum speed Basic cycle descriptions REGULAR cycle with the ECO option has been designed for normally soiled everyday washing eg sheets towels t shirts HEAVY cycle is for heavily soiled durable garments eg overalls jeans tea towels HANDWASH cycle is designed for your most delicate garments and is recommended...

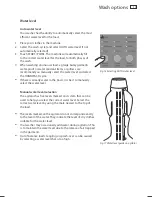
Страница 19: ...there is already water in the bowl it is best to manually select the water level Manual water level selection The agitator has five levels marked on its stem that can be used to help you select the correct water level Select the correct water level by using the mark nearest to the top of the load The levels marked on the agitator do not correspond exactly to the level of the water They indicate th...

Страница 20: ... for your cold water wash Spin speed Your washer offers 3 spin speeds FAST 1100 rpm MEDIUM 670 rpm and SLOW 330 rpm plus an additional NO SPIN option Simply increase or decrease your spin speed by touching the SPIN SPEED button Note some spin speeds are not available on some cycles for best clothes care eg HANDWASH cycle Use the NO SPIN option to Remove drip dry garments from a mixed load before t...

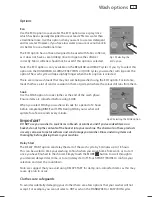
Страница 21: ...before using SOAK When you select SOAK your washer will soak for a period of 2 hours before completing RINSE and SPIN During SOAK your washer will agitate for a few seconds every minute Important DO NOT use your washer to soak items in bleach or sanitiser and if you ve soaked items in a bucket do not tip the contents of the bucket into your machine The chemicals in these products are very corrosiv...

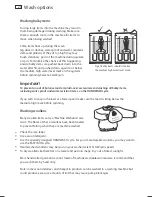
Страница 22: ...ms on the HANDWASH cycle If you wish to re spin the load at a faster speed make sure the load is sitting below the medium high mark before spinning Washing woollens Many woollen items carry a Machine Washable care claim The fibres of these woollens have been treated to prevent felting when they are machine washed Check the care label Use a wool detergent Use the specially designed HANDWASH cycle F...

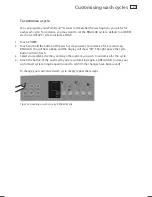
Страница 23: ...le you want to customise for 3 seconds eg REGULAR You will hear a beep and the display will show SEt The light above the cycle button will also flash 3 Select your preferred setting and any other options you wish to customise for this cycle 4 Touch the button of the wash cycle you are customising again eg REGULAR to store your customised cycle a long beep will sound to confirm the changes have bee...

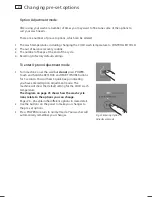
Страница 24: ...Option Adjustment mode 1 Turn machine on at the wall but do not press POWER Touch and hold the KEYLOCK and START PAUSE buttons for 3 seconds You will hear 3 quick beeps indicating you have entered Option Adjustment mode The machine will show the default setting for the COLD wash temperature The diagram on page 23 shows how the wash cycle icons relate to the options you can change Pages 24 26 expla...

Страница 25: ...ALLERGY cycle buttons only Use this diagram to help you adjust the options ie select the REGULAR cycle button to modify the wash temperature select the HEAVY cycle button to change the out of balance OOB recovery process and so on Fig 24 WashSmart Option Adjustment mode 3 Use the DELAY START MORE button on the panel to scroll through the available settings of your selected option eg to increase or...

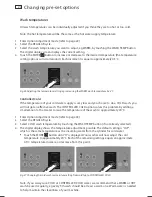
Страница 26: ...ffective wash The CONTROLLED COLD option solves this problem by adding a small amount of hot water to raise the temperature of the wash to approximately 20 C 1 Enter Option Adjustment mode refer to page 22 2 Select the REGULAR cycle 3 Select COLD wash temperature by touching the WASH TEMP button if not already selected 4 The digital display shows the temperature adjustment possible The default set...

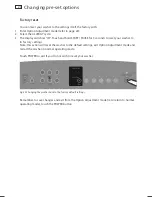
Страница 27: ...ally correct the out of balance load It will fill with water and agitate to redistribute the load before trying to spin up again To change the out of balance recovery option 1 Enter Option Adjustment mode refer to page 22 2 Select the HEAVY cycle 3 Touch the MORE button to turn AUTOMATIC RECOVERY on or off Fig 28 Changing the out of balance recovery routine End of cycle beeps The beeps signalling ...

Страница 28: ...3 seconds to reset your washer to its factory settings Note this action will reset the washer to the default settings exit Option Adjustment mode and restart the washer in normal operating mode Touch POWER to exit if you do not wish to reset your washer Fig 30 Changing the washer back to the factory default settings Remember to save changes and exit from the Option Adjustment mode ie to return to ...

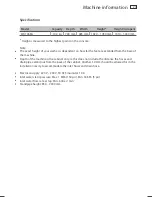
Страница 29: ...tended from the base of the machine Depth of the machine is the cabinet only ie this does not include the distance the hoses and drainpipe extend out from the back of the cabinet Another 50 mm should be allowed for in the installation cavity to accommodate the inlet hoses and drain hose Electrical supply 220 V 240 V 50 Hz Sinusoidal 10 A Inlet water static pressure Max 1 MPa 150 psi Min 34 KPa 5 p...

Страница 30: ...lean the fabric softener dispenser after each cycle using warm soapy water To remove the agitator for cleaning unscrew the nut down the centre of the agitator by turning anti clockwise Important The agitator must be fully pushed onto the shaft when refitting Tighten the nut firmly by hand Ensure the agitator is not loose Cleaning the inside of your washer If you use fabric softener or do regular c...

Страница 31: ... machine but we suggest you thoroughly clean your washer afterwards We do not recommend the use of dye strippers in your washer Washer sounds and beeps Your washer will make sounds that you will not have heard from other clothes washers While draining your machine may give several low thuds Your machine is checking that the water has drained before spinning Your washer will beep if you have used N...

Страница 32: ...r the second load You may need to add extra detergent 4 Remove the second load at the end of the cycle 5 Replace the first load select RINSE and complete the cycle Recycling the water from a deep rinse 1 Select SPIN HOLD on the first wash cycle Note you cannot use the ECO option when recycling the water from a deep rinse 2 Remove the clothes at the end of the rinse and add the second load to the r...

Страница 33: ...nected to the wrong taps no CLd I am not getting any cold water Cold tap has not been turned on Inlet hose filters may be blocked There may be a kink in the hose Inlet hoses are connected to the wrong taps Cold water temperature exceeds recommended limits refer to page 4 The flow rate of the supply water is too slow no tAP I am not getting any water The taps have not been turned on Inlet hose filt...

Страница 34: ...age 11 If the symptom persists call your Fisher Paykel Dealer or Authorised Repairer too FUL too full I am overloaded The machine is overloaded and can not agitate Ensure the machine is stationary Remove items until the remaining ones can move freely Select a higher water level Single beep every second and possible solutions Three digit fault code displayed on screen 1 Turn your machine off at the...

Страница 35: ...wl your washer has compensated by lowering the spin speed Machine is continually going out of balance Check the machine is level and does not rock in any direction refer to page 5 Too much water for load refer to page 17 Too much or too little water when filling on AUTO water level The machine may still be in the process of determining the correct water level for the load refer to page 17 Some loa...

Страница 36: ...etter eg full loads of sheets may not wash as well Hard water requires more detergent than soft water Linting Wash lint givers eg towels flannelette sheets separately from lint collectors eg synthetic fabrics Overloading the washer Try reducing your load size Not enough detergent to hold the lint in suspension Overdrying in a dryer can cause a build up of static electricity in synthetic fabrics an...

Страница 37: ...s left sitting in a washer or laundry basket can transfer dye onto other clothes Tangling Washing with too much water ie underloading can cause the clothes to tangle around one another Do not load the washer by wrapping items around the agitator eg place items especially sheets in the bowl as loose parcels ...

Страница 38: ...e not related to any defect in the product The cost of a service call will be charged if the problem is not found to be a product fault For example 1 Correcting the installation eg removal of bottom packer and transit bolts front loading washers levelling the machine adjustment of the drain to correct siphoning noises crossed kinked or leaking inlet hose connections turning on water noises caused ...

Страница 39: ... product s warranty Service under these warranties must be provided by a Fisher Paykel Authorised Repairer refer to the Customer Care section at the back of this book Such service shall be provided during normal business hours This warranty certificate should be shown when making any claim For Australian Customers This Warranty is an extra benefit and does not affect your legal rights Our goods co...

Страница 40: ...can carry out any service necessary on your appliance Your dealer or our Customer Care Centre can recommend a Fisher Paykel Authorised Repairer in your area In Australia if you need assistance Call the Fisher Paykel Customer Care Centre and talk to one of our Customer Care Consultants Toll Free 1300 650 590 Fax 07 3826 9298 Email customer care fp com au Postal Address PO Box 798 Cleveland QLD 4163...

Страница 41: ......

Страница 42: ......

Страница 43: ......

Страница 44: ...e product specifications in this booklet apply to the specific products and models described at the date of issue Under our policy of continuous product improvement these specifications may change at any time You should therefore check with your Dealer to ensure this booklet correctly describes the product currently available ...

Отзывы: