background image

28

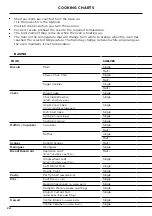
COOKING CHARTS

BROILING

FOOD

SHELVES

Beef

Steak

Rare

Single

Medium

Single

Hamburger
(ground - patties)

Single

Meatballs
(ground)

Single

Lamb Chops

Medium

Single

Well done

Single

Pork

Chops (well done)

Single

Ham steak

Single

Bacon

Single

Chicken

Boneless pieces

Single

Bone In Pieces

Single

Sausages 

Sausages

Single

Fish

Fillets

Single

Whole

Single

Vegetables 

Sliced

Single

Содержание RDV2 Series

Страница 1: ...USER GUIDE US CA PROFESSIONAL RANGE RGV2 RDV2 models ...

Страница 2: ...to light any appliance Do not touch any electrical switch Do not use any phone in your building Immediately call your gas supplier from a neighbor s phone Follow the gas supplier s instructions If you cannot reach your gas supplier call the fire department Installation and service must be performed by a qualified installer service agency or the gas supplier WARNING If the information in this manua...

Страница 3: ...le 10 Oven use Positioning the shelves 11 Using your oven for baking and roasting 14 Using your oven for broiling 15 Using your oven for proofing dough 16 Oven cooking guidelines 18 Oven modes 21 Baking charts 24 Cooktop use Using the cooktop burners 30 Guidelines for using the cooktop burners 31 Using the grill 32 Using the griddle 33 Care and cleaning Manual cleaning chart 34 Removing and replac...

Страница 4: ...d be injured or a fire could start Keep the area around the appliance free from combustible materials eg wall coverings curtains drapes gasoline and other flammable vapors and liquids Do not let cooking grease or other flammable materials accumulate in or or near the appliance Do not hang any articles eg dish towels off the oven handle Some fabrics may ignite or melt from the heat Never leave the ...

Страница 5: ...nce as a space heater to heat or warm the room Doing so may result in carbon monoxide poisoning and overheating of the appliance Failure to follow this advice may result in poisoning or death WARNING Hot Surface Hazard Accessible parts may become hot during use Do not touch burners areas near burners the grill griddle grease drip pans heating elements or interior surfaces of oven These may be hot ...

Страница 6: ...of the appliance unless specifically recommended in the manual All other servicing should be referred to a qualified technician Technicians must disconnect the appliance from the power supply before any servicing Storage in or on appliance Flammable materials should not be stored in an oven or near the cooktop Use care when opening the oven door Let hot air or steam escape before removing or repla...

Страница 7: ...king as doing so will irreversibly damage the porcelain enamel finish For safety reasons the cooktop burner flame size should be adjusted so it does not extend beyond the edge of the cookware Use cookware of the appropriate size and construction for the type of cooking This appliance is equipped with burners of different sizes Cookware must be matched to the size of the burner Select utensils with...

Страница 8: ...6 INTRODUCTION RGV2 488 RDV2 488 RGV2 486GL RDV2 486GL RGV2 486GD RDV2 486GD RGV2 485GD RDV2 485GD 48 MODELS ...

Страница 9: ...7 INTRODUCTION RGV2 366 RDV2 366 RGV2 305 RDV2 305 RGV2 304 RDV2 304 RGV2 364GD RDV2 364GD 36 MODELS 30 MODELS ...

Страница 10: ... and service 3 Read this guide taking special note of the Safety and warnings section 4 Remove all the packaging from the oven s and cooktop Recycle items that you can If any adhesive residue is left on surfaces remove this using dishwashing liquid on a soft cloth Do not use any harsh or abrasive cleaners 5 Make sure you follow the instructions under First use before using your range for cooking I...

Страница 11: ...p grate Shelf secondary oven Broiler Oven door vents Broil rack Broil pan Shelf slide main oven Label with model and serial numbers Side racks Grill Griddle cover Back trim Burner grates Cooktop burner knobs Secondary oven mode knob Secondary oven temperature knob Oven vents Model may vary Accessories Grill grate Alternative to griddle some models only ...

Страница 12: ...sure you condition this also following the steps above Seasoning the griddle 1 Clean the griddle thoroughly with hot soapy water to remove any protective coating 2 Rinse with a mixture of 1 cup water and cup white vinegar then dry thoroughly 3 Pour 1 tsp vegetable but not corn oil into the center of the griddle then rub it over its entire surface using a soft heavy cloth 4 Turn the griddle knob co...

Страница 13: ...d from the bottom Position the shelves you will need before turning the oven on For advice on which shelf position to use see sections Oven modes Oven cooking guidelines and Cooking charts IMPORTANT Always position the oven shelves before turning the oven on Remove any unused shelves and baking utensils from the oven Secondary oven shelves These shelves have safety stops to keep them from sliding ...

Страница 14: ... firmly with both hands making sure you grip the wire shelf too to stop it sliding forward 3 Pull the shelf forward about of the way 4 Lift the rear of the shelf slightly so that the tags clear the side rack wires then remove 2 Hold the shelf firmly with both hands making sure you grip the wire shelf too to stop it sliding forward 4 Push the shelf all the way into the oven ensuring the front and r...

Страница 15: ... 4 Lower the shelf back onto the side rack wires and slide all the way into the oven To remove the shelves 1 Wait for the oven to cool down completely 2 Pull the shelf forward about of the way 3 Tilt the front up slightly to help the safety stops clear the side rack wires 4 Remove the shelf 2 Position the shelf it should rest on the side rack wires as shown Guard rail Side rack wire Safety stop ...

Страница 16: ...ox 10 20 minutes the halo will turn orange Note the halo may alternate between white and orange during cooking as the oven maintains the set temperature 2 Turn the OVEN MODE knob counterclockwise to BAKE BAKE CONVECTION or TRUE CONVECTION some models only The halo will glow orange 4 When you have finished using the oven turn both the oven mode and temperature knobs clockwise to OFF The halos will ...

Страница 17: ...g or searing preheat the broiler for about 5 8 minutes before placing food in the oven 2 Turn the OVEN MODE knob counterclockwise to BROIL or BROIL CONVECTION some models only Make sure you turn the knob exactly to the setting never past it The halo will glow orange 4 When you have finished using the oven turn both the oven mode and temperature knobs clockwise to OFF The halos will go out You may ...

Страница 18: ...models only 1 Turn the OVEN MODE knob of the secondary oven counterclockwise to PROOF The oven will heat to an ideal proofing temperature 100o F in about 5 minutes 2 AFTER 5 MINUTES place the dough in the oven in a covered and lightly oiled heatproof bowl 3 When risen to the required size remove the dough from the oven 4 Turn the oven mode knob clockwise back to OFF Halo Orange Halo Unlit ...

Страница 19: ...en will heat to an ideal proofing temperature 100o F in about 5 minutes 2 AFTER 5 MINUTES turn the temperature knob clockwise back to OFF 3 Place the dough in the oven in a covered and lightly oiled heatproof bowl 4 When risen to the required size remove the dough from the oven and turn the oven mode knob clockwise back to OFF Halo Orange Halo White Halo Unlit Halo Unlit ...

Страница 20: ... of the oven preheating will take around 10 20 minutes The temperature dial will turn from white to orange when the preset temperature is reached Your cookware will influence baking times Dark pans absorb the heat more quickly than reflective pans glass cookware may require a lower temperature Avoid opening the oven door frequently during baking Do not open the oven door until at least through the...

Страница 21: ...o that is is in the center of the oven or lower BROILING This is a healthier alternative to frying Always broil with the oven door completely shut If you open the oven door to check food have it open for as short a time as possible to prevent the control panel overheating If you use glass or ceramic pans be sure they can withstand the high temperatures of broiling To avoid piercing the meat and le...

Страница 22: ...ION and set the temperature to WARM Once thawed cook the food immediately and do not refreeze To prevent liquid from thawing food dripping on the oven floor be sure any uncooked food is tightly wrapped in foil and or placed in a container PROOFING DOUGH Use a lightly oiled heatproof glass bowl to proof your dough This allows you to check how much it has risen without opening the oven or removing t...

Страница 23: ... of the cavity and distributes it around the oven cavity Food cooked on BAKE CONVECTION tends to brown more quickly than foods cooked on BAKE You may need to decrease the time from that recommended in traditional recipes or reduce the baking time For foods with a baking time of over an hour reducing both the temperature and time slightly may give the best results Use BAKE CONVECTION at a low tempe...

Страница 24: ...lf cooking Trays of cookies cooked on different shelves are crisp on the outside and chewy in the middle Meat and poultry are deliciously browned and sizzling while remaining juicy and tender Casseroles are cooked to perfection and reheating is quick and efficient When multi shelf cooking it is important to leave a gap between trays eg use shelves 2 4 to allow the air to move freely This enables t...

Страница 25: ... for whole chicken tenderloin of beef or broiling your favorite chicken fish or steak this is not a cooking mode The self cleaning cycle takes care of the mess and grime that is traditionally associated with oven cleaning During self cleaning the oven reaches very high temperatures burning off and breaking down food soils and grease deposits A self cleaning cycle lasts about 5 hours with an additi...

Страница 26: ... Cookies Single Multi Cakes Pound Cake Single Chocolate Brownie 8 x8 20x20cm pan Single Angel Food Cake 10 x4 25x10cm tube pan Single Rich Fruit Cake Single Sponge single large Single Sponge 2x20cm Single Muffins Cupcakes Cupcakes Single Multi Muffins Single Multi Scones English Scones Multi Meringues Meringues Single Bread Bread rolls Sandwich Loaf 9 x5 23x13cm Loaf Pan Multi Wholewheat Loaf 9 x5...

Страница 27: ...e Convection 2 4 325 350 160 175 7 15 Bake 3 325 160 70 80 Bake 3 350 175 20 25 Bake 3 325 350 160 175 50 60 Bake 3 275 300 135 150 3 6 hrs Bake 3 350 175 30 40 Bake 3 350 175 15 25 Bake Convection 3 365 185 13 18 True Convection 1 4 345 170 13 18 Bake Convection 3 345 170 23 30 True Convection 1 4 345 170 23 30 Bake 3 425 450 215 230 10 12 Bake 3 250 270 120 130 60 70 Bake 3 350 175 40 50 Bake 3 ...

Страница 28: ...ingle Bake Broil Convection Medium Bake Broil Convection Well Done Bake Broil Convection Lamb Rack Medium Rare Single Bake Lamb leg Bone in Medium Single Bake Well Done Bake Lamb leg Boneless Medium Single Bake Broil Convection Well Done Bake Broil Convection Veal Medium Single Bake Well Done Bake Chicken Whole Unstuffed Single Bake Broil Convection Whole Stuffed Bake Broil Convection Whole Butter...

Страница 29: ... 160 170 30 55 450g 165 174 74 79 2 320 340 160 170 15 30 450g 130 138 54 59 2 320 340 160 170 20 35 450g 140 165 60 74 2 320 340 160 170 25 40 450g 165 174 74 79 2 390 200 20 122 50 2 320 340 160 170 18 28 450g 149 158 65 70 2 320 340 160 170 20 33 450g 165 174 74 79 2 320 340 160 170 20 35 450g 149 158 65 70 2 320 340 160 170 25 45 450g 170 174 77 79 2 320 340 160 170 20 40 450g 160 71 2 320 340...

Страница 30: ...ger ground patties Single Meatballs ground Single Lamb Chops Medium Single Well done Single Pork Chops well done Single Ham steak Single Bacon Single Chicken Boneless pieces Single Bone In Pieces Single Sausages Sausages Single Fish Fillets Single Whole Single Vegetables Sliced Single ...

Страница 31: ...I HI 12 15 Broil 3 HI HI 12 15 Broil 4 HI HI 15 20 Broil 4 HI HI 20 25 Broil 3 HI HI 15 20 Broil 3 HI HI 15 20 Broil 3 HI HI 4 7 Broil Convection 3 350 175 30 40 Broil Convection 3 350 175 40 50 Broil 3 HI HI 10 15 Broil Convection 3 390 430 200 220 8 12 Broil Convection 3 390 430 200 220 15 20 Broil Convection 3 HI HI 8 12 ...

Страница 32: ...n you have finished cooking turn the knob clockwise back to OFF The knob will release and the burner and halo will go out If you are using LP gas there may be a slight extinction pop or flash at the flame spreader a few seconds after the burner has been turned off This is normal for LP gas 2 Push the knob in and turn it counterclockwise to LITE Make sure you stop at LITE before turning the knob to...

Страница 33: ... the way Turn handles so that they don t extend over the edge of the cooktop or another burner that is on Take care when deep frying Oil or fat can overheat very quickly particularly on a high setting Make sure that all burner parts are properly in place Incorrectly or incompletely assembled burners may produce dangerous flames See Replacing the burner parts in Care and cleaning Keep the burners c...

Страница 34: ... orange There may be a delay of a minute or so before the grill burner lights This is normal 3 Allow the empty grill to heat up for about 15 minutes 4 Adjust the heat anywhere between HI high and LO low during grilling 5 When you have finished using the grill turn the grill knob clockwise back to OFF 6 Clean the grill grate immediately after use See Care and cleaning for instructions 7 When the gr...

Страница 35: ...e Always keep the vents at the rear of the griddle frame clear of any object airflow to the vents must not be blocked 2 If you haven t used the griddle for a long time re season it See section First use seasoning the griddle for instructions 3 Turn the griddle knob counterclockwise to the desired temperature There may be a delay of a minute or so before the griddle comes on This is normal While th...

Страница 36: ...e difficult and may present a fire hazard Do not use any abrasive or harsh cleaners cloths scouring pads or steel wool These will scratch your range and damage its appearance Do not use a steam cleaner to clean any part of the range Do not perform any cleaning or maintenance on parts not specifically named in the chart below If in doubt contact Customer Care Do not lift the black grill and griddle...

Страница 37: ... recommend removing any easy to reach spills food or greasy stains from the enamel after each use In self cleaning ovens this will also reduce the need for using the CLEAN cycle frequently Enamel oven interior stubborn baked on soiling Self cleaning ovens those with CLEAN on the oven mode knob use the CLEAN cycle See Using the CLEAN cycle for instructions Non self cleaning ovens those without CLEA...

Страница 38: ...asher Bake and broil burners gas ovens Do not clean these parts They self clean during normal use Broil element electric ovens Oven door glass interior Self cleaning ovens those with CLEAN on the oven mode knob This will be cleaned during a CLEAN cycle However if it is particularly soiled wipe down with hot water to loosen stains before starting a CLEAN cycle Non self cleaning ovens those without ...

Страница 39: ...ignition problems Before replacing the burner parts check that they are dry Wet burner parts may result in an irregular flame Before lighting a burner you have reassembled check that all of its parts are positioned correctly Incorrect assembly can cause dangerous irregular flames and ignition problems Ignitors 1 Check that the burner is turned OFF 2 Clean the ignitor with a small brush eg old toot...

Страница 40: ...color with use This is normal To ensure that you replace the grill grate correctly see illustrations in section Using the grill Radiant tray under grill grate 1 Wait until the grill has completely cooled 2 Lift off the grill grate lift out the grease drip pan then carefully lift out the radiant tray 3 Shake it gently over a sheet of newspaper or waste bin to empty it of ash and food particles 4 Re...

Страница 41: ... not be removed The griddle will develop a non stick coating and will darken or discolor in patches with use this is normal Grease drip pan 1 Wait until the grease drip pan has cooled to a safe temperature to touch then slide it slightly towards you and lift out 2 Discard grease then clean the drip pan with hot water and dishwashing liquid The grease drip pan is also dishwasher safe 3 Rinse with c...

Страница 42: ... remove the door Before removing the door make sure there is a large enough clear protected surface in the kitchen to rest the door on Take care the oven door is heavy To remove the oven door 1 Open the door fully 3 Holding the door firmly on both sides gently close it about halfway 4 Disengage the hinges and remove the door Place on a protected surface 2 Open the levers fully on both sides Lever ...

Страница 43: ...mly in an approximately halfway open position 3 Open the door fully 4 Fully close the levers on the left and right hinges as shown then close the door 2 Insert the hinge tongues into the slots making sure that the notches on both sides drop into place as shown Notch ...

Страница 44: ...he prongs into the mounting slots 2 Ensure the prongs are fully inserted into the slots then lower the side rack carefully and gently push the retaining wire underneath the lock stud 3 Swing the bottom of the side rack up towards the center of the oven until it is almost horizontal 4 Slide the prongs at the top out of the mounting slots 2 Gently pull down on the retaining wire from underneath the ...

Страница 45: ...ins on the bottom of the brass flame spreader are properly aligned with the locating pin holes on the top of the simmer ring Incorrect alignment will produce a potentially dangerous flame and poor burner performance Burner cap Locating pin Notches Brass flame spreader Locating pin hole Simmer ring Do not remove Ignitor ...

Страница 46: ...o reach 4 Turn the power supply to the range off at the main fuse or circuit breaker panel If you don t know how to do this contact an electrician IMPORTANT Failure to disconnect the range from the power supply may result in death or electrical shock 5 Remove the lamp cover turn it counterclockwise to unscrew 6 Remove the faulty bulb and replace with a new 40 W appliance light bulb 7 Replace the l...

Страница 47: ...RTANT Do not use oven cleaners any degreasing cleaners or oven liners in a self cleaning oven If there are cracks or flaws in the oven door glass if the oven gasket is damaged stiff or worn or if the door does not close properly do not start a CLEAN cycle Call your Authorized Service Center or Customer Care Make sure you remove the side racks oven shelves broiler pan and all other bakeware and ute...

Страница 48: ...interior the shaded areas shown above clean these using a soap filled non abrasive pad then wipe with a clean damp cloth 5 Close the oven door firmly 6 Turn the ventilation hood above the range on maximum and leave it on for the duration of the cycle 7 Turn the oven mode knob counterclockwise to CLEAN Its halo will glow red 8 Turn the temperature knob counterclockwise to CLEAN Its halo will glow r...

Страница 49: ... See sections Removing and replacing the side racks and Positioning the shelves for instructions To cancel a CLEAN cycle 1 Turn the oven mode and temperature knobs clockwise to OFF The halos will remain red The door will remain locked Once the oven has cooled to a cooking temperature this may take up to 30 minutes depending on the stage the cycle was in when canceled the halos around the function ...

Страница 50: ... been restored The supply to the house may not be working or there may be an outage Contact your local gas supplier One of the oven lights does not come on but the oven works The light bulb is loose The light bulb has blown See instructions for Replacing the oven light bulb in section Care and cleaning Instead of replacing the bulb simply ensure that it is secure in its socket Replace the bulb See...

Страница 51: ...ood in the oven using a CONVECTION mode Fan noise and warm ventilation air coming from the range during and after use or a CLEAN cycle A cooling fan in the range runs to prevent the oven door and control panel from overheating This is normal and requires no action Occasional brief glowing inside the oven during a CLEAN cycle Heavy soiling is getting incinerated This is normal and requires no actio...

Страница 52: ... on in a CONVECTION mode Technical fault Contact your Authorized Service Center or Customer Care Uneven baking Oven not properly preheated Unsuitable or incorrectly arranged bakeware Wait until the halo around the temperature knob has changed from white to orange before putting food in See Oven cooking guidelines for advice COOKTOP BURNERS None of the burners grill or griddle will light No power s...

Страница 53: ...nterclockwise to LITE 2 When the flame is burning all the way around the burner you may adjust the heat IMPORTANT If the flame is blown out during a power failure turn the knob immediately to OFF as the burner will not automatically relight and gas may escape The flames have suddenly gone out A draft or a spill has extinguished the flame No action required The burner will detect this and automatic...

Страница 54: ...rip pan Minor flare ups are normal To minimize them trim excess fat off meat before grilling Turn the grill off wait for it to cool then position it correctly See Using the grill for instructions and illustrations There is a power failure can I still use the grill Power outage in your home or neighborhood The grill cannot be used until power is restored The grill will not light halo does not illum...

Страница 55: ...t persists contact your Authorized Service Center or Customer Care The TEMPERATURE knob is flashing orange Electronics fault Disconnect and reconnect the oven to the power supply If the fault persists contact your Authorized Service Center or Customer Care The OVEN MODE knob is flashing white Technical fault Contact your Authorized Service Center or Customer Care ...

Страница 56: ... Warranty book for warranty details and your nearest Authorized Service Centre Customer Care or contact us through our website www fisherpaykel com Contact details For replacement parts or if further help is needed concerning this appliance call Toll Free 1 888 9 FNP USA 1 888 936 7872 or write to Fisher Paykel Appliances Inc 695 Town Center Drive Suite 180 Costa Mesa CA 92626 1902 USA or contact ...

Страница 57: ......

Страница 58: ......

Страница 59: ......

Страница 60: ...ations in this booklet apply to the specific products and models described at the date of issue Under our policy of continuous product improvement these specifications may change at any time You should therefore check with your Dealer to ensure this booklet correctly describes the product currently available ...

Отзывы: