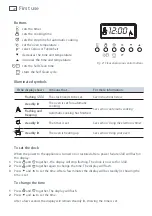
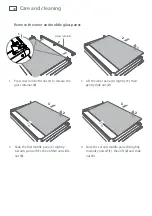
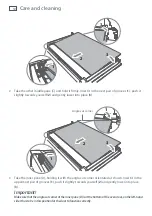
Fisher & Paykel OR90SDBGFPX Скачать руководство пользователя страница 38

36

If a burner does not light

Check that:


The cooker is plugged in and the electricity is switched on.


The gas is turned on.


The gas bottle is not empty (if you are using bottled gas).


You have held down the dial for at least 10 seconds.


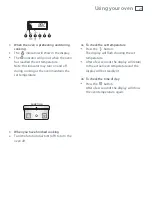
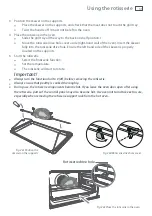
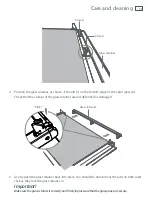
The ignitors are sparking. If the ignitors are not sparking, they may be dirty or wet. Clean them 
with a toothbrush and methylated spirits, as shown in Fig.26.

If the flame is irregular

If the flame is yellow or irregular, check that the burner parts, including the burner cap, are:


clean and dry.


positioned correctly.  See ‘Care and cleaning’. 


See also ‘Cooktop troubleshooting’.

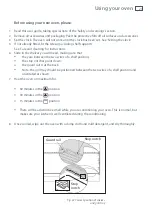
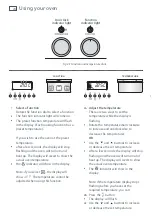
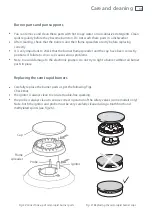
Using your gas cooktop

Flame failure probe

Ignitor

Fig. 26 Cleaning the probe and ignitor

Содержание OR90SDBGFPX

Страница 1: ...NZ AU Installation instructions and User guide Freestanding cooker OR90SDBGFPX models...

Страница 2: ......

Страница 3: ...ng your gas cooktop 34 Care and cleaning 38 Using the Self Clean function 54 Troubleshooting 57 Warranty and service 59 Important SAVETHESEINSTRUCTIONS The models shown in this User Guide may not be a...

Страница 4: ...AGA at www aga asn au This appliance must be installed in accordance with these installation instructions local gas fitting regulations municipal building codes water supply regulations electrical wir...

Страница 5: ...fixed wiring and provide a 3 mm air gap contact separation in all poles in accordance with the local wiring rules In Australia and New Zealand a switch of the approved type with a 3 mm air gap must b...

Страница 6: ...onents burners pan supports or the base when hot Before cleaning turn the cooker off and make sure it is cool Follow the instructions on starting a Self Clean cycle Items made from combustible materia...

Страница 7: ...t be done by children without supervision Do not store things children might want above the oven Children could be burned or injured while climbing on the oven to retrieve items Safe food handling lea...

Страница 8: ...re on Keep handles out of reach of children If the electrical supply cord is damaged it must only be replaced by an authorised person This cooker is not to be used as a space heater especially if it i...

Страница 9: ...n as part of the oven s cooling system Placement of oven shelves always position shelves in the desired location before preheating the oven If a shelf must be removed while the oven is hot do not let...

Страница 10: ...e from the periphery of the nearest burner to any vertical combustible surface is less than 200 mm the surface shall be protected in accordance with the standards to a height of not less than 150 mm a...

Страница 11: ...00 cavity width 900 Fig 1 Dimensions and distances from cooker 240 mm 450 mm Depending on feet adjustment 70 mm 70 mm Locating the area for gas and electrical connection Dotted line showing the positi...

Страница 12: ...p unscrew the two screws holding it in place The cooker is already fitted with four levelling feet Level the cooker by screwing or unscrewing the feet Make sure you follow the instructions in Figs 3a...

Страница 13: ...t rear foot slides under the bracket as shown in Fig 4 4 Access the bracket by removing the drawer Fig 5 a Slide out the drawer completely b Press the lever of the left guide rail down and pull the le...

Страница 14: ...g 8 Correctly lifting the cooker Fig 10 Incorrectly moving the cooker Fixing the backguard Before installing the cooker assemble the backguard C The backguard C can be found packed at the rear of the...

Страница 15: ...to tighten or loosen the connecting pipe Fig 14 Installation with a flexible hose assembly If this appliance has to be installed with a hose assembly the installer shall refer to the network operator...

Страница 16: ...suitable seal Gas inlet pipe Nipple Washer Brass conical adaptor Thread tight use suitable seal Gas pressure regulator Test point adaptor Test point Test point Fig 13 Natural gas connection Fig 12 LP...

Страница 17: ...our Customer Service Centre should be called to obtain the nearest authorized Service Agent Converting to a different gas type This appliance is suitable for use with Natural gas or LPG check the gas...

Страница 18: ...for outer crown J Injector for nner crown J Installation instructions Injector Fig 15 Semi rapid burner Fig 16 Triple ring wok burner Fig 17 Dual burner Injector Injectors for outer crown Injector fo...

Страница 19: ...small flat screwdriver turn the screw see Fig 18 to the correct regulation Inside crown of dual burner 1 Turn on the burner 2 Turn the valve to the MINIMUM position of the inner crown only 3 Take off...

Страница 20: ...h Injector Orifice Dia mm Gas Consumption MJ h Semi rapid 1 17 6 50 0 70 6 30 Triple ring wok 1 54 11 88 0 98 12 00 Dual 0 76 inner crown 16 20 inner and outer crowns operating 0 50 inner crown 16 20...

Страница 21: ...amp C Oven top heating element G Oven grill heating element SI Oven bottom heating element int SE Oven bottom heating element ext CI Oven circular heating element DLM Door lock motor GIR Rotisserie mo...

Страница 22: ......

Страница 23: ...erature dial 4 Function dial 5 Front left triple ring wok burner dial 6 Rear left semi rapid burner dial 7 Central dual burner dial 8 Rear right semi rapid burner dial 9 Front right triple ring burner...

Страница 24: ...and beeping Automatic cooking has finished steadily lit The timer is set See section Using the electronic timer steadily lit The oven is heating up See section Using your oven To set the clock When t...

Страница 25: ...sure that they are between the two wires of a shelf position the stop notches point down the guard rail is at the back Note the grill tray should be positioned between the two wires of a shelf positi...

Страница 26: ...show dEF The temperature cannot be adjusted when using this function 2a Adjust the temperature There are two ways to set the temperature while the display is flashing Rotate the temperature dial cloc...

Страница 27: ...the oven maintains the set temperature 5 When you have finished cooking Turn the function dial to o off to turn the oven off 4a To check the set temperature Press the button The display will flash sho...

Страница 28: ...s the traditional method of cooking It is best to cook on only one shelf at a time in this function Ideal for large cakes and dishes that bake for several hours FAN BAKE The upper and lower heating el...

Страница 29: ...r on the outside See Using the rotisserie SELF CLEAN this is not a cooking function The oven heats to a high temperature reducing food residue to a fine ash that can be wiped out with a damp cloth Imp...

Страница 30: ...delines only Follow the instructions in your recipe or on packaging and be prepared to adjust the oven settings and baking times to achieve the best possible results for you Shelf positions are counte...

Страница 31: ...Function Shelf positions Temp C Time mins Small cakes single shelf Bake 2 180 190 20 30 multi shelf Fan Forced 1 and 3 160 170 30 40 Scones single shelf Bake 2 210 230 15 20 multi shelf Fan Forced 1...

Страница 32: ...the lock studs Push the supports all the way down to lock them in firmly 2 Secure the meat Important Take care the forks are sharp When securing the meat ensure that the skewer goes through the centre...

Страница 33: ...hand wall of the oven Insert the skewer fully into the rotisserie drive hole Ensure the left hand side of the skewer is properly located on the supports 5 Start the rotisserie Select the Rotisserie fu...

Страница 34: ...w the time of day if the oven is off or temperature if the oven is on and will be steadily lit To check the remaining time 3 Press the timer button The timer counts down in minutes hrs min until the l...

Страница 35: ...tting the stop time step 3 above When automatic cooking is set If there is time before cooking starts the oven will turn off and the pre set temperature and 0 A will show in the clock display indicati...

Страница 36: ...ny heat between and but never between and o OFF Dual burner o closed valve OFF maximum flow of inner crown only turn dial clockwise minimum flow of inner crown only turn dial clockwise maximum flow of...

Страница 37: ...r has lit Releasing the dial too soon will extinguish the flame 3 Adjust the flame anywhere between and or and or and positions Do not adjust the flame between or or and o OFF Note If the burner does...

Страница 38: ...s are sparking If the ignitors are not sparking they may be dirty or wet Clean them with a toothbrush and methylated spirits as shown in Fig 26 If the flame is irregular If the flame is yellow or irre...

Страница 39: ...ly Do not use the stand for ordinary flat bottomed saucepans The wok stand MUST BE PLACED ONLY over the pan support for the triple ring or dual burner The cooktop becomes very hot during operation Kee...

Страница 40: ...off any caustic cleaners if they are spilled onto the oven door handle Wipe the outside surfaces often using warm water and a mild household detergent The stainless steel may also be cleaned with a su...

Страница 41: ...cing correctly It is very important to check that the burner flame spreader and the cap have been correctly positioned Failure to do so can cause serious problems Note to avoid damage to the electroni...

Страница 42: ...The probe is always clean to ensure correct operation of the safety valves some models only Note both the ignitor and probe must be very carefully cleaned using a toothbrush and methylated spirits se...

Страница 43: ...or a flat head screwdriver loosen and remove the front fixing screw 2 Slide the side rack clear of the rear lock stud and remove Refitting the side racks 3 Slide the side rack gently so it engages wi...

Страница 44: ...ers instructions Cleaning the grill tray and shelves Clean these in hot soapy water After cleaning slide in the shelves making sure that they are between the two wires of a shelf position the stop not...

Страница 45: ...sure that you fit the side racks the slides to the top wire of a shelf position both sides of each pair of slides both slides on the same level Important Removethesideracksfirsttomakeremovingtheslidin...

Страница 46: ...s the lever on the left guide rail down and the right guide rail up 3 Holding the levers disengage and remove the drawer Do not use excessive force or you may damage the drawer slides Replace the draw...

Страница 47: ...ply wall switch 3 Using a flat head screwdriver twist and lift the retainer clip upwards to release the glass cover Hold the glass cover to prevent it falling 5 Hold the replacement bulb in a soft clo...

Страница 48: ...he glass bumping against any surface This may result in the glass shattering Don t use oven cleaners or any other harsh abrasive cleaners cloths scouring pads steel wool or sharp metal scrapers to cle...

Страница 49: ...flat surface 1b Open the door to its full extent 2 Open the levers on the left and right hinges to their full extent as shown 3 Gently close the door until the left and right hinge levers are hooked t...

Страница 50: ...ase the glass retainer 2 2 Lift the inner pane D slightly 1 then gently slide out 2 1 2 1 2 Glass retainer 3 Slide the first middle pane C slightly towards yourself 1 then lift 2 and slide out 3 4 Sli...

Страница 51: ...es make sure that you replace all three panes correctly as shown Each pane must be in the position described below in order to fit into the door and to ensure that the oven operates safely and correct...

Страница 52: ...into place 3 3 Take the inner pane D holding it with the angle cut corner orientated as shown Insert it in the uppermost pair of grooves 1 push it slightly towards yourself 2 and gently lower into pla...

Страница 53: ...mps of the glass retainer are not deformed or damaged 5 Gently push the glass retainer back into place You should be able to hear the tabs on both sides click as they lock the glass retainer in Import...

Страница 54: ...door to its full extent 2 Insert the hinge tongues into the slots making sure that the notches on both sides drop into place as shown 4a Fully close the levers on the left and right hinges as shown 4b...

Страница 55: ...f Clean cycle see Using the Self clean function wait five minutes the door lock indicator light should turn on after five minutes turn the function dial to O Off IMPORTANT DonotcontinuewiththeSelfClea...

Страница 56: ...not store flammable items in the storage drawer If possible avoid opening the drawer during the cycle or use oven mitts to remove items from the drawer Do not use your oven to clean miscellaneous par...

Страница 57: ...ay discolour the oven surfaces 1c Check the inner glass pane of the oven door D If it has soiling on it eg stains from greasy splatter you will need to clean it manually before starting a Self Clean c...

Страница 58: ...f the door is not shut completely after a few minutes the oven will switch off the display will show Fdor and the oven will beep See Troubleshooting 6 At the end of the Self Clean cycle The oven will...

Страница 59: ...even flame Check the burner parts are clean and dry Check the assembly and make sure the burner cap is sitting flat The flame goes out at low settings The gas supply pressure may be low Check this wit...

Страница 60: ...the oven The display shows Fdor The door has not shut completely Self clean function or the Self Clean function has failed Close the door firmly and try re starting the Self Clean cycle If the displa...

Страница 61: ...or contact us through our website www fisherpaykel com This cooker has been designed and constructed in accordance with the following codes and specifications In New Zealand and Australia AS 4551 App...

Страница 62: ......

Страница 63: ......

Страница 64: ...product specifications in this booklet apply to the specific products and models described at the date of issue Under our policy of continuous product improvement these specifications may change at a...

Отзывы: