background image

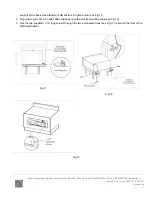
support at the back. See placement dimensions in figure below (see Fig.11).

2. Plug power cord into AC outlet. Slide the body onto the anti-tip mounting clips (see Fig.12).

3. Use the two supplied 1-1/2” long screws through the two embossed holes (see Fig.13) to secure the front of the

Warming Drawer.

Fig.11

Fig.12

Fig.13

https://producthelp.fisherpaykel.com/us/Cook/Built-In_Ovens/Single/OD30WDX2/User_Guide_OD30WDX2/03_installation_in…

Updated: Sun, 14 Jun 2020 18:16:52 GMT

Powered by

5

Содержание OD30WDX2

Страница 1: ...lation Cut Out Dimensions The cabinet depth from the outer edge of the face frame to the inside back of the cabinet or wall should be at least 24 see Fig 04 https producthelp fisherpaykel com us Cook Built In_Ovens Single OD30WDX2 User_Guide_OD30WDX2 03_installation_in Updated Sun 14 Jun 2020 18 16 52 GMT Powered by 1 ...

Страница 2: ...120Volts AC 5 Amp min 15 Amp maximum circuit requirement Fig 04 Wall Cabinet Installation DOUBLE Wall Oven and Warming Drawer Installation SINGLE Wall Oven and Microwave and Warming Drawer Installation Fig 05 https producthelp fisherpaykel com us Cook Built In_Ovens Single OD30WDX2 User_Guide_OD30WDX2 03_installation_in Updated Sun 14 Jun 2020 18 16 52 GMT Powered by 2 ...

Страница 3: ...n or warm 1 To remove the drawer first remove plates trays etc from the drawer 2 Pull the drawer open towards you all the way until it reaches the stop position Fig 07 3 Unlock the drawer by lifting up the tab on the left hand side Fig 08 and pressing down the tab on the right hand side Fig 09 while pulling the drawer open at the same time Fig 10 4 Keep pulling the drawer open until the slides are...

Страница 4: ...net should be made of solid plywood or two 2x4 beam It holds the anti tip mounting clips and supports the weight of Warming Drawer which is 90 lbs see Fig 11 and 12 If two 2 x 4 beams are used the distance between their centers must be 20 to be able to secure the Warming Drawer 1 Use the screws provided and attach the mounting clips They must be installed for anti tip safety to the bottom https pr...

Страница 5: ...ip mounting clips see Fig 12 3 Use the two supplied 1 1 2 long screws through the two embossed holes see Fig 13 to secure the front of the Warming Drawer Fig 11 Fig 12 Fig 13 https producthelp fisherpaykel com us Cook Built In_Ovens Single OD30WDX2 User_Guide_OD30WDX2 03_installation_in Updated Sun 14 Jun 2020 18 16 52 GMT Powered by 5 ...

Страница 6: ...wer push the slides fully inside 2 Position the drawer in front of the cavity and align the slides Fig 14 3 With the slides aligned push the drawer all the way inside Fig 15 When the drawer is re installed the slides may feel stiff and hard to push in This is normal Pull the drawer back out to realign the rollers The drawer should now feel smooth and free Fig 14 Fig 15 https producthelp fisherpayk...

Страница 7: ...x screws The force necessary to open and close the drawer can be changed by adjusting the two flathead screws Fig 16 Fig 16 https producthelp fisherpaykel com us Cook Built In_Ovens Single OD30WDX2 User_Guide_OD30WDX2 03_installation_in Updated Sun 14 Jun 2020 18 16 52 GMT Powered by 7 ...

Отзывы: