background image

INSTALLATION GUIDE / USER GUIDE

GUIDE D’INSTALLATION / GUIDE D’UTILISATION

US CA

PROFESSIONAL RANGE HOOD

HCB30-6, HCB36-6, HCB36-12, HCB48-12

HC36 (Shell) & HC48 (Shell) models

HOTTE PROFESSIONNELLE

Modèles HCB30-6, HCB36-6, HCB36-12, HCB48-12

HC36 (Coque) et HC48 (Coque)

Содержание HC36 Shell

Страница 1: ...UIDE GUIDE D INSTALLATION GUIDE D UTILISATION US CA PROFESSIONAL RANGE HOOD HCB30 6 HCB36 6 HCB36 12 HCB48 12 HC36 Shell HC48 Shell models HOTTE PROFESSIONNELLE Modèles HCB30 6 HCB36 6 HCB36 12 HCB48 12 HC36 Coque et HC48 Coque ...

Страница 2: ...English Page 1 29 Français Page 31 59 ...

Страница 3: ...our website fisherpaykel com or contact your local Fisher Paykel dealer Registration Register your product with us so we can provide you with the best service possible To register your product visit our website fisherpaykel com EN Introduction 3 Safety and warnings 4 Product information 6 Installation preparation 8 Installation instructions 16 Operating instructions 24 Cleaning and maintenance 25 ...

Страница 4: ......

Страница 5: ...er Paykel appliances Our team has spent thousands of hours designing engineering and testing it to make sure you get the perfect product for your home For more information visit our website or for further support contact our customer care team EN ...

Страница 6: ...he risk of fire electric shock or injury to persons observe the following Use this unit only in the manner intended by the manufacturer If you have questions contact the manufacturer For residential use only Before servicing or cleaning unit switch power off at service panel and lock the service disconnecting means to prevent power from being switched on accidentally When the service disconnecting...

Страница 7: ...bilee Peppercorn Beef Flambé Clean ventilating fans frequently Grease should not be allowed to accumulate on fan or filter Use proper pan size Always use cookware appropriate for the size of the surface element WARNING To reduce the risk of injury to persons in the event of a range top grease fire observe the following Smother flames with a close fitting lid cookie sheet or metal tray then turn of...

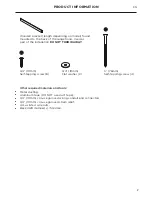
Страница 8: ...48 12 HC36 Shell HC48 Shell models HOTTE PROFESSIONNELLE Modèles HCB30 6 HCB36 6 HCB36 12 HCB48 12 HC36 Coque et HC48 Coque Internal blower including 3 4 19mm screws 4 HCB30 6 1 HCB36 6 1 HCB36 12 2 HCB48 12 2 HC36 48 0 Filters HCB30 2 HCB36 HC36 2 HCB48 HC48 3 Grease trays HCB30 2 HCB36 HC36 2 HCB48 HC48 3 Range hood with light bulbs and 8 203mm duct connection rings installed 1 Wall plug 2 OD x ...

Страница 9: ...us listed wire nuts Back draft damper s if desired 3 76mm Self tapping screw 4 3 4 19mm Self tapping screw 8 d e g 8 x 3 4 Truss Head Philips Drive Self Tapping Screw 20 x Pan Head Philips Drive Machine Screw M4 x8 Pan Head Torx Drive Machine Screw 10x 3 Countersunk Pozidrive Self tapping Screw OD x 3 16 ID Flat Washer 10 32 Pan Head Pozi Drive Wall Plug 8 x 3 4 Truss Head Philips Drive Self Tappi...

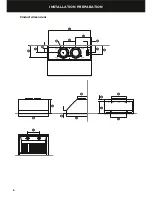
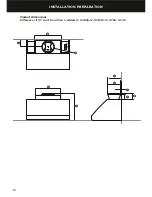
Страница 10: ...8 INSTALLATION PREPARATION Product dimensions P O Q A B I C D S R K T E F M N G L J H ...

Страница 11: ...8 18 7 8 480 K Distance between wall mounting slots 17 5 8 448 17 5 8 448 17 5 8 448 17 5 8 448 L Distance between under cabinet mounting slots 28 7 8 734 34 7 8 886 34 7 8 886 46 7 8 1191 M Distance from wall to rear under cabinet mounting slots 2 5 8 66 2 5 8 66 2 5 8 66 2 5 8 66 N Distance from wall to front under cabinet mounting slots 9 11 16 246 9 11 16 246 9 11 16 246 9 11 16 246 O Dimensio...

Страница 12: ...10 INSTALLATION PREPARATION Product dimensions Differences if 10 duct transition is added to HCB36 12 HCB48 12 HC36 HC48 350 00 A B G D J C H E F I ...

Страница 13: ...eter 10 254 E Height of transition outlet pipe above range hood 5 128 F Height of transition body above range hood 3 3 4 95 G Width of transition body 21 3 4 552 H Depth of transition body 10 7 16 256 I Distance from back edge of cooktop to transition body 1 1 16 26 J Distance from centre of outlet to wall 6 1 4 159 IMPORTANT Actual product dimensions may vary by 1 16 2mm Please read the entire in...

Страница 14: ... details of the required installation height of the range hood This range hood must be installed no lower than the minimum height indicated in the table below Minimum installation height may be greater if required by the cooktop manufacturer Installation at the minimum height will improve the efficiency of capturing cooking odors grease and smoke Installation at the maximum recommended height impr...

Страница 15: ... Y Z Where A Installation height W Ceiling height X Cooktop surface height Y Range hood height Z Duct cover height if desired Example A Installation height 96 36 18 12 30 Example A Installation height 2438mm 914mm 457mm 305mm 762mm Hood height 18 457mm Installation height 30 to 42 762 to 1067mm recommended Cooking surface height 36 914mm Ceiling height 8ft 96 2438mm Duct cover height 6 or 12 152 o...

Страница 16: ...ore placing them onto the range hood and completing step 2 Duct transition The range hood is supplied with individual duct connection rings that connect to 8 208mm ducting refer to B An optional transition may be ordered separately please refer to Parts and accessories for details This can be mounted to the top of the range hood to provide a single 10 254mm outlet For wall mounting installation th...

Страница 17: ...llation with the range hood assemble the kit to the range hood prior to installation See instructions supplied with the kit for assembly to your range hood WARNING To avoid any electrical shock the installation of the infra red heat lamp and panel kit should be done by a qualified electrician and before starting the installation of the range hood EN ...

Страница 18: ... or electric shock do not use this fan with any solid state speed control device Venting requirements CAUTION To reduce risk of fire and to properly exhaust air be sure to duct air outside Do not vent exhaust air into spaces within walls or ceilings or into attics crawl spaces or garages The range hood can be installed to operate with the exhaust air ducted externally from the kitchen Use the shor...

Страница 19: ...e in accordance with these instructions may result in electrical hazards When cutting or drilling into wall or ceiling do not damage electrical wiring and other hidden utilities IMPORTANT Wear gloves to protect against sharp edges The manufacturer is not liable for any damage caused by not following these instructions Before you start installation Ensure you have read the Installation preparation ...

Страница 20: ...to use for mounting the wooden bracket refer to C 5 Align the top of the wood bracket along the horizontal line drawn in step 1 Align the centerlines of the bracket and cooktop refer to A 6 Drill a 3 76mm deep 1 8 3mm hole through the wooden bracket drywall and into the stud 7 Use the 3 76mm screws to attach the bracket to the wall refer to A For support of longer range hoods use three or four stu...

Страница 21: ... into the wooden bracket 4 Drill a 3 8 9 5mm hole through the center of the holes indicated in H into the wall Insert two wall plugs into the drilled holes Tighten the range hood to the wall plugs by installing the 3 4 19mm washers onto the screws supplied with the wall plug then tighten 5 Attach the duct to the 10 254mm transition or the 8 203mm duct rings and screws not supplied and seal with al...

Страница 22: ... the underside of your cabinet 3 At either end of L draw two lines one at distance M from the wall the other one at distance N from the wall This will give you the 4 positions for the screw holes Note Allow space for the power conduit and ducting attachment in the cabinetry base 4 In the base of the cabinet drill 1 8 3mm holes as marked 5 Screw four 3 4 19mm screws leaving 1 4 6mm of the screw exp...

Страница 23: ... 3 4 19mm screws provided 4 Lift the blower into the range hood fit the rear of the blower plate onto the mounting bracket 5 Lift the front of blower upwards until the screws enter the keyhole slots on the blower plate 6 Push the blower away from you to the rear of the range hood and tighten the 1 2 12 7mm screws to secure the blower to the range hood Inline blower connection HC36 and HC48 range h...

Страница 24: ...he junction box cover as shown below 3 Remove knockouts as required and install a cULus listed 3 4 19mm wiring conduit and conduit connector or strain relief in the junction box 4 Run three wires for the power supply through the 3 4 19mm strain relief or conduit from the power supply to junction box Tighten the strain relief 5 Connect the power supply wires to the range hood wires in the following...

Страница 25: ...23 INSTALLATION INSTRUCTIONS Wiring diagram EN ...

Страница 26: ...e hood light on or off Adjust the light levels from LOW to HIGH General operating information The range hood should be turned on for a few minutes before cooking To establish air currents up ward through the range hood Help remove hot air from your kitchen and keep the range hood surface cool When heat smoke moisture grease and cooking odors are produced they will be carried outside instead of dri...

Страница 27: ...ote In areas of high humidity or coastal environments cleaning should be carried out more frequently Filters and grease trays Filters and grease tray should be cleaned at least once a month Filters and grease trays should be removed and cleaned with hot soapy water or in a dishwasher If washed in a dishwasher the filter and grease tray should be placed in an upright position After cleaning and dry...

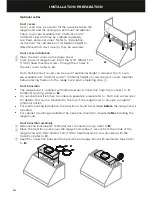
Страница 28: ...rease tray tilted down as you insert it lower the back of the grease tray into the range hood track 2 Ensure the bottom of the grease tray is seated flat in the range hood track To replace the filters 1 Hold the filter by the knobs 2 Insert the front of the filter into the front track of the range hood and slide toward you refer to C 3 Lift the back of the filter up and lower it into the grease tr...

Страница 29: ...efore calling a service representative Replacing the infra red heat lamp optional accessory WARNING To avoid any electrical shock the installation of the infra red heat lamp and panel kit should be done by a qualified electrician and before starting the installation of the range hood Optional infra red heat lamp panel can be ordered separately and mounted into your range hood see the Parts and acc...

Страница 30: ...2 305mm high 50093 36 Duct cover 12 305mm high 50077 48 Duct cover 12 305mm high 50079 OD x 3 16 ID Flat Washer 10 32 Pan Head Pozi Drive Wall Plug 8 x 3 4 Truss Head Philips Drive Self Tapping Screw 20 x Pan Head Philips Drive Machine Screw M4 x8 Pan Head Torx Drive Machine Screw 10x 3 Countersunk Pozidrive Self tapping Screw FP Pro Hood Fasteners 2 x Halogen light bulbs 120V 50W Filters 11 7 8 3...

Страница 31: ...Manufacturer s Warranty and contacts for servicing please refer to your separate service and warranty book provided with your range hood Complete and keep for safe reference Model Serial No Purchase Date Purchaser Dealer City State Zip Country EN ...

Страница 32: ......

Страница 33: ...tre site Web fisherpaykel com ou contacter votre détaillant Fisher Paykel local Enregistrement Enregistrez votre produit afin que nous puissions vous offrir un service de la meilleure qualité possible Pour enregistrer votre produit visitez notre site Web fisherpaykel com FR Introduction 33 Consignes de sécurité et mises en garde 34 Informations sur le produit 36 Préparation pour l installation 38 ...

Страница 34: ......

Страница 35: ...e a consacré des milliers d heures à la conception l ingénierie et la mise à l essai afin de vous offrir le produit idéal pour votre maison Pour plus d informations visitez notre site Web pour une assistance supplémentaire communiquez avec notre équipe de service à la clientèle FR ...

Страница 36: ...tilation générale Ne pas utiliser pour l évacuation de matières ou de vapeurs dangereuses ou explosives MISE EN GARDE Pour réduire les risques d incendie de choc électrique ou de blessures respectez ces consignes Utilisez cet appareil uniquement de la manière prévue par le fabricant Pour toute question communiquez avec le fabricant Pour une utilisation résidentielle uniquement Avant de procéder à ...

Страница 37: ...hauffez les huiles lentement à feu doux ou moyen Allumez toujours la hotte lorsque vous cuisinez à feu vif ou faites flamber des aliments par ex crêpes Suzette cerise jubilé steak au poivre flambé Nettoyez fréquemment les ventilateurs Ne laissez jamais la graisse s accumuler sur le ventilateur ou le filtre Utilisez des récipients de taille appropriée Utilisez toujours des plats de cuisson adaptés ...

Страница 38: ...D UTILISATION US CA PROFESSIONAL RANGE HOOD HCB30 6 HCB36 6 HCB36 12 HCB48 12 HC36 Shell HC48 Shell models HOTTE PROFESSIONNELLE Modèles HCB30 6 HCB36 6 HCB36 12 HCB48 12 HC36 Coque et HC48 Coque Ventilateur interne incluant les vis de 3 4 po 19 mm 4 HCB30 6 1 HCB36 6 1 HCB36 12 2 HCB48 12 2 HC36 48 0 Filtres HCB30 2 HCB36 HC36 2 HCB48 HC48 3 Plateaux à graisse HCB30 2 HCB36 HC36 2 HCB48 HC48 3 Ho...

Страница 39: ...puchons de connexion homologués cULus Clapet s anti refoulement d air si nécessaire s Vis autotaraudeuse de 3 po 76 mm 4 Vis autotaraudeuse de 3 4 po 19 mm 8 d e g 8 x 3 4 Truss Head Philips Drive Self Tapping Screw 20 x Pan Head Philips Drive Machine Screw M4 x8 Pan Head Torx Drive Machine Screw 10x 3 Countersunk Pozidrive Self tapping Screw OD x 3 16 ID Flat Washer 10 32 Pan Head Pozi Drive Wall...

Страница 40: ...38 INSTALLATION INSTRUCTIONS PRÉPARATION POUR L INSTALLATION Dimensions du produit P O Q A B I C D S R K T E F M N G L J H ...

Страница 41: ...s de montage au mur 17 5 8 po 448 17 5 8 po 448 17 5 8 po 448 17 5 8 po 448 L Distance entre les fentes de montage sous l armoire 28 7 8 po 734 34 7 8 po 886 34 7 8 po 886 46 7 8 po 1 191 M Distance entre le mur et les fentes arrière de montage sous l armoire 2 5 8 po 66 2 5 8 po 66 2 5 8 po 66 2 5 8 po 66 N Distance entre le mur et les fentes avant de montage sous l armoire 9 11 16 po 246 9 11 16...

Страница 42: ...ALLATION INSTRUCTIONS PRÉPARATION POUR L INSTALLATION Dimensions du produit Différences lorsqu une transition de conduit de 10 po est ajoutée au modèle HCB36 12 HCB48 12 HC36 ou HC48 350 00 A B G D J C H E F I ...

Страница 43: ... E Hauteur du tuyau de sortie de transition au dessus de la hotte 5 po 128 F Hauteur du corps de transition au dessus de la hotte 3 3 4 po 95 G Largeur du corps de transition 21 3 4 po 552 H Profondeur du corps de transition 10 7 16 po 256 I Distance entre le rebord arrière de la surface de cuisson et le corps de transition 1 1 16 po 26 J Distance entre le centre de la sortie et le mur 6 1 4 po 15...

Страница 44: ...étails sur la hauteur d installation requise de la hotte Cette hotte ne doit pas être installée à une hauteur inférieure à la hauteur minimale indiquée dans le tableau ci dessous La hauteur d installation minimale peut être supérieure si cela est requis par le fabricant de la surface de cuisson L installation à la hauteur minimale améliore l efficacité de l appareil pour l élimination des odeurs d...

Страница 45: ...uteur du plafond X Hauteur de la surface de cuisson Y Hauteur de la hotte Z Hauteur du panneau de recouvrement de conduit si nécessaire Exemple A Hauteur d installation 96 po 36 po 18 po 12 po 30 po Exemple A Hauteur d installation 2 438 mm 914 mm 457 mm 305 mm 762 mm Hauteur de la hotte 18 po 457 mm Hauteur d installation 30 po à 42 po 762 à 1 067 mm recommandée Hauteur de la surface de cuisson 3...

Страница 46: ... po 305 mm Vissez ensemble les panneaux de recouvrement de conduit avant de les placer sur la hotte et de terminer l étape 2 Transition de conduit La hotte est fournie avec des anneaux individuels de raccordement de conduit permettant le raccordement à un conduit de 8 po 208 mm reportez vous à B Une transition optionnelle peut être commandée séparément veuillez vous reporter à Pièces et accessoire...

Страница 47: ...semblez l ensemble avec la hotte avant l installation Consultez les instructions fournies avec l ensemble pour l assemblage avec votre hotte MISE EN GARDE Pour éviter toute électrocution faites installer l ensemble de panneau et lampe infrarouge par un électricien qualifié avant de commencer l installation de la hotte FR PRÉPARATION POUR L INSTALLATION FR ...

Страница 48: ...ques d incendie ou de choc électrique n utilisez pas ce ventilateur avec un dispositif de contrôle de vitesse à semi conducteurs Exigences relatives à l évacuation ATTENTION Pour réduire les risques d incendie et évacuer l air adéquatement assurez vous d évacuer l air vers l extérieur N évacuez pas l air dans les murs plafonds greniers vides sanitaires ou garages La hotte peut être installée de ma...

Страница 49: ...de fixation conformément à ces instructions peut entraîner des risques de choc électrique Au moment de couper ou percer le mur ou le plafond veillez à ne pas endommager le câblage électrique ou les conduites qui y sont dissimulés IMPORTANT Portez des gants pour vous protéger des rebords tranchants Le fabricant n est pas responsable des dommages résultant du non respect de ces instructions Avant de...

Страница 50: ... les montants derrière la cloison sèche en utilisant un détecteur de montant Localisez un montant d un côté ou l autre de la ligne centrale de la surface de cuisson afin de l utiliser pour le montage du support en bois reportez vous à C 5 Alignez le dessus du support en bois le long de la ligne horizontale tracée à l étape 1 Alignez les lignes centrales du support et de la surface de cuisson repor...

Страница 51: ...de 3 4 po 19 mm dans les fentes avec encoche en trou de serrure 3 Depuis l intérieur de la hotte vissez quatre ou six vis de 3 4 po 19 mm selon le modèle dans les trous indiqués reportez vous à G dans le support en bois 4 Percez dans le mur un trou de 3 8 po 9 5 mm au centre des trous indiqués dans H Insérez deux chevilles murales dans les trous percés Fixez la hotte aux chevilles murales en insta...

Страница 52: ...e M à partir du mur l autre à la distance N à partir du mur Cela vous donnera les 4 positions pour les trous de vis Remarque Laissez un espace pour le conduit d alimentation électrique et la fixation du conduit dans la base de l armoire 4 Dans la base de l armoire percez des trous de 1 8 po 3 mm aux endroits marqués 5 Vissez quatre vis de 3 4 po 19 mm en laissant dépasser 1 4 po 6 mm de la vis pou...

Страница 53: ...otte et installez la partie arrière de la plaque du ventilateur sur la pièce de fixation 5 Soulevez vers le haut la partie avant du ventilateur jusqu à ce que les vis entrent dans les fentes avec encoche en trou de serrure sur la plaque du ventilateur 6 Poussez le ventilateur vers l arrière de la hotte et serrez les vis de 1 2 po 12 7 mm pour fixer le ventilateur à la hotte Raccordement du ventila...

Страница 54: ...e de jonction comme illustré ci dessous 3 Retirez les alvéoles défonçables nécessaires et installez un conduit de câblage homologué cULus de 3 4 po 19 mm et un raccord de conduit ou serre câble dans la boîte de jonction 4 Faites passer trois fils d alimentation dans le serre câble ou conduit de 3 4 po 19 mm de l alimentation électrique à la boîte de jonction Serrez le serre câble 5 Connectez les f...

Страница 55: ...53 Schéma de câblage INSTRUCTIONS D INSTALLATION FR ...

Страница 56: ...d allumer ou éteindre la lumière de la hotte Permet de régler le niveau d éclairage à LOW ou HIGH Informations d utilisation générales La hotte doit être mise en marche quelques minutes avant la cuisson Pour établir les courants d air vers le haut dans la hotte Pour aider à éliminer l air chaud de votre cuisine et garder la surface de la hotte froide Lorsque de la chaleur de la fumée de l humidité...

Страница 57: ... les régions où l humidité est élevée ou les environnements côtiers le nettoyage doit être effectué plus fréquemment Filtres et plateaux à graisse Les filtres et plateaux à graisse doivent être nettoyés au moins une fois par mois Les filtres et plateaux à graisse doivent être retirés et nettoyés avec de l eau savonneuse et chaude ou dans un lave vaisselle Si vous les lavez au lave vaisselle vous d...

Страница 58: ...nt que vous l insérer puis abaissez la partie arrière du plateau à graisse dans le rail de la hotte 2 Assurez vous que la partie inférieure du plateau à graisse repose à plat dans le rail de la hotte Pour réinstaller les filtres 1 Saisissez le filtre par les boutons 2 Insérez le devant du filtre dans le rail avant de la hotte puis glissez le vers vous reportez vous à C 3 Soulevez la partie arrière...

Страница 59: ... ampoules sont insérées correctement avant d appeler un représentant de service Remplacement de la lampe infrarouge accessoire en option MISE EN GARDE Pour éviter toute électrocution faites installer l ensemble de panneau et lampe infrarouge par un électricien qualifié avant de commencer l installation de la hotte Le panneau de lampe infrarouge en option peut être commandé séparément et fixé sur v...

Страница 60: ...po 152 mm 50078 Panneau de recouvrement de conduit de 30 po hauteur de 12 po 305 mm 50093 Panneau de recouvrement de conduit de 36 po hauteur de 12 po 305 mm 50077 Panneau de recouvrement de conduit de 48 po hauteur de 12 po 305 mm 50079 OD x 3 16 ID Flat Washer 10 32 Pan Head Pozi Drive Wall Plug 8 x 3 4 Truss Head Philips Drive Self Tapping Screw 20 x Pan Head Philips Drive Machine Screw M4 x8 P...

Страница 61: ...cant et les coordonnées pour le service veuillez vous reporter au manuel d entretien et de garantie distinct fourni avec votre hotte Remplir et conserver pour référence ultérieure Modèle N de série Date d achat Acheteur Détaillant Ville État Province Code postal Pays FR ...

Страница 62: ......

Страница 63: ......

Страница 64: ...Dealer to ensure this booklet correctly describes the product currently available Fisher Paykel Appliances 2017 Tous droits réservés Les caractéristiques de produit présentées dans ce livret s appliquent aux modèles et produits spécifiques qui y sont décrits à la date de publication Dans le cadre de notre politique d amélioration en permanence de nos produits ces caractéristiques peuvent être modi...

Отзывы: