


9
6
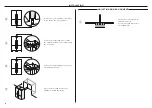
Adjust front feet of both appliances
until level.
Turn clockwise to decrease height or
anti-clockwise to increase height.
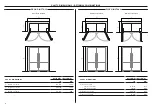
7
At the top of each appliance,
remove the three screw caps using
a flat-blade screwdriver.
9
Ensure both appliances are level and
aligned before securing the second
appliance to the rear bracket using
three 8x16 screws.
Replace both rear compartment covers
using a Phillips screwdriver.
8
Align the front upper bracket to the
screw holes.
Secure by partially engaging the
5x20 screws.
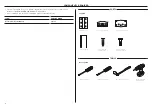
INSTALLATION
!3
Open both doors for easy access to
the center join.
!1
!2
Remove the leveling feet from both
appliances using a socket wrench by
rotating them anti-clockwise.
Remove the mounting bolts and
washers, and set aside.
Align the front lower bracket to the
spaces created by removing the leveling
feet.
Ensure the bracket is correctly oriented
as illustrated.
Secure using the leveling feet and
mounting bolts before lowering the
appliances carefully.
Leveling
feet
!0
Carefully tilt the connected appliances
backwards to access the rear feet and
the lower front bracket location.
IMPORTANT!
Two people required.
Front
lower
bracket
Washers
Mounting
bolts