background image


1. 

Getting Started………………………………………………………………………………4


1.1 

USB handset outlook………………………………………………………………………4


1.2 

Charging the Battery…………………………………………………………………….…5


1.3 

Switch the wireless handset On / Off…………………………………………………...6


1.4 

LCD outlook


………………………………………………………………………………..6


1.5 

Icon indications (PC side) ………………………………………………………………..7


1.6 

LED light indication for the USB Dongle………………………………………………7


2   

Driver Installation and Handset Set ups. ………………………………………………8


2.1 

Driver Installation…………………………………………………………………………..8


2.1.1

 Step-by-Step Driver installations


…………………………………………………..…8


2.1.2. 

Synchronization between PC and handset………………..………………………10


2.1.3 

Manual Synchronize name lists between PC and handset


………………….…11


3. 

Using the wireless USB handset………………………………………………………...12


3.1 

Basic operating functions ……………………………………………………………….12       

3.1.1

 Volume setup……………………………………………………………………………..12


3.1.2

 Skype

TM

 User Status setup…………………………………………………...………..13 


3.1.3 

Language Setup……………………………………………………………………….…14


3.1.4 

Ring Tone Setup………………………………………………………………………….15


3.1.5 

Ring Volume Setup………………………………………………………………………16


3.1.6 

LCD Contrast Setup……………………………………………………………………..17


3.1.7 

LCD backlight time Setup………………………………………………………………18


3.1.8

 Factory Default Setup……………………………………………………………………19


3.1.9 

Update list - Synchronize name list with PC…………………………………………20


3.1.10

 Paring up - USB phone and Dongle………………………………………….………21


3.2 

Using Skype

TM

 to make calls…………………………………………………………..…22


3.2.1

 Making calls from Name lists in handset…………………………………………..…22


3.2.1.1 

Contact person status……………………………………………………………....…24


3.2.2 

Making Conference calls from name lists in handset………………………..….…24


3.2.3 

Making Skype

TM

 Out from handset…………………………………………………….26


3.2.4

 Making Speed dial from handset


………………………………………………...…….27


3.3

 Using Handset to remote control Skype

TM

 software………………………….....……28 


3.4

 Calling History……………………………………………………………………………….29 

4

 Using Utility Control……………………………………………………….………………….30


4.1

 Utility control panel………………………………………………………………………....30


4.1.1

 Device Setup………………………………………………………………………….....…30 


4.1.2 

Favorite Website………………………………………………………………………...…31 


Содержание 07D200N

Страница 1: ...ypeTM User Status setup 13 3 1 3 Language Setup 14 3 1 4 Ring Tone Setup 15 3 1 5 Ring Volume Setup 16 3 1 6 LCD Contrast Setup 17 3 1 7 LCD backlight time Setup 18 3 1 8 Factory Default Setup 19 3 1 9 Update list Synchronize name list with PC 20 3 1 10 Paring up USB phone and Dongle 21 3 2 Using SkypeTM to make calls 22 3 2 1 Making calls from Name lists in handset 22 3 2 1 1 Contact person statu...

Страница 2: ...2 5 Assigning PC Audio to PC Speakers 32 6 Package and accessories 33 7 Technical Specification 34 8 Technical problem Q A 35 ...

Страница 3: ... reach of children The rechargeable battery must be disposed of properly and may need to be recycled Refer to your battery s label for battery type Contact your local recycling center for proper disposal methods Disposal of the device Some of the product material can be reuse if you bring them to a recycling point Please contact your local authorities in case you need more information on the colle...

Страница 4: ...tep by step instructions for using the wireless USB headset 1 1 USB handset outlook 1 LCD Display 2 SkypeTM Tab Select Button 3 Answer Call Hold History Button 4 Numeric Mute Keys 5 Menu Exit Button 6 Up Down Name List Speaker Volume Control 7 Power On Off Call Ending Delete Button 3 2 1 4 5 6 7 ...

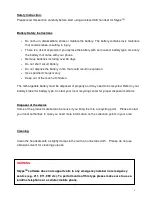
Страница 5: ...ated See below c Your PC or notebook must be in Power on status d Plug the USB cord charger into the Wireless SkypeTM phone and connect to the USB jack of your PC or notebook OPTIONAL Place the USB Wireless Phone on the charging cradle Connect the USB cord in the back of the cradle to start charging While charging the battery indicator bar will show the progress of charging in the LCD display Batt...

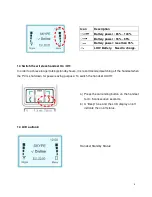
Страница 6: ... In order to achieve longer talking standby hours it is recommended switching off the handset when the PC is shut down for power saving purpose To switch the handset On Off a Press the call ending button on the handset for 3 5 consecutive seconds b A Beep tone and the LCD display on off indicate the on off status 1 4 LCD outlook Handset Standby Status ...

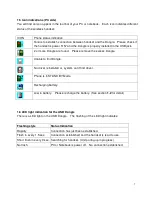
Страница 7: ... Unable to find Dongle No driver is installed or system can t find driver Phone is in STAND BY Mode Recharging battery Low in battery Please recharge the battery See section 1 2 for detail 1 6 LED light indication for the USB Dongle There is a LED light on the USB Dongle The flashing of the LED light indicates Flashing style Status Indication Rapidly Connection has just been established Flash in e...

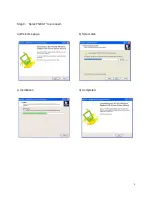
Страница 8: ...t the driver must be installed first Please follow the installation procedures appear in the PC screen 2 1 1 Step by Step Driver installations Step1 Please follow below indicated procedures to install the Driver for wireless USB handset Step 2 Select language Language is preset following the language set in the windows OS If the windows preset language is not recognizable the language in this sele...

Страница 9: ...9 Step 3 Select NEXT to proceed a Welcome page b Select disk c Installation d Completed ...

Страница 10: ...2 Synchronization between PC and handset Once the driver is installed and the SkypeTM program has been properly set Section 2 1 1 please connect the dongle to your PC Laptop for phone set up PC side will show this icon if dongle is not plug in PC side will show this icon if dongle is plug in Remark a Please make sure the wireless handset is in Power ON status see 1 3 for detail ...

Страница 11: ... b Synchronization successful 2 1 3 Manually Synchronize name lists between PC and handset Manual synchronization can also be done by following steps Also refer to Section3 1 9 Remark Please DO NOT remove dongle nor power off handset while Sync is in process Remark It will take few seconds for handset to completed name list updating Remark Please ensure SkypeTM program Driver dongle and handset ar...

Страница 12: ... and Microphone volume can be adjusted by the following steps a Press Menu to enter Menu mode b Scroll up and down to Volume and press Select c Using Up and Down key for adjusting Speaker and Microphone volume Press Next to select device or Exit to exit Remark The Volume may also be adjusted when there is a call in progress While on the call press UP DOWN button to adjust ...

Страница 13: ...s a Press Menu to enter Menu mode b Scroll up and down to User Status and press Select c Using Up Down key for modifying the user s status Press Select to confirm or Exit to exit Remark In order to select the user status please ensure that SkypeTM program driver handset and dongle are in operative status ...

Страница 14: ... steps a Press Menu to enter Menu mode b Scroll up and down to Language and press Select c Using Up Down key for selecting the languages pre set in the handset Press Select to conform or Exit to exit Remark The language in the language setup functions is pre set function by OEM customers ...

Страница 15: ...15 kinds of ring tone can be selected by the following steps a Press Menu to enter Menu mode b Scroll up and down to Ring tone and press Select c Using Up and Down key for ring tone selection Press Set to select or Exit to exit ...

Страница 16: ...p The Ring tone volume can be modified the following steps a Press Menu to enter Menu mode b Scroll up and down to Ring Volume and press Select c Using Up and Down key for ring tone selection Press Set to select or Exit to exit ...

Страница 17: ...17 3 1 6 LCD Contrast setup a Press Menu to enter Menu mode b Scroll up and down to Contrast and press Select c Using Up and Down key ring tone selection Press Set to select or Exit to exit ...

Страница 18: ...18 3 1 7 LCD backlight time setup a Press Menu to enter Menu mode b Scroll up and down to Back light and press Select c Using Up and Down key to adjust time duration Press Set to set or Exit to exit ...

Страница 19: ...9 3 1 8 Factory Default setup If you wish to return to the factory default settings please do the following steps a Press Menu to enter Menu mode b Scroll up and down to Factory Default and press Select ...

Страница 20: ...rent from the name list on the SkypeTM software please do the following steps to synchronize the name lists a Press Menu to enter Menu mode b Scroll up and down to Update list and press Select c Updating indicated update on progress Remark Please ensure SkypeTM program Driver dongle and handset are in operative status ...

Страница 21: ...se two devices Please do the following steps for paring up a Press Menu to enter Menu mode b Scroll up and down to Relink and press Select c A timer indicated update on progress Remark Please ensure SkypeTM program Driver dongle and handset are in operative status Do not remove Dongle or Power off handset when pairing up is in progress ...

Страница 22: ... name list a Return to the following page b Press Up Down key to enter phone book Remark The handset only display name lists which is stored in your SkypeTM account If the name lists are not the same please refer to section 3 1 9 for name list synchronization WARNING SkypeTM software does not support calls to any emergency number nor emergency service e g 211 911 999 etc To perform calls of this t...

Страница 23: ... in progress f Hang up by press End call Remark 1 The Volume may also be adjusted when there is a call in progress While on the call press UP DOWN button to adjust 2 While phone call in progress the following buttons have designated functions Button Hold un Hold Button Microphone Mute un Mute ...

Страница 24: ...n Description Icon Description Online Exit Not available Offline Do Not Disturb Away Hide Invisible Pre set telephone number 3 2 2 Making Conference calls from name lists in handset Follow the following steps to host a multi users conference call a Return to the following page b Press Up Down key to enter phone book Press Mark for con call members ...

Страница 25: ...ers are marked press to call More button will show con calls details e Conference call details as shown f Using Up Down key to highlight the caller you wish to hang up and press to terminate the caller Press Exit to the main page g Press Cancel to hang up all calls in conference call section ...

Страница 26: ...r side to pick up d Call in progress e Hang up by Press End call WARNING SkypeTM software does not support calls to any emergency number nor emergency service e g 211 911 999 etc To perform calls of this type please make sure to use a landline telephone or a cellular mobile phone Remark You must have SkypeTM Out credit to active this function For more SkypeTM out information please visit www Skype...

Страница 27: ...nd the most useful dialing method offered by the SkypeTM Simply follow the SkypeTM speed dial section to preset the desire name list a Return to the following page b Press pre set speed dial number you wish to call Call to dial out Clear for back spacing c Speed dial in progress ...

Страница 28: ...e handset is able to remote control the SkypeTM program in PC side while SkypeTM software is running properly in PC side a Return to the following page b Press SkypeTM key to activate remote control function c press the SkypeTM key to select SkypeTM Tab in PC ...

Страница 29: ...29 3 4 Calling History This function allows users to check calling history a Press bottom in the following page b Select desire function by pressing Up Down c Press Select for details ...

Страница 30: ...ion Use the Mouse to complete the setups USB Phone Volume Adjustment a Using the Mouse to select the sound device b Press the Mouse to volume up down the speaker and Microphone volume SkypeTM Audio Devices Refer to section 5 Please set both output and input device in the SkypeTM Audio Device section to USB Phone to get the proper USB Phone function If you connect your speaker with your computer un...

Страница 31: ...nd quick access into the designate website Follow the simple steps of programming your favor websites as below a Set your favor website by entering the Name and Website address in the designated column and click Save b Access the pre set web address by pointing at the highlighted word ...

Страница 32: ...the music or video files used to be played through your speakers or stereo headset that are connected to the original sound card in your PC once the USB handset is plugged in To allow music and sound effect be played through the original speakers you must reset audio output device of your PC 1 Refer for to section 4 1Utility Control Panel 2 To adjust the SkypeTM Audio Device select the desire devi...

Страница 33: ...ce 5 If you wish to have proper sound out from your original speaker select your system build in sound card See below Picture B 6 Package and accessories You will find the package contains Wireless phone for SkypeTM x 1 pc USB Dongle x 1 pc Driver CD x 1 pc Rechargeable Battery x 1 pc USB recharge cord x 1 pc Charging Cradle x 1 pc Optional QIG x 1 pc Picture B ...

Страница 34: ...MHz 2 Channel Number 34 Channel s 3 Operation range 30 Meter at free space C Phone Specification 1 Speaker 32 ohm 500mW Max Frequency response 300Hz 3400Hz 2 Microphone Condenser microphone 42dB 3dB 20Hz 20 000Hz 3 Connection type USB connector for battery charger Version 1 1 2 0 4 LCD display Size 30 mm x24 mm Pixel 101 x 79 dots Menu Support language Chinese English Multi languages with content ...

Страница 35: ...s no Driver install or the driver is not activated in the PC side Bad wireless internet connection Please re install the Driver using CD Rom or activate the driver again Check your internet connection again The LCD display shows S on the left hand corner what does it mean The S indicates that the SkypeTM program in the PC side has been log out or not activated Please re run the SkypeTM program in ...

Страница 36: ...ipment off and on the user is encouraged to try to correct the interference by one of the following measures Reorient or relocate the receiving antenna Increase the separation between the equipment and receiver Connect the equipment into an outlet on a circuit different from that to which the receiver is connected Consult the dealer or an experienced radio TV technician for help FCC Caution Any ch...

Страница 37: ...36 Product name Wired USB Phone for Skype TM Software version V 3 0 0 1 www xfone biz 2007 FirstCom Technology Co Ltd ...

Отзывы: