


DO
NOT
touch
hot
parts
and
AVOID
hot
exhaust
gases
.
Allow
equipment
to
cool
before
touching
.
Keep at least 5 feet (1.5 m) of clearance on all
sides of generator including overhead.
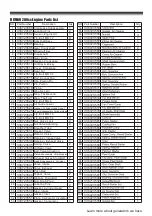
Replacement parts must be the same and
installed in the same position as the original
parts.
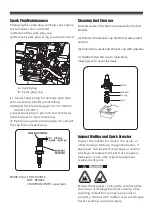
Clean
or
replace
spark
arrester
as
follows
:
1. Allow the engine to cool completely before
servicing the spark arrester.
2. Remove the screws securing the spark arrester
in place and the remove it from muffler.
3. Carefully remove the carbon deposits from
the spark arrester screen with a wire brush.
Failure to clean the spark arrester will result in
degraded engine performance.
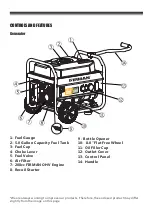
Generator Maintenance
Make certain that the generator is kept clean
and stored properly. Only operate the unit on
a flat, level surface in a clean, dry operating
environment.
DO NOT
expose the unit to
extreme conditions, excessive dust, dirt,
moisture or corrosive vapours.
DO NOT
use a garden hose to clean the generator.
Water can enter the generator through the cooling
slots and damage the generator windings.
Use a damp cloth to clean exterior surfaces of
the generator.
Use a soft bristle brush to remove dirt and oil.
Use an air compressor (25 PSI) to clear dirt and
debris from the generator.
Inspect all air vents and cooling slots to ensure
that they are clean and unobstructed.
•
•
•
•
Depending on the type fuel used ,the type and
amount of lubricant used, and/or your operating
conditions, the exhaust part and muffler may
become blocked with carbon deposits. If you
notice power loss, you may need to remove these
deposits to restore performance.
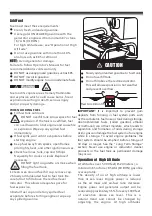
CAUTION
CAUTION
4. Replace the spark arrester if it is damaged.
5. Position the spark arrester in the muffler and
attach with the screws.
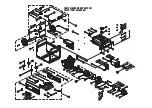
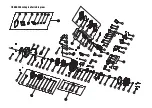
Spark arrester
screen
Flange
Screw
SERVICE AND STORAGE
Infrequent Service
If the unit is used infrequently, difficult starting
may result. To eliminate hard starting, follow
these instructions:
1. Run the generator at least 30 minutes every
month.
2. Run the generator, then close the fuel shut-off
valve and allow the unit to run until the engine
stops.
3. Move the engine switch to the "OFF" position.