background image

1.  

Veiligheidsinstructies 

2.  

Algemeen 


2.1  

Verpakking 


2.2 

Afvalverwerking 


2.3 

Uitleg symbolen 

3.  

Montage 


3.1  

Montage stappenplan 


3.2  

Aanpassen zadelpositie 


3.3  

Aanpassen stuur


3.4  

Hoogteaanpassing

4. 

Reiniging en Onderhoud 

5.  

Computer


5.1  

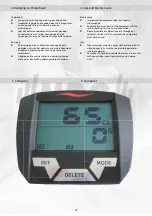
Computertoetsen


5.2 

Computerfuncties


5.2.1    Opmerkingen over de individuele functies


5.3   

Computer gebruiken


5.3.1 

Trainen zonder ingestelde waardes


5.3.2 

Trainen met ingestelde waardes

6. 

Trainingshandleiding


6.1  

Trainingsfrequentie


6.2  

Trainingsintensiteit 


6.3   

Hartslag-gecontroleerde training


6.4  

Trainingscontrole


6.5  

Trainingsduur

7.  

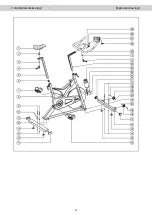
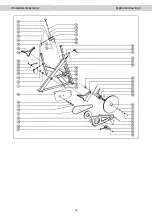
Onderdelentekening

8.  

Onderdelenlijst 

9.  

Garantie

1.  

Safety instructions 

02

2.  

General 03


2.1  

Packaging 

03


2.2 

Disposal 

03


2.3 

Explanation of symbols 

03

3.  

Assembly 

04 


3.1  

Assembly Steps 

04


3.2  

Adjust for perfect saddle postion 

08


3.3  

Handlebar adjustment 

08


3.4  

Height adjustment 

08

4. 

Care and Maintenance 

09

5.  

Computer 

09


5.1  

Computer keys 

10


5.2 

Computer functions 

10 


5.2.1    Remarks on the individual functions 

10


5.3   

How to use the computer 

11


5.3.1  

Training without setting of data 

11


5.3.2  

Training with preset data 

11

6.  

Training manual 

12


6.1  

Training frequency 

12


6.2  

Training intensity 

12


6.3   

Heartrate orientated training 

12


6.4  

Training control 

13


6.5  

Trainings duration 

14

7.   

Explosion drawing 

15

8.  

Parts list 

17

9.  

Warranty (Dutch only) 

18

Inhoudsopgave

Index

Pagina/Page

01


5.2.1    Opm

pm

er

er

er

ki

ki

ki

ki

ki

ng

ng

ng

ng

en over de individuele functies


5.3   

Com

om

om

om

pu

pu

pu

pu

pu

te

te

te

r gebruiken


5.3.1 

Trai

ne

ne

ne

ne

ne

zo

zo

zo

nder ingestelde waardes

5.3.2 

Tr

Tr

Tr

ai

ai

ai

nen 

me

met 

in

in

in

ge

st

st

el

el

el

el

el

de w

 w

 w

aa

aa

aa

rd

rd

rd

es


T


T


T

ra

ra

ra

in

in

in

in

gs

gs

gs

gs

gs

ha

ha

ha

nd

le

le

le

idin

in

g

g

g

g


6


6


6


6


6

.1

.1

.1


Tr

Tr

Tr

ai

ai

ai

ni

ng

ng

ng

sf

re

re

re

re

quentie


6


6


6

.2

.2

.2


Tr

Tr

Tr

aini

ng

ng

si

nt

nt

nt

nt

nt

ensi

te

te

te

te

it 


6


6


6

.3

.3

.3

.3


H


H


H


H

ar

ar

ar

ts

ts

ts

la

la

g-

ge

ge

ge

ge

ge

cont

ro

ro

ro

ro

leerde tra

in

in

in

in

in

ing


6


6


6


6

.4

.4

.4


Tr

Tr

Tr

Tr

Tr

ai

ai

ni

ni

ni

ng

sc

sc

sc

sc

ontrol

ol

ol

e

e


6

.5

.5

.5


Tr

Tr

Tr

Tr

ai

ai

ni

ni

ni

ni

ni

ng

sd

sd

sd

uur

Onde

rd

rd

rd

el

en

en

en

en

en

tekening

Onderdelenlijst 


5.2.1    Remarks on the indi

di

di

vi

vi

vi

vi

du

du

du

du

du

al functions 

1


5.3   

How to use the co

mp

mp

mp

mp

ut

ut

ut

ut

er

er 

1


1


1


1


1


1

5.3.1  

Training without 

se

se

se

se

ttin

in

in

of data 

5.3.2 


T


T


T


T


T

rain

in

in

in

in

in

in

wi

wi

wi

th pre

se

se

se

se

da

da

da

da

da

ta

ta

ta


1


1


1

6.  

Tr

Tr

Tr

Tr

aining manual 


6


6


6


6


6


6


6

.1  

Tr

ai

ni

ni

ni

ni

ni

ng

ng

ng

ng frequ

qu

en

en

en

cy


1


1


1


1


6


6


6


6


6

.2  

Tr

Tr

Tr

Tr

aining i

nt

nt

nt

en

en

en

si

ty

ty

ty


1


1


1


1


1


1


1


6


6


6


6


6


6


6

.3  


H


H


H


H


H


H


H

eartrate

 o

 o

 o

rien

en

en

ta

ta

ta

te

tr

tr

tr

tr

ai

ni

ni

ni

ng

ng

ng

ng


1


1


1


6


6


6


6


6


6


6


6

.4  

Tr

Tr

Tr

Tr

Tr

Tr

Tr

Tr

Tr

ai

ai

ai

ai

ai

ning

 c

 c

 c

 c

on

on

on

tr

ol

ol

ol

ol

ol


1


1


1


1


1


6


6


6


6


6


6


6

.5  

Traini

ng

ng

ng

ng

ng

ng

s dura

ti

ti

ti

on


1


1


1


1

7.   

Expl

pl

pl

pl

osio

io

io

io

io

n drawing 

8.

Parts list

Содержание Speedbike CRS

Страница 1: ...2 1 Opm pmer er erki ki ki ki king ng ng ngen over de individuele functies 5 3 Com om om ompu pu pu pu pute te ter gebruiken 5 3 1 Traine ne ne ne nen zo zo zonder ingestelde waardes 5 3 2 Tr Tr Trai...

Страница 2: ...by a physician 10 The safety level of the machine can be ensured only if you regularly inspect parts subject to wear These are indicacated by an in the parts list Levers and other adjusting mechanism...

Страница 3: ...ntally compatible and recyclable materials l External packaging made of cardboard l Molded parts made of foam CFS free polystyrol PS l Sheeting and bags made of polyethylene PE l Wrapping straps made...

Страница 4: ...at u in alle richtingen voldoende ruimte overhoudt voor beweging tijdens het monteren minimaal 1 5m In order to make assembly of the exercise bike as easy as pos sible for you we have preassembled the...

Страница 5: ...Stap Step 2 05 Stap Step 3...

Страница 6: ...06 Stap Step 4 Stap Step 5...

Страница 7: ...n van het remleer U kunt het geluid doen verminderen door de remgedeelte van het vliegwiel in te smeren met een paar druppels silicone According to a low humidity or during longer exercise there could...

Страница 8: ...urning the height adjustment screws can solve the wobble of the Speedbike turn the screw anti clockwise increases the height Please pay attention that there is enough thread left in the foot cap 08 en...

Страница 9: ...th a damp cloth 4 Reiniging en Onderhoud 4 Care and Maintenance 5 Computer 5 Computer 09 Onderhoud l In beginsel vereist de apparatuur geen onderhoud l Inspecteer regelmatig alle onderdelen van het ap...

Страница 10: ...geeft de afstand in stappen van 0 01 km 00 00 999 00 U kunt een afstand instellen van 1 99 5 km SCAN Alle waardes worden afwisselend weergegeven in periodes van 5 seconden PULSE hartslagen minuut Weer...

Страница 11: ...pedalling 5 3 2 Training with preset data Press a key or start pedalling to activate the computer By pressing the MODE button a value can be activated The symbol of the activated value is blinking If...

Страница 12: ...g it is recommended in principle to select a lower step resistance and to train at a higher rpm revolutions per minute Ensure that the rpm is higher than 80 RPM but does not exceed 100 6 3 Heartrate o...

Страница 13: ...g resting pulse 2 10 minutes after starting training training working pulse 3 One minute after training recovery pulse l During the first weeks it is recommended that training be done at a pulse rate...

Страница 14: ...nics or stret ching in order to loosen up the muscles Stop training immediately if you feel unwell or if any signs of overexertion occur Alterations of metabolic activity during training l In the firs...

Страница 15: ...7 Onderdelentekening 1 Explosiondrawing 1 15...

Страница 16: ...Onderdelentekening 2 Explosiondrawing 2 16...

Страница 17: ...r Ball bearing 6302 ZZ 3 60 Vliegwiel lager Flywheel bushing 1 61 Zeskantbout Hex head screw M8x15 4 62 Afdekkap rechts Decorate cover right side 1 63 Inbusschroef Allenscrew M6x60 2 64 Moer Nut M6 2...

Страница 18: ...amen met u proberen het probleem op te lossen Als dit niet mocht lukken bieden wij nog individuele servicemogelijkheden die u ook kunt bespreken met uw vakhandel 18 De onderdelen met een zijn gevoelig...

Страница 19: ...de oplossing van een probleem voor u als gebruiker van het trainingstoestel is zodat u zonder al te lange onderbrekingen met veel plezier kunt trainen Daarom ondersteunen wij de vakhandel warenhuizen...

Отзывы: