Finlux FL4922 Скачать руководство пользователя страница 7

Getting Started

English

   - 22 -

Teletext

Press 

TXT

 button to enter. Press again to activate mix 

mode. Press once more to exit. Follow the instructions 

displayed on digital teletext screen.

Digital Teletext (for UK only)

Press 

TXT

 button to view digital teletext information. 

Operate it with the coloured buttons, cursor buttons 

and the 

OK

 button. The operation method may differ 

depending on the contents of the digital teletext. Follow 

the instructions displayed on the digital teletext screen. 

When the 

TXT

 button is pressed again, the TV returns 

to television broadcast.
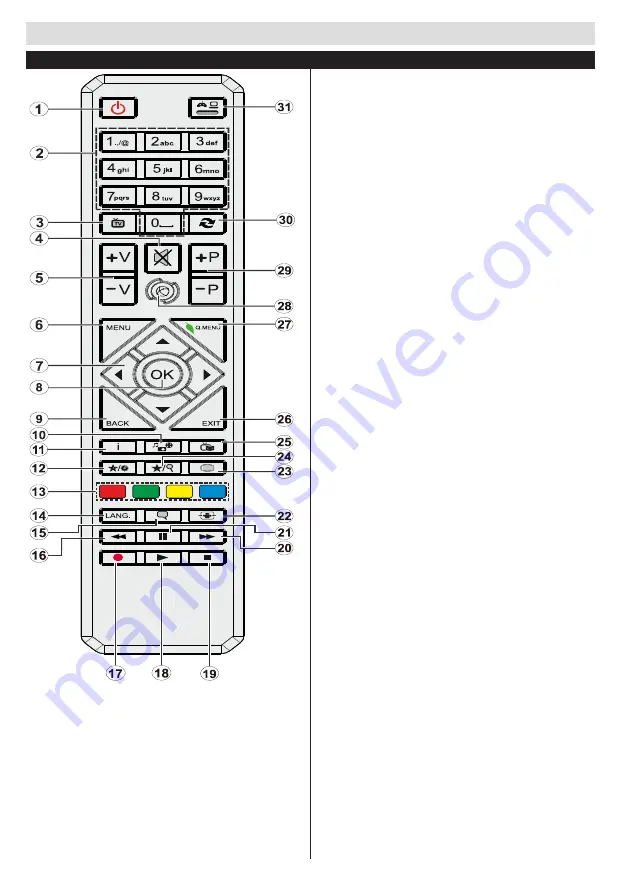
Remote Control 

1. 

Standby: Switches On / Off the TV

2. 

Numeric buttons: Switches the channel, enters a number 

or a letter in the text box on the screen.

3. 

TV: Displays channel list / Switches to TV Source

4. 

Mute: Completely turns off the volume of the TV

5. 

/-

6. 

Menu: Displays TV menu

7. 

Directional buttons: Helps navigate menus, content etc. 

and displays the subpages in TXT mode when pressed 

Right or Left

8. 

OK: Confirms user selections, holds the page (in TXT 

mode), views channel list (DTV mode)

9. 

Back/Return: Returns to previous screen, opens index 

page (in TXT mode)

10. 

Media browser: Opens the media browsing screen

11. 

Info: Displays information about on-screen content, 

shows hidden information (reveal - in TXT mode)

12. 

My button 1 (*)

13. 

Coloured Buttons: Follow the on-screen instructions for 

coloured button functions

14. 

Language: Switches among sound modes (analogue 

TV), displays and changes audio/subtitle language 

(digital TV, where available)

15. 

Subtitles: Turns subtitles on and off (where available)

16. 

Rapid reverse: Moves frames backwards in media such 

as movies

17. 

Record: Records programmes

18. 

Play: Starts to play selected media

19. 

Stop: Stops the media being played

20. 

Rapid advance: Moves frames forward in media such 

as movies

21. 

Pause: Pauses the media being played, starts timeshift 

recording

22. 

Screen: Changes the aspect ratio of the screen

23. 

Text: Displays teletext (where available), press again 

to superimpose the teletext over a normal broadcast 

picture (mix)

24. 

My button 2 (*)

25. 

EPG (Electronic programme guide): Displays the 

electronic programme guide

26. 

Exit: Closes and exits from displayed menus or returns 

to previous screen

27. 

Quick Menu: Displays a list of menus for quick access

28. 

No function

29. 

Pro/-

30. 

Swap: Quickly cycles between previous and current 

channels or sources

31. 

Source: Shows all available broadcast and content 

sources

(*) MY BUTTON 1 & MY BUTTON 2: 

These buttons may have default functions depending on 

the  model. However you can set a special function to these 

buttons  by  pressing  on  them  for  five  seconds  when  on  a 

desired source or channel. A confirmation message will be 

displayed on the screen. Now the selected MY BUTTON is 

associated with the selected function.Note that if you perform 

First Time Installation

, MY BUTTON 1&2 will return to their 

default function.

Содержание FL4922

Страница 1: ...FL4922 Kleurentelevisie Colour television T l vision en couleur Farve tv Owner s manual Manuel d utilisateur Brugervejledning De handleiding...

Страница 2: ...und the set Do not block ventilation holes Do not place the TV on sloping or unstable surfaces the TV may tip over Use this device in moderate climates The power cord plug should be easily accessible...

Страница 3: ...is designed in such a way that it does not require a safety connection to electrical earth the earth connection is used for functional purposes Protective Earth Connection The marked terminal is inte...

Страница 4: ...without anchoring both the furniture and the television set to a suitable support Not standing the television set on cloth or other materials placed between the television and supporting furniture Edu...

Страница 5: ...colour TV Fully integrated digital cable TV DVB T C HDMI inputs are for connecting a device that has a HDMI socket USB input OSD menu system Scart socket for external devices such as DVD Players PVR...

Страница 6: ...timedia Interface are trademarks or registered trademarks of HDMI Licensing LLC Information for Users on Disposal of Old Equipment and Batteries European Union only These symbols indicate that equipme...

Страница 7: ...instructions for coloured button functions 14 Language Switches among sound modes analogue TV displays and changes audio subtitle language digital TV where available 15 Subtitles Turns subtitles on a...

Страница 8: ...tput will not be available via the scart socket When using the wall mounting kit optional we recommend that you plug all your cables into the back of the TV before mounting on the wall Insert or remov...

Страница 9: ...lable broadcasts in accordance with a recognizable channel sequence if available Cable Installation If you select CABLE option and press OK button on the remote control To continue please select YES a...

Страница 10: ...is not sufficient Watching Recorded Programmes Select the Recordings Library from the Media Browser menu Select a recorded item from the list if previously recorded Press the OK button to view the Pla...

Страница 11: ...uto Only available in Scart mode with SCART PIN8 high voltage low voltage switching Film Mode Films are recorded at a different number of frames per second to normal television programmes Turn this fe...

Страница 12: ...isables selected source options Other Settings Displays other setting options of the TV set Menu Timeout Changes timeout duration for menu screens Scan Encrypted Channels When this setting is on the s...

Страница 13: ...of certain programmes channels and menus can be locked by using the parental control system To display parental lock menu options the PIN number should be entered The factory default PIN number is 000...

Страница 14: ...up at 03 00 and searches broadcast channels for new software upgrades If new software is found and downloaded successfully the next time the TV powers up it will have the new software version Note If...

Страница 15: ...r TV may not support all resolutions Your TV supports up to 1920x1080 Index Resolution Frequency 1 640x480 60 Hz 2 800x600 56 Hz 3 800x600 60 Hz 4 1024x768 60 Hz 5 1024x768 66 Hz 6 1280x768 60 Hz 7 12...

Отзывы: