background image

English

   - 27 -

Note:  The  content  available  on  EPG  is  driven  by 

TV channels themselves and will only display if the 

channel content is available. When you select a 

programme, Freeview Play will directly launch the 

catch up service. If you wish to watch Demand 5 on 

Freeview Play, please use the other options listed 

below to access the catch up service.

2. Freeview Play via the ‘FPlay button’ 

Click Freeview Play button on your remote control. 
This will bring up the Freeview Play portal, where you 

can choose the channel and programme to watch 

with ease.

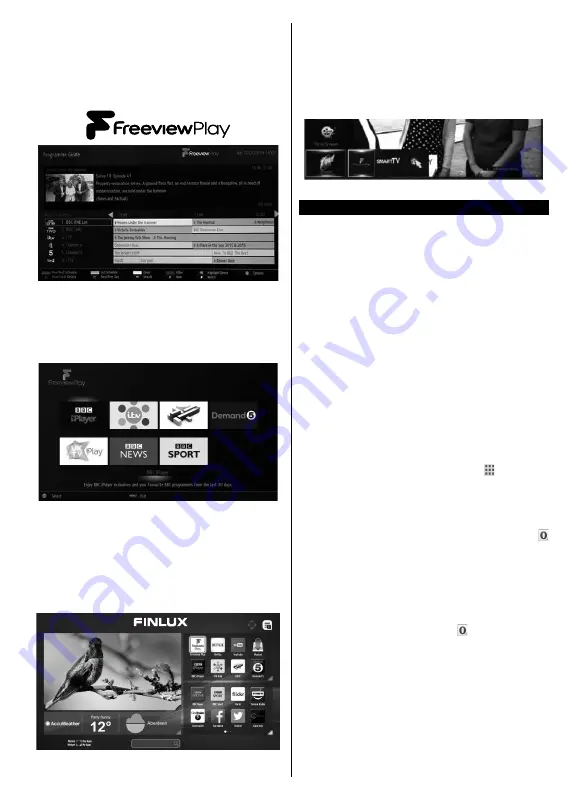
3. Freeview Play via the TV’s Smart Portal

Bring up the Smart Portal on your TV, Freeview Play 

will be one of the applications displayed on the first 

page. Once the Freeview play app is selected it will 

direct you to the same Freeview play portal seen 

above, where you can choose what programme you’d 

like to watch.

4. Freeview Play via the TV Menu

Click the Menu button, scroll down to ‘Internet’ and 

Freeview Play will be one of the options you can 

choose. You will see the familiar Freeview Play portal 

and be able to choose the channel and programme 

you’d like to watch.

Internet Browser

To use the internet browser, 

enter the portal first. Then 

launch the 

Internet

 application on the portal.

(*) The appearance of the internet browser logo may change

In the initial screen of the browser, the thumbnails of 

the predefined (if any) links to web sites available will 

be displayed as 

Speed Dial

 options along with the 

Edit Speed Dial

 and the 

Add to Speed Dial

 options.

To navigate the web browser, use the directional 

buttons on the remote or a connected mouse. To see 

the browser options bar, move the cursor to the top of 

the page or press the 

Back/Return

 button. 

History

Tabs

 and 

Bookmarks

 options and the browser bar 

which contains previous/next buttons, the refresh 

button, the adress/search bar, the 

Speed


Dial

 and 

the 

Opera

 buttons are available.

To add a desired website to the 

Speed Dial

 list for 

quick access, move the cursor to the top of the page 

or press the 

Back/Return

 button. The browser bar 

will appear. Highlight the 

Speed Dial

 -   button and 

press the 

OK

 button. Then select 

Add to Speed Dial


option and press the 

OK

 button. Fill in the blanks for 

Name

 and 

Address

, highlight 

OK

 and press the 

OK


button to add. Whilst you are on the site you wish to 

add to the 

Speed Dial

 list, highlight the 

Opera- 


button and press the 

OK

 button. Then highlight 

Add 

to Speed Dial

 option in the submenu and press the 

OK

 button again. 

Name

 and 

Address

 will be filled 

automatically according to the site you are visiting. 

Highlight 

OK

 and press the 

OK

 button to add.

You can also use the 

Opera

 menu options to manage 

the browser. Highlight the 

Opera- 

 button and press 

the 

OK

  button  to  see  available  page  specific  and 

general options.
There are various ways to search or visit websites 

using the web browser.
  Enter the address of a website(URL) into the search/

address bar and highlight the 

Submit

 button on the 

virtual keyboard and press the 

OK

 button to visit the 

site.

Содержание 55-FUB-8022

Страница 1: ...Owner s manual 55 inch LED TV 55 FUB 8022 ...

Страница 2: ......

Страница 3: ...Me TV if available 10 CEC and CEC RC Passthrough 10 E Manual if available 10 TV Menu Contents 11 General TV Operation 15 Using the Channel List 15 Configuring Parental Settings 15 Electronic Programme Guide EPG 15 Teletext Services 16 Software Upgrade 16 Troubleshooting Tips 17 PC Input Typical Display Modes 18 AV and HDMI Signal Compatibility 18 Supported Video File Formats for USB Mode 19 Suppor...

Страница 4: ...dripping or splashing of liquids and do not place objects filled with liquids such as vases cups etc on or over the TV e g on shelves above the unit Do not expose the TV to direct sunlight or do not place open flames such as lit candles on the top of or near the TV Do not place any heat sources such as electric heaters radiators etc near the TV set Do not place the TV on the floor and inclined sur...

Страница 5: ...in from your local dealer if not supplied with your TV Do not install the TV on a ceiling or on an inclined wall Use the specified wall mounting screws and other accessories Tighten the wall mounting screws firmly to prevent the TV from fall Do not over tighten the screws WARNING Apparatus connected to the protective earthing of the building installation through the MAINS connection or through oth...

Страница 6: ...minutes it will go into standby When you next switch on the following message will be displayed TV switched to stand by mode automatically because there was no signal for a long time Press OK to continue If the TV is on and it isn t being operated for a while it will go into standby When you next switch on the following message will be displayed TV switched to stand by mode automatically because n...

Страница 7: ...S Licensing Limited DTS the Symbol DTS and the Symbol together are registered trademarks and DTS TruSurround is a trademark of DTS Inc DTS Inc All Rights Reserved For DTS patents see http patents dts com Manufactured under license from DTS Licensing Limited DTS DTS HD the Symbol DTS or DTS HD and the Symbol together are registered trademarks of DTS Inc DTS Inc All Rights Reserved This product cont...

Страница 8: ...mW 5470 5725 MHz CH100 CH140 200 mW Country Restrictions This device is intended for home and office use in all EU countries and other countries following the relevant EU directive without any limitation except for the countries mentioned below Country Restriction Bulgaria General authorization required for outdoor use and public service France In door use only for 2454 2483 5 MHz Italy If used ou...

Страница 9: ...top Stops the media being played 17 Rapid advance Moves frames forward in media such as movies 18 Subtitles Turns subtitles on and off where available 19 Screen Changes the aspect ratio of the screen 20 Text Displays teletext where available press again to superimpose the teletext over a normal broadcast picture mix 21 Media browser Opens the media browsing screen 22 EPG Electronic programme guide...

Страница 10: ...e available via the scart socket When using the wall mounting kit available from third party in the market if not supplied we recommend that you plug all your cables into the back of the TV before mounting on the wall Insert or remove the CI module only when the TV is SWITCHED OFF You should refer to the module instruction manual for details of the settings The USB 2 0 inputs on the back side and ...

Страница 11: ...network settings Please refer to Connectivity section to configure a wired or a wireless connection After the settings are completed press OK button to continue To skip to the next step without doing anything select No and press the OK button when the message is displayed asking whether you want to do the network settings On the next screen you need to agree to the terms and conditions of Freeview...

Страница 12: ... CEC RC Passthrough This function allows to control the CEC enabled devices that are connected through HDMI ports by using the remote control of the TV The CEC option in the System Settings More menu should be set as Enabled at first Press the Source button and select the HDMI input of the connected CEC device from the Sources List menu When new CEC source device is connected it will be listed in ...

Страница 13: ...ss of the picture by pressing Left or Right buttons Picture Zoom Sets the desired image size format Film Mode Films are recorded at a different number of frames per second to normal television programmes Turn this feature on when you are watching films to see the fast motion scenes clearly Skin Tone Skin tone can be changed between 5 and 5 Colour Shift Adjust the desired colour tone HDMI Full Rang...

Страница 14: ... screen you can discover and connect the sound devices to your TV wirelessly AVL Automatic Volume Limiting Sets the sound to obtain fixed output level between programmes Headphone Lineout When you connect an external amplifier to your TV using the headphone jack you can select this option as Lineout If you have connected headphones to the TV set this option as Headphone Please ensure before using ...

Страница 15: ...essibility Displays accessibility options of the TV Hard of Hearing Enables any special feature sent from the broadcaster Audio Description A narration track will be played for the blind or visually impaired audience Press OK to see all available Audio Description menu options This feature is available only if the broadcaster supports it Netflix If this feature is supported by your TV you can view...

Страница 16: ...volume of the audio device OSS Displays Open Source Software license information Smart Remote Press OK to open the Smart Remote menu screen Using this screen you can discover and connect the remote controller devices to your TV wirelessly Installation Menu Contents Automatic channel scan Retune Displays automatic tuning options Digital Aerial Searches and stores aerial DVB stations Analogue Search...

Страница 17: ...PIN This option will appear as greyed out if no CI module is inserted into the CI slot of the TV You can change the default PIN of the CI CAM using this option Note Default PIN can be set to 0000 or 1234 If you have defined the PIN is requested depending on the country selection during the First Time Installation use the PIN that you have defined Some options may not be available depending on the ...

Страница 18: ... the opening page you can access to BBC s main services such as BBC iPlayer BBC News BBC Sport and many others There are also links to the home pages of the related applications available Use the navigation buttons on the TV s remote control to move through the application Press Exit button to close and exit Software Upgrade Your TV is capable of finding and updating the firmware automatically via...

Страница 19: ...ord is plugged in securely to wall outlet Check if batteries are exhausted Press the Power button on the TV Poor picture Check if you have selected the correct TV system Low signal level can cause picture distortion Please check antenna access Check if you have entered the correct channel frequency if you have done manual tuning The picture quality may degrade when two devices are connected to the...

Страница 20: ...900 75Hz 27 1600x1200 60Hz 28 1680x1050 59Hz 29 1680x1050 60Hz 30 1920x1080 60Hz AV and HDMI Signal Compatibility Source Supported Signals Available EXT SCART PAL O SECAM O NTSC4 43 O NTSC3 58 RGB 50 60 O Back AV PAL O SECAM O NTSC4 43 O NTSC3 58 O YPbPr 480i 480p 60Hz O 576i 576p 50Hz O 720p 50Hz 60Hz O 1080i 50Hz 60Hz O HDMI 480i 60Hz O 480p 60Hz O 576i 576p 50Hz O 720p 50Hz 60Hz O 1080i 50Hz 60...

Страница 21: ...P 3gpp 3gp AVI avi MKV mkv H 264 3840x2160 30fps 1080P 60fps 135Mbps FLV flv MP4 mp4 mov 3GPP 3gpp 3gp MPEG transport stream ts trp tp ASF asf AVI avi MKV mkv Motion JPEG 720P 30fps 10Mbps AVI avi 3GPP 3gpp 3gp MP4 mp4 mov MKV mkv ASF asf VP8 1080P 30fps 20Mbps MKV mkv WebM webm HEVC 4K2K 60fps 160Mbps MP4 mp4 mov MKV mkv MPEG transport stream ts trp tp VP9 4K2K 30fps 100Mbps MKV mkv WebM webm Sup...

Страница 22: ...KHz 44 1KHz 48KHz 32Kbps 640Kbps AC3 ac3 AVI avi Matroska mkv mka 3GPP 3gpp 3gp MP4 mp4 mov m4a MPEG transport stream ts trp tp MPEG program stream DAT VOB MPG MPEG EAC3 32KHz 44 1KHz 48KHz 32Kbps 6 Mbps EAC3 ec3 3GPP 3gpp 3gp MP4 mp4 mov m4a MPEG transport stream ts trp tp MPEG program stream DAT VOB MPG MPEG AAC HEAAC 8KHz 48KHz AAC aac AVI avi Matroska mkv mka 3GPP 3gpp 3gp MP4 mp4 mov m4a MPEG...

Страница 23: ...nnectors by using DVI converter cable DVI to HDMI cable not supplied you can refer to the following resolution information 56Hz 60Hz 66Hz 70Hz 72Hz 75Hz 640x480 þ þ 800x600 þ þ þ 1024x768 þ þ þ 1280x768 þ þ 1280x960 þ 1360x768 þ 1366x768 þ 1280x1024 þ þ þ 1400x1050 þ 1600x900 þ ...

Страница 24: ...l outlet LAN input on the rear side of the TV network wall socket Configuring Wired Device Settings Network Type The Network Type can be selected as Wired Device Wireless Device or Disabled in accordance with the active connection to the TV set Select this as Wired Device if you are connecting via an ethernet Internet Speed Test Highlight Internet Speed Test and press the OK but ton TV will check ...

Страница 25: ...e this keyboard via the directional buttons and the OK button on the remote control Wait until the IP address is shown on the screen This means that the connection is now established To disconnect from a wireless network highlight Network Type and press Left or Right buttons to set as Disabled Highlight Internet Speed Test and press the OK button to check your internet connection speed Highlight A...

Страница 26: ...alls of your network allow the TV wireless connection Try searching for wireless networks again using the Network Internet Settings menu screen If the wireless network does not function properly try using the wired network in your home Refer to the Wired Connectivity section for more information on the process If the TV does not function using the wired connection check the modem router If the rou...

Страница 27: ...ork through Audio Video Sharing feature You can connect only one television to the same network If a problem occurs with the network please switch your television off at the wall socket and back on again Trick mode and jump are not supported with the Audio Video Sharing feature Note There may be some PC s which may not be able to utilize the Audio Video Sharing feature due to administrator and sec...

Страница 28: ...the playback Use the Stop button to stop the playback Press the Exit button to exit iPlayer Press the Return Back button for going back to the previous screen Note Episode is unavailable message may be displayed on the screen if a problem occurs during the playback Searching a Programme Highlight the Search tab using the navigation buttons and press the OK button Use the virtual keyboard to type t...

Страница 29: ...able will be displayed as Speed Dial options along with the Edit Speed Dial and the Add to Speed Dial options To navigate the web browser use the directional buttons on the remote or a connected mouse To see the browser options bar move the cursor to the top of the page or press the Back Return button History Tabs and Bookmarks options and the browser bar which contains previous next buttons the r...

Страница 30: ...V first when it starts MY CHANNELS The programmes of first four channels from the channel list retrieved from the TV are shown You can change the listed channels Press on the channel thumbnail and hold A list of channels will be displayed and you can choose your desired channel to be replaced TV You can watch content through the TV tab In this mode you can navigate through the channel list retriev...

Страница 31: ... formats are supported This function will not work if Audio Video Sharing feature is not supported Portal Launcher To access the Portal Launcher widget tap on the Up arrow on the bottom left side of the screen You can access the portal page by tapping on the Portal Launcher widget Note Internet connection is required This function will not work if a portal page is not in use Smart Remote Feature Y...

Страница 32: ...minal which is marked with the letter E or by the earth symbol or coloured green or green and yellow The wire which is coloured blue or black must be connected to the terminal which is marked with the letter N or coloured Black The wire which is coloured brown or red must be connected to the terminal which is marked with the letter L or coloured Red For continued protection against risk of fire re...

Страница 33: ...ommercial Brand FINLUX C Product No 10109920 D Model No 55 FUB 8022 E Energy efficiency class A F Visible screen size diagonal approx inch cm 55 inches 140 cm G On mode average power consumption Watt 86 H Annual energy consumption kWh annum 125 I Standby power consumption Watt 0 5 J Off mode power consumption Watt 0 K Display resolution px 3840x2160 ...

Страница 34: ...ivom 2014 53 EU Cjeloviti tekst EU izjave o sukladnosti dostupan je na sljedećoj internetskoj adresi doc vosshub com HU VESTEL Elektronik Sanayi ve TicaretA Ş igazolja hogy a TFT IDTV típusú rádióberendezés megfelel a 2014 53 EU irányelvnek Az EU megfelelőségi nyilatkozat teljes szövege elérhető a következő internetes címen doc vosshub com IT Il fabbricante VESTEL Elektronik Sanayi ve Ticaret A Ş ...

Страница 35: ......

Страница 36: ...50388759 ...

Отзывы: