background image

English   

- 44 -

  Connecting to a DVD Player 

 If you want to connect a DVD player to your LCD 
TV, you can use connectors of the TV set. DVD 
players may have different connectors. Please refer 
to your DVD player’s instruction book for additional 
information. Power off both the TV and the device 
before making any connections. 

 Note

: Cables shown in the illustration are not supplied. 

 • If your DVD player has an HDMI socket, you can 

connect via HDMI. When you connect to DVD player 
as illustrated below, switch to HDMI source. See, 
“Input Selection” section.

• Most DVD players are connected through 

COMPONENT SOCKETS. Use a component video 
cable to connect video input. For enabling audio, use 
a component audio cable as illustrated below. When 
the connection is made, switch to 

YPbPr

 source. 

See, “Input selection” section.

• You may also connect through the SCART 1 or 

SCART 2. Use a SCART cable as shown below.


Note

 : These three methods of connection perform the same 

function but in different levels of quality. It is not necessary 
to connect by all three methods. 


HDMI

inputs

Scart  sockets

Component 

video

inputs

Component 

audio

inputs

DVD  Player


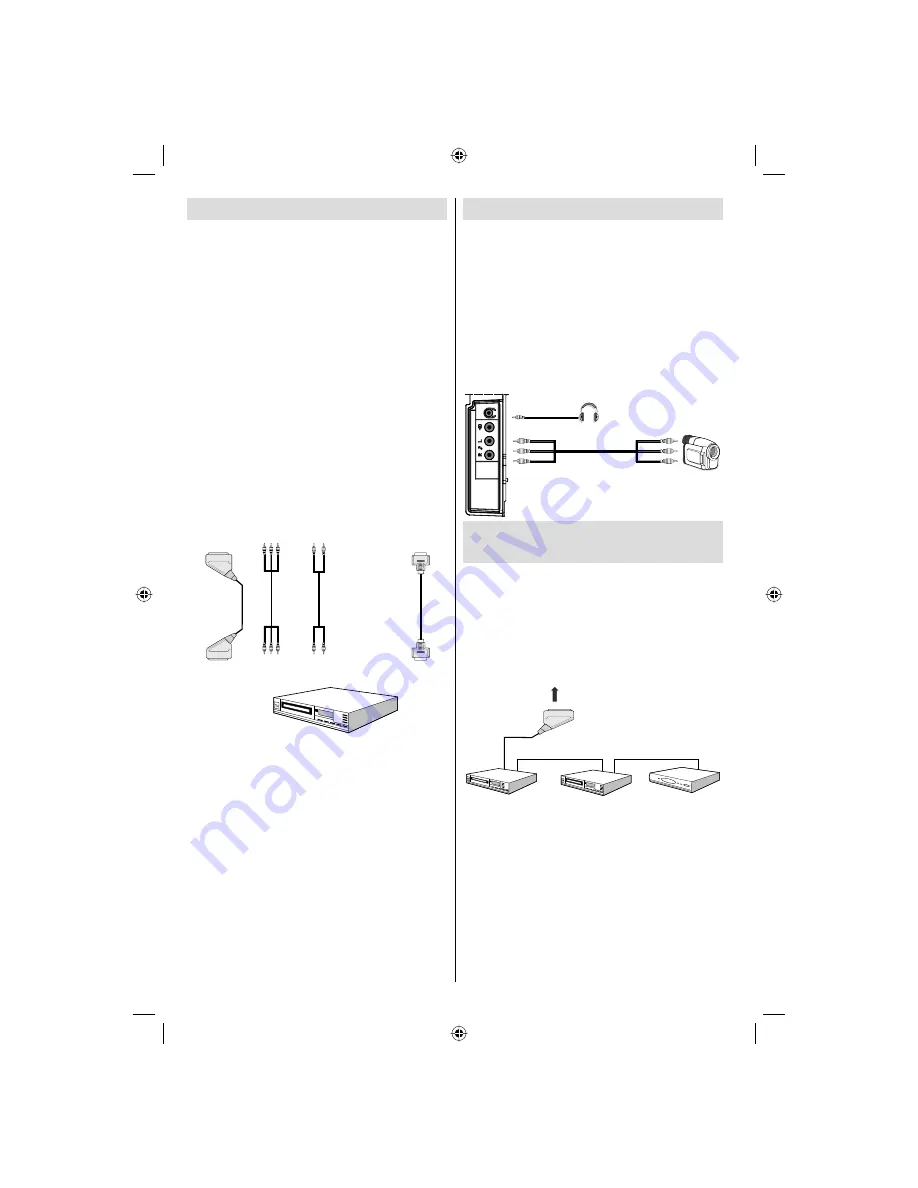
   Using Side AV Connectors 

 You can connect a range of optional equipment 
to your LCD TV. Possible connections are shown 
below. Note that cables shown in the illustration are 
not supplied. 
  • For connecting a camcorder, connect to the  VIDEO 

IN socket and the AUDIO SOCKETS.  Do not connect 
the camcoder to  VIDEO IN socket at the same time 
since it can cause noise in the picture. For selecting 
the related source, see the section “Input selection” 
in the following parts. 

• To listen  to the TV sound from headphones, connect 

to the HEADPHONE jack of theTV. 

Camcorder

Headphone

     Connecting Other Equipment 
via Scart

  Most devices support SCART connection. You can 
connect a; DVD recorder, a VCR or a decoder to your 
LCD TV by using the SCART sockets. Note that cables 
shown in the illustration are not supplied. 
Power off both the TV and the devices before making 
any connections.
For more information, refer to your device’s own 
instruction book. 


Scart  sockets

Decoder

DVD  Recorder

Video  Recorder


02-[GB]_MB36_MASQUE_HDIDTV-MPEG4_NICKEL7_37845W_1186UK_10065849_50157839.indd   44

02-[GB]_MB36_MASQUE_HDIDTV-MPEG4_NICKEL7_37845W_1186UK_10065849_50157839.indd   44

05.11.2009   13:40:47

05.11.2009   13:40:47

Содержание 42FLHX845U

Страница 1: ...colour television f rg tv bruksanvisning owner s manual 42FLHX845U...

Страница 2: ...flytter du kanaler i kanallisten 14 Slik sletter du kanalene i kanallisten 14 Omd pe kanaler 14 Slik l ser du kanaler 14 Slik velger du favoritter 15 Programguide 15 Tidsinnstilling 15 Felles grensesn...

Страница 3: ...produktet Denne brukerh ndboken vil vise deg hvordan du bruker TV en din forskriftsmessig Les h ndboken n ye f r du bruker TV en Bevar denne h ndboken p et sikkert sted for fremtidig bruk Tilbeh r P...

Страница 4: ...ektrisk st t eller andre farer Vedlikehold Alt vedlikehold m utf res av kvalifisert personell Ikke fjern bakdekselet dette kan f re til elektrisk st t Avfallsh ndtering Instruksjoner for avfallsh ndte...

Страница 5: ...du TV en av p Sl p TV en Koble str mledningen til et uttak med 220 240V AC 50 Hz Trykk STANDBY knappen Da kommer LED for standby p For sl TV en p fra standbymodus enten Trykk P P eller en siffertast p...

Страница 6: ...n 19 Bl Installasjonsmeny Favorittmodus i 20 DTV modus Gul Funksjonsmeny 21 Volumregulering 22 Sl av lyden 23 TV Digital TV 24 Mark r h yre 25 Mark r opp 26 OK Velg Frys bilde 27 Kanalliste modus i DT...

Страница 7: ...l en subwoofer enhet Audio Line Outs 2 overf rer lydsignaler til en ekstern enhet for eksempel et lydanlegg Bruk en lydkabel fra AUDIO utgangen p TV en for koble eksterne h yttalere til TV en din 3 SC...

Страница 8: ...som brukes n Bruk en SPDIF koaksialkabel for overf re lydsignaler til en enhet med S PDIF inngang 8 S PDIF Digital Out sender digitale lydsignaler fra den aktuelle kilden som brukes n Bruk lydkabel fo...

Страница 9: ...og VIDEO UT utgangen p enheten Audioinnganger brukes for koble de eksterne enhetenes lydsignaler 6 Koble lydkabelen mellom TV ens AUDIO innganger og AUDIO utgangene p enheten din Merk Hvis du kobler...

Страница 10: ...n SETT FRA SIDEN USB MINNE USB MINNEKOBLING Plugg USB enheten i USB inngangen p TV en VIKTIG TV en st tter kun FAT32 diskformatering NTFS format er ikke st ttet Hvis den insatte USB disken ikke blir o...

Страница 11: ...m tene samtidig HDMI innganger Scartkontakter Videoinngang for komponenter Lydinngang for komponenter DVD spiller Slik bruker du AV sidekontakter Du kan koble en rekke tilleggsutstyr til LCD TV en din...

Страница 12: ...menysystemet er beskrevet i f lgende avsnitt Voluminnstilling Trykk V tasten for ke volumet Trykk V tasten for redusere volumet En volumniv skala stolpe vises p skjermen Programvalg forrige eller nes...

Страница 13: ...ommer det opp en liste over programmer p skjermen P programlisten kan du se programnumre og navnet p tilsvarende program Hvis du ikke aksepterer plasseringene og eller programnavnene p programmer kan...

Страница 14: ...B T kan du i tillegg til bilder og lyd ogs se digital tekst TV Digital tekst TV sendes av og til samtidig med normale sendinger Trykk p Tekst TV TELETEXT knappen Informasjon om digital tekst TV vises...

Страница 15: ...analene i kanallisten Klikk eller for velge hvilken kanal som skal slettes Trykk eller for velge elementet som skal slettes p kanallisten Trykk OK for slette den markerte kanalen fra kanallisten Meldi...

Страница 16: ...ghet vil bli vist automatisk etter at start og sluttid er satt Endre slette bestemmer om andre brukere skal f lov til endre noe Du kan lagre justeringene ved trykke GR NN tast eller avbryte prosessen...

Страница 17: ...s vises som sp r etter l sekode Fabrikkinnstilt kode er 0000 Angi koden Hvis feil l sen kkel skrives inn vil meldingen WRONG PIN FEIL PIN vises p skjermen og TV en g r tilbake til den forrige menyen H...

Страница 18: ...arker tidsinnstillinger Time Settings ved trykke p eller Trykk knappene eller for sl Dolby Digital Ext ut P eller Av Hvis kanalen du ser p st tter AC3 lyd kan du sl den p H rselssvake Bruk eller for v...

Страница 19: ...og Merk Hvis landvalget er satt til Danmark Sverige Norge eller Finland vil spr kmenyen fungere slik som beskrives under Spr kinnstillinger Bruk eller for merke menyelementet som skal innstilles og tr...

Страница 20: ...et til laste inn standardinnstillinger som er forberedt fra fabrikken For gjenopprette fabrikkinnstillinger marker F rstegangs installasjon og trykk OK Du vil deretter bli bedt om bekrefte sletting av...

Страница 21: ...rrige neste Repeter BL Spiller av valgt fil gjentatte ganger Slik viser du JPEG filer Hopp 0 9 Hopper til valgt fil ved hjelp av talltastene OK se valgt bilde i fullskjerm Spill Lysbildefremvisning GR...

Страница 22: ...r for velge nsket alternativ Trykk eller for stille inn niv et Merk Valg av Nyanse er kun synlig n r TV en mottar et NTSC signal Fargetemperatur Trykk eller for velge Fargetemperatur Trykk eller for v...

Страница 23: ...k eller for velge Balanse Trykk eller for endre balansen Balanseniv et kan justeres mellom 32 og 32 Hodetelefon Trykk eller for velge Hodetelefon Trykk for vise Hodetelefonmenyen Hodetelefonundermenya...

Страница 24: ...om Film eller Musikk Bruk eller knappen for velge Effekt valgfritt N r du ser p en sending i mono velg Effekt for f en bedre tiln rmet stereolyd Hvis gjeldende lydsystem er stereo vil lyden h res st r...

Страница 25: ...tt ut Barnel s Trykk eller for velge Barnel s Bruk eller for sette Barnel s til P eller Av N r P er valgt vil det kun v re mulig betjene TV apparatet ved hjelp av fjernkontroll I s fall vil ingen av...

Страница 26: ...0 programmer mellom tallene 0 og 199 B nd B nd kan enten velges som C eller S ved trykke eller Kanal Kanal kan endres ved trykke p knappen eller eller talltastene Fargesystem Trykk eller for velge Far...

Страница 27: ...sk justering vil alle lagrede programmer bli slettet og TV en vil s ke etter tilgjengelige kanaler Under s ket vil f lgende melding vises p skjermen N r du trykker BL knapp vilAPS funksjonen stanse og...

Страница 28: ...og Source innstillinger er identiske til instillingene forklart i Analog TV meny system Slik viser du TV informasjon Programnummer programnavn lydindikator og zoom modusinformasjon vises p skjermen n...

Страница 29: ...s originale fasong 4 3 Bruk for vise et normalt bilde i 4 3 bildesideforhold da dette er standard fasong Panorama Denne strekker venstre og h yre side av et normalt bilde 4 3 bildesideforhold for fyll...

Страница 30: ...TV ens innbrenning kan forsvinne etter en liten stund Pr v skru av TV en en stund For unng innbrenning ikke la TV en vise stillbilder i lengre perioder Ikke str m Hvis du ikke f r str m til TV en kont...

Страница 31: ...ESA 16 9 4 3 14 800 600 85 53 7 VESA 16 9 4 3 15 832 624 75 49 7 MAC 16 9 4 3 16 1024 768 43 35 5 VESA interlace 16 9 4 3 17 1024 768 60 48 4 VESA 16 9 4 3 18 1024 768 70 56 5 VESA 16 9 4 3 19 1024 76...

Страница 32: ...480P 60Hz O 576I 50Hz O 576P 50Hz O 720P 50Hz O 720P 60Hz O 1080I 50Hz O 1080I 60Hz O 1080P 50Hz O 1080P 60Hz O 1080P 24 HZ O X Ikke tilgjengelig O Tilgjengelig Merk Noen ganger kan et signal p LCD TV...

Страница 33: ...9 9 9 9 9 9 9 9 8 RGB Denne angir at valg bare er mulig hvis Scart 1 har RGB signal Begrensninger Scart 1 kilden m ha RGB signal for utf re PIP PAP med kildene TV Scart 2 og FAV Hvis disse kildene er...

Страница 34: ...tekst valgfritt srt Kun tidsbaserte formater for ndertekst er st ttet Ramme baserte undertekst formater f eks Micro DVD er ikke st ttet sub unntatt Micro DVD format Tillegg E St ttede DVI oppl sninger...

Страница 35: ...Vekt kg 19 DxLxH uten stativ 103 x 1014 x 657 Vekt kg 18 Digitalt mottak Sendestandarder DVB T MPEG2 DVB T MPEG4 HD i DEMODULERING Symbolrate COFDM med 2K 8K FFT modus Modulering 16 QAM 64 QAM FEC fo...

Страница 36: ...tire Channel List 48 Moving the channels in the channel list 48 Deleting the Channels in the Channel List 48 Renaming channels 48 Adding Locks to Channels 49 Setting Favourites 49 Program Guide 49 Tim...

Страница 37: ...sing this product This manual will guide you for the proper operation of your TV Before operating the TV please read this manual thoroughly Please do keep this manual in a safe place for future refere...

Страница 38: ...ctrical shock or other hazards Servicing Please refer all servicing to qualified personnel Do not remove the cover yourself as this may result in an electric shock Waste Disposal Instructions for wast...

Страница 39: ...TV On Off To Switch the TV On Connect the power cord to the 220 240V AC 50 Hz Press switch Then the standby LED lights up To switch on the TV from standby mode either Press the button P P or a numeric...

Страница 40: ...n DTV mode Teletext PAT mode 13 Mix in TXT mode PIP mode 14 Expand in TXT mode Image Size 15 Reveal in TXT mode 16 Switch from TV to PC Index page Guide in DTV mode 17 Update in TXT mode PAP mode 18 H...

Страница 41: ...ch deeper bass effect Use an appropriate RCA cable to connect the set to a subwoofer unit Audio Line Outs 2 output audio signals to an external device such as an optional sound system To connect the e...

Страница 42: ...axial Out outputs digital audio signals of the currently watched source Use an SPDIF coaxial cable to transfer audio signals to a device that has S PDIF input 8 S PDIF Digital Out outputs digital audi...

Страница 43: ...e used for connecting audio signals of external devices 6 Connect the audio cable between the AUDIO INPUTS on the TV and the AUDIO OUTPUT jacks on your device Note If you connect a device to the TV vi...

Страница 44: ...USB MEMORY USB Memory Connection Plug your USB device to the USB input of the TV IMPORTANT The TV supports only FAT32 disk formatting NTFS format is not supported If the plugged USB disk is not recogn...

Страница 45: ...Scart sockets Component video inputs Component audio inputs DVD Player Using Side AV Connectors You can connect a range of optional equipment to your LCD TV Possible connections are shown below Note...

Страница 46: ...ed in accordance with the menu system of your TV Functions of the menu system are described in the following sections Volume Setting Press V button to increase the volume Press V button to decrease th...

Страница 47: ...ter automatic tuning is finalized a programme list will appear on the screen In the programme list you will see the programme numbers and names assigned to the programmes If you do not accept the loca...

Страница 48: ...LETEXT button The digital teletext information appears Operate it with the coloured buttons buttons and OK button The operation method may differ depending on the contents of the digital teletext Foll...

Страница 49: ...that you want to move services will be replaced Do you want to continue OSD will be displayed Press OK to confirm or select No to cancel Deleting the Channels in the Channel List Press or buttons to s...

Страница 50: ...l or activate the item from the main menu To add a timer press the YELLOW button on the remote control Then Add Timer window appears Channel or keys will navigate the user through the TV or Radio list...

Страница 51: ...button to select Scan Encrypted and then press or button to set this setting as On or Off Parental Control Some channels broadcast material which you do not want younger members of the family to watc...

Страница 52: ...light Configuration menu with or keys and press OK Use or buttons to choose RECEIVER UPGRADE and press OK button Using the or button change Automatic scanning from Enabled to Disabled Highlight Scan f...

Страница 53: ...of active antenna Note Antenna power should be Off when standard antenna is used instead of the active antenna Language Settings In this menu the user can adjust the preferred language Select Languag...

Страница 54: ...duplicates of that channel Clear Service List This setting is visible only when the Country option is set to Denmark Sweden Norway or Finland Use this setting to clear channels stored Press or button...

Страница 55: ...ick in analogue mode the TV will automatically switch to digital TV mode Note If the USB stick is not recognized after Power off on or First Time Installation first plug the USB device out and power o...

Страница 56: ...ing requirements you can set the related mode option Press or button to select Mode Press or button to choose from one of these options Pixellence optional Cinema Dynamic and Natural Pixellence option...

Страница 57: ...the remote control will have no function while Game Mode is on If the TV is switched to PIP PAP mode Game Mode setting will be disabled and be removed from the Picture menu Picture Zoom Select Picture...

Страница 58: ...neOut SPDIF you will get audio through the active audio connectors In this case audio output will not be available through TV speakers and mute function cannot be used While LineOut SPDIF is activated...

Страница 59: ...the menu settings Pip Pap This line controls Pip Pap modes Use or buttons to switch the TV to Pip Pap or Off Pip Size Using this setting you can set the size of the Pip window Press or button to highl...

Страница 60: ...nguage Use or button to change Teletext Language to West East Turk Gre Cyrillic Arabic or Persian HDMI PC Full Mode optional If you want to view PC screen in HDMI mode by using external connection HDM...

Страница 61: ...n four directions you can reach 20 programmes in the same page You can scroll the pages up or down by pressing the navigation buttons to see all the programmes in TV mode except for the AV modes By cu...

Страница 62: ...ching to PC source press SOURCE button on your remote control and select PC input You can also use Source menu to switch to PC mode Note that PC mode menu settings are available only while the TV is i...

Страница 63: ...PIP Mode is entered the default active window is the PIP window and the active window is indicated by a yellow frame around it The active window can be changed by pressing or button The status info O...

Страница 64: ...conditions some text errors may occur or the teletext mode may be aborted Teletext function buttons are listed below Teletext On Off PAT Mode Activates teletext mode when pressed once Pressing this bu...

Страница 65: ...Sometimes you can improve the picture quality by changing the direction of the aerial Is the picture or teletext unrecognisable Check if you have entered the correct frequency Please retune the channe...

Страница 66: ...VESA 16 9 4 3 14 800 600 85 53 7 VESA 16 9 4 3 15 832 624 75 49 7 MAC 16 9 4 3 16 1024 768 43 35 5 VESA interlace 16 9 4 3 17 1024 768 60 48 4 VESA 16 9 4 3 18 1024 768 70 56 5 VESA 16 9 4 3 19 1024 7...

Страница 67: ...76I 50Hz O 576P 50Hz O 720P 50Hz O 720P 60Hz O 1080I 50Hz O 1080I 60Hz O 1080P 50Hz O 1080P 60Hz O 1080P 24 HZ O X Not Available O Available Note In some cases a signal on the LCD TV may not be displa...

Страница 68: ...B This indicates that selection is possible only if Scart 1 has a RGB signal Restrictions Scart 1 source must have RGB signal to perform PIP PAP with sources TV Scart 2 FAV If these sources are set to...

Страница 69: ...rnal Subtitles optional srt Only time based subtitle formats are supported Frame based subtitle formats e g MicroDVD are not supported sub except MicroDVD format Appendix E Supported DVI Resolutions W...

Страница 70: ...1014 x 657 Weight Kg 18 Digital Reception Transmission Standards DVB T MPEG2 DVB T MPEG4 HD i DEMODULATION Symbol rate COFDM with 2K 8K FFT mode Modulation 16 QAM 64 QAM FEC for all DVB modes automati...

Страница 71: ...50157840...

Отзывы: