background image

English   

- 17 -

All the recordings are kept in a list in the recordings 
library. 

Red bar

: Indicates the used space of the recordings 

on the hard disk.

Green

 bar: Shows the free space on the USB  disk.

RED 

button

 (Delete)

 :Erases the selected 

recording.

GREEN

 button (Edit): Makes changes on the selected 

recording.

BLUE

 button (Sort): Changes the order of the 

recordings. You can select from a wide range of 
sorting options.

OK

 button: Activates play options menu:

 • 

Play from start

: Plays the recording from the 

beginning.

 • 

Resume

: Recommences the recordings.

 • 

Play from offset

: Speci

fi

 es a playing point.

Note: Viewing main menu and menu items will not ve available 
during the playback.

INFO

 (Details): Displays the short extended 

programmes in detail.


 (Resume): Recommences the recordings.

 Conditional Access 

 • Press the  “ 

MENU 

”  button to display the main menu and 

use the “ ” or “ ” button to highlight the “Conditional 
Access” line and press the  “ 

OK

 ”  button: 


 Some Digital Terrestrial channels operate on a Pay 
Per View basis. These require a subscription and a 
hardware decoder.
Obtain the Conditional Access Module (CAM) and the 
viewing card by subscribing to a pay channel company, 
then insert those to the TV using the following procedure. 
 • Switch off the TV and unplug from the mains.
• The CAM should be correctly inserted, it is impossible 

to insert fully if reversed. The CAM or the TV terminal 
may be damaged if the CAM is forcefully inserted.

• Connect the TV to the mains supply, switch on and then 

wait for few moments until the card is activated.

• Some CAMs may require the following set up. Please 

set the CAM by entering the IDTV menu, Conditional 
Access then pressing the “

OK

” button. (CAM set up 

menu is not displayed when it is not required.)

• To see the viewing contract information: enter IDTV; 

press the “ 

MENU 

” button, then highlight Conditional 

Access and press the  “ 

OK

 ”


 button.

• When no module is inserted, “No Conditional Access 

module detected” message appears on the screen.

• Refer to the module instruction manual for details of 

the settings. 

Note

: Insert or remove the CI module only when the TV  is 

switched off or in standby mode.

 TV Setup 

 You can use this item to display the TV functions.
The digital TV Setup menu screen is accessed from 
the main menu. Press the  

“MENU”

  button to display 

the main menu and use “ ” or “ ” button to highlight 
“TV Setup”, press the  “ 

OK

 ”  button to display TV Setup 

menu screen. 


 You can 

fi

 nd detailed information for all menu items in 

“Analogue TV Menu System” section. 

 Setup 

 The adjustments in this menu are given as the following: 
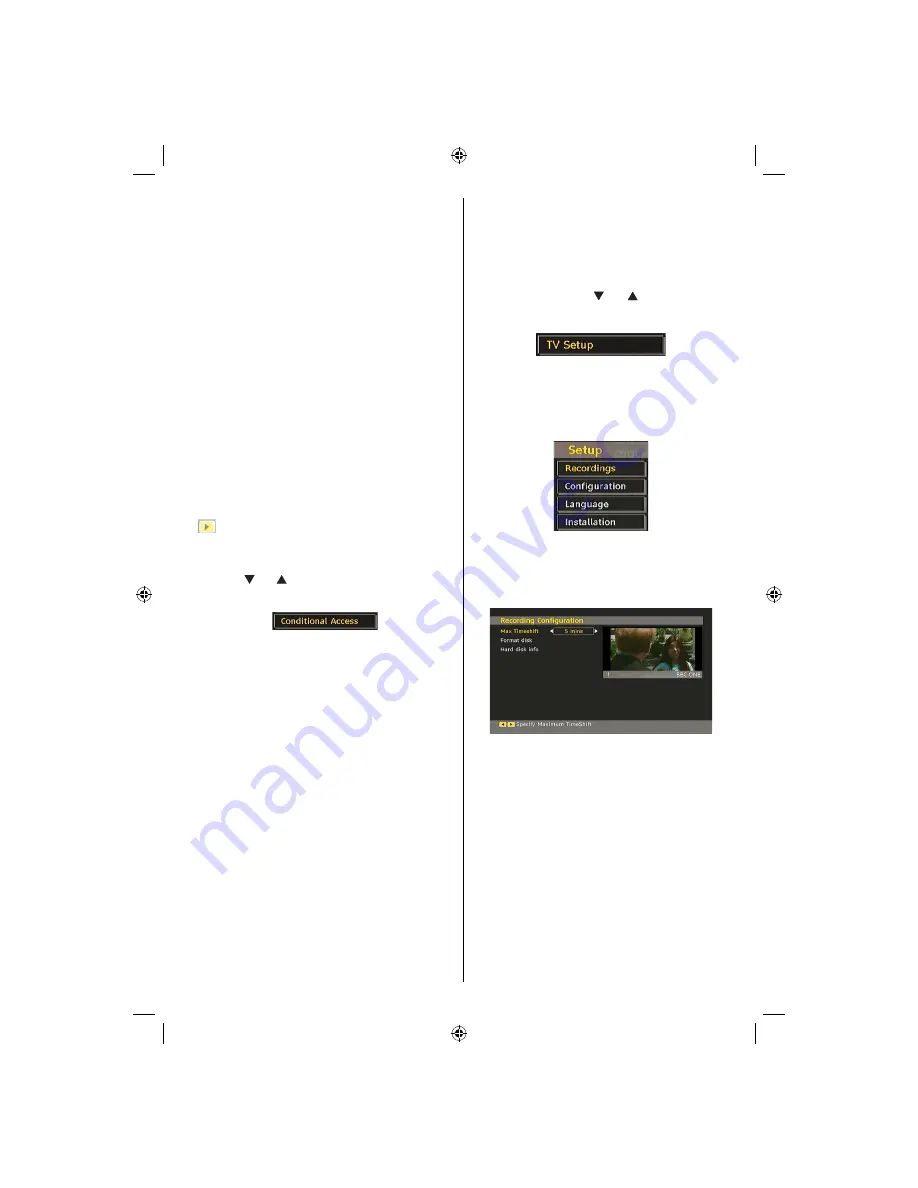


 Recordings

Select Recordings item in the Setup menu to con

fi

 gure 

recording settings. The following menu is displayed 
for recording con

fi

 guration.

The following options are available for adjustments:

Start Early (*)

You set recording timer’s starting time to start earlier 
by using this setting.

(*) Available only for EU country options.

End Late (*)

You set recording timer’s starting time to start later 
by using this setting.

(*) Available only for EU country options.

Max Timeshift

This setting allows you to set the maximum time 
allowed for timeshifting. Duration options are 
approximate and can change accordingly, depending 
on the broadcast received.

MB45_[GB]_(01-TV)_1900UK_PVR_IDTV_NICKEL9_22850W_10065795_50157824.indd   17

MB45_[GB]_(01-TV)_1900UK_PVR_IDTV_NICKEL9_22850W_10065795_50157824.indd   17

23.10.2009   10:20:31

23.10.2009   10:20:31

Содержание 22FLD850VRU

Страница 1: ...colour television owner s manual 22FLD850VRU...

Страница 2: ...me Guide EPG 12 Programme Options 13 Displaying Subtitles 13 Digital Teletext for UK only 13 Analogue Teletext 13 Widescreen 13 IDTV Menu System 14 Channel List 14 Recording Timers 15 Recordings Libra...

Страница 3: ...y fault and unsafe situations please do not place any objects on top of the set Use this device in moderate climates 10 cm 10 cm 10 cm Safety Precautions Pleasereadthefollowingrecommendedsafety precau...

Страница 4: ...are intended for ventilation and to ensure reliable operation To prevent overheating these openings must not be blocked or covered in anyway Heat and Flames The set should not be placed near to open f...

Страница 5: ...tion 22 Source selection 23 Red Sound 24 Green Picture 25 Yellow Feature Current language in DTV 26 mode Menu 27 Blue Install 28 OK Select Hold in TXT mode 29 Cursor right TXT Subpage 30 Cursor down T...

Страница 6: ...l sonnection with a device that has component output Connect the YPbPr to PC cable between the PC INPUT on the TV and the component video outputs of your device HDMI 3 HDMI input HDMI Input is for con...

Страница 7: ...uch a case use an appropriate audio cable between the connected device s audio outputs and the TV s audio inputs Note If you connect a device to the TV via the VIDEO or PC YPbPr cable you should also...

Страница 8: ...ugging USB devices is a very hazardous operation Especially do not repeatedly quickly plug and unplug the drive This may cause physical damage to the USB player and especially the USB device itself Do...

Страница 9: ...nformation Power off both the TV and the device before making any connections Note Cables shown in the illustration are not supplied If your DVD player has an HDMI socket you can connect via HDMI When...

Страница 10: ...de Place the batteries in the right directions and replace the battery cover Note Remove the battery from remote control handset when it is not to be used for a long period Otherwise it can be damaged...

Страница 11: ...to increase the volume Press V button to decrease the volume Avolume level scale slider will be displayed on the screen Programme Selection Previous or Next Programme Press P button to select the pre...

Страница 12: ...ilable Press PAUSE button while watching a broadcast for switching to timeshifting mode In timeshifting mode the programme is paused and simultaneously recorded to the connected USB disk Press PLAY bu...

Страница 13: ...ectronic Programme Guide EPG Some but not all channels send information about the current and next events Press EPG button to view the EPG menu EPG appears on the screen It is able to get Information...

Страница 14: ...desired language If Subtitle is on and a language option is set pressing the button causes the following warning message display on the screen for UK only Digital Teletext for UK only Press the butto...

Страница 15: ...number by using the numeric buttons on the remote control and press OK to confirm Note If you enter the same programme number of the channel that you want to move channel services will be replaced Do...

Страница 16: ...d to Favourite List Removing a Channel from Favourite List Highlight the channel that you want to remove from the favourite list and press OK button to remove You can press OK button again to re add a...

Страница 17: ...Press RED button on the remote control to delete Aconfirmation screen will be displayed Delete this timer Select YES to delete the timer or select NO to cancel Timers To display timers window activate...

Страница 18: ...by entering the IDTV menu Conditional Access then pressing the OK button CAM set up menu is not displayed when it is not required To see the viewing contract information enter IDTV press the MENU butt...

Страница 19: ...Only with the or buttons you navigate through only radio channels If you select Text Only with the or buttons you navigate through only text channels Scan Encrypted Scan Encrypted Channel feature wil...

Страница 20: ...2 Current Time on the top of the menu list will then change according to the selected Time Zone Audio Description Optional Audio description refers to an additional narration track for blind and visua...

Страница 21: ...ity when multiple choices are available on a broadcast Secondary settings are the alternatives when the first options are not available Installation IMPORTANT If you perform first time installation wh...

Страница 22: ...s and settings By selecting Yes and pressing the OK button the existing channel table will be deleted After factory settings are loaded First Time Installation menu will be displayed The menu which is...

Страница 23: ...Next buttons Jump to previous or n e x t f i l e o f slideshow Rotate buttons Rotate the picture using up down buttons Return Back Back to file list Loop Shuffle GREEN button Slideshow goes on continu...

Страница 24: ...Picture Menu Mode For your viewing requirements you can set the related mode option Press or button to select Mode Press or button to choose from one of these options Cinema Dynamic and Natural Bright...

Страница 25: ...izer menu the preset can be changed to Music Movie Speech Flat Classic and User Select the desired frequency by pressing or button and increase or decrease the frequency gain by pressing or button Pre...

Страница 26: ...ess or button to set Blue Background as On or Off Menu Background Press or button to select Menu Background You can set menu background level by pressing or button Menu Timeout To set a specific displ...

Страница 27: ...install menu when the TV is in AV modes Note that limited options will be available Switch to TV mode for viewing complete version of the Install menu Colour System Press or button to select Colour S...

Страница 28: ...annels During the search the following OSD will be displayed Whenever you press the BLUE button APS function stops and Program Table appears on the screen If you wait until the end of APS Program Tabl...

Страница 29: ...graphs or text in smaller fonts Select Dot Clock item by using or buttons Use or button to adjust the value PC Picture Menu For adjusting PC picture items do the following Press or button to select th...

Страница 30: ...s up the wide picture 14 9 aspect ratio to the upper and lower limits of the screen Cinema This zooms up the wide picture 16 9 aspect ratio to the full screen Subtitle This zooms up the wide picture 1...

Страница 31: ...at your USB disk does not meet the speed requirements Try connecting another USB disk Poor Picture Have you selected the correct TV system Is your TV set or house aerial located too close to a non ear...

Страница 32: ...4 3 5 800 600 60 37 9 VESA 16 9 4 3 6 800 600 70 43 8 16 9 4 3 7 800 600 72 48 1 VESA 16 9 4 3 8 800 600 75 46 9 VESA 16 9 4 3 9 832 624 75 49 7 MAC 16 9 4 3 10 1024 768 60 48 4 VESA 16 9 4 3 11 1024...

Страница 33: ...O 1080I 50Hz O 1080I 60Hz O 1080P 24Hz X 1080P 25Hz X 1080P 30HZ X 1080P 50HZ X 1080P 60HZ X X Not Available O Available Note In some cases a signal on the LCD TV may not be displayed properly The pro...

Страница 34: ...File Format but do not support Picture File Format smi sub Note Necessary bitrates for some video types are higher than USB limits For this reason some video types cannot be played Products Battery I...

Страница 35: ...Video MP ML PAL 4 3 16 9 Audio MPEG Layer I II 32 44 148kHz NUMBER OF PRESET CHANNELS 200 CHANNEL INDICATOR On Screen Display RF AERIAL INPUT 75 Ohm unbalanced OPERATING VOLTAGE 220 240V AC 50 Hz AUDI...

Страница 36: ...inal which is marked with the letter N or coloured Black The wire which is coloured brown or red must be connected to the terminal which is marked with the letter L or coloured Red For continued prote...

Страница 37: ...d optical digital audio outputs optional Multi Audio up to 8 support According to disc content Multi Subtitle up to 32 support According to disc content Multi Angle up to 9 support According to disc c...

Страница 38: ...ts or leave it in a car parked in direct sunlight as the temperature can rise quickly and damage the disc After playing store the disc in its case On cleaning Before playing clean the disc with a clea...

Страница 39: ...times to eject Overview of the Remote Control Standby 1 Numeric buttons 2 Return back 3 Language selection Set language 4 Display time DVD menu 5 Clear 6 Stop 7 No function 8 Rapid Reverse 9 Rapid ad...

Страница 40: ...G Audio language X X MENU Displays TV menu OK SELECT Enter View Play REPEAT Displays repeat options RETURN Returns back to the previous menu if available ROOT Goes back to the root folder if available...

Страница 41: ...disc the subtitle language will automatically be set to the disc s priority language Usually a circulation will happen while switching 8 to another language that is you can cancel the subtitle by pre...

Страница 42: ...aged Scratch fingerprint etc Clean the DVD disc and try again See instructions described in Notes on Discs to clean your disc properly Ensure that the DVD disc is in the drawer with the label uppermos...

Страница 43: ...each other there is the potential to achieve double sided play sometime in the future for even longer duration play Subtitles These are printed lines appearing at the bottom of the screen which transl...

Страница 44: ...74 m in 20 m in S i n g le s id ed 240 m in D o u b le s id ed 480 m in S i n g le s id e d 80 m in D o u b le s id ed 160 m in C h ar ac t er is tic s D V D c o n ta in s ex c ellen t s o u n d a n...

Страница 45: ...SC pixels 50 and 60 Hz frame refresh rates PAL NTSC Digital bit stream processing rate up to 108Mbits sec Line resolution more than 500 lines Audio Type Dolby Digital Decoding MPEG Multichannel Decodi...

Страница 46: ...50157824...

Отзывы: